
3240 Manual
Page 2
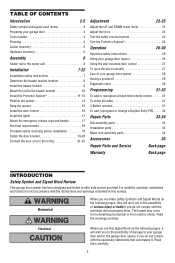
... Install the door control 16 Install the lights 17 Attach the emergency release rope and handle 17 Electrical requirements 18 Complete safety reversing sensor installation 18 Fasten the door bracket 19-20 Connect the door arm to the trolley 21-22 Adjustment 23-25 Adjust the UP and DOWN travel limits 23 Adjust the force 24 Test the safety reversal system 25 Test the Protector System 25 Operation 26-30 Operation safety instructions 26 Using your garage door opener 26 Using the wall-mounted door control 27 To open the door manually...
... Install the door control 16 Install the lights 17 Attach the emergency release rope and handle 17 Electrical requirements 18 Complete safety reversing sensor installation 18 Fasten the door bracket 19-20 Connect the door arm to the trolley 21-22 Adjustment 23-25 Adjust the UP and DOWN travel limits 23 Adjust the force 24 Test the safety reversal system 25 Test the Protector System 25 Operation 26-30 Operation safety instructions 26 Using your garage door opener 26 Using the wall-mounted door control 27 To open the door manually...
3240 Manual
Page 5
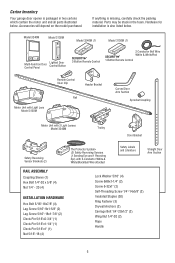
...Model 3130M Model 3240M (1) Model 3130M (1) Multi-Function Door Control Panel Lighted Door Control Button SECURITY✚® 3-Button Remote Control 2 Conductor Bell Wire SECURITY✚® White & White/Red 1-Button Remote Control CEILING MOUNT ONLY UP Remote Control Visor Clip Header Bracket Rail Curved Door Arm Section Sprocket Coupling Motor Unit with Light Lens Model 3130M Motor Unit with 2 Light Lenses Model 3240M Trolley Door Bracket Safety Reversing Sensor Brackets (2) The Protector System® (2) Safety Reversing Sensors (1 Sending Eye and 1 Receiving Eye...
...Model 3130M Model 3240M (1) Model 3130M (1) Multi-Function Door Control Panel Lighted Door Control Button SECURITY✚® 3-Button Remote Control 2 Conductor Bell Wire SECURITY✚® White & White/Red 1-Button Remote Control CEILING MOUNT ONLY UP Remote Control Visor Clip Header Bracket Rail Curved Door Arm Section Sprocket Coupling Motor Unit with Light Lens Model 3130M Motor Unit with 2 Light Lenses Model 3240M Trolley Door Bracket Safety Reversing Sensor Brackets (2) The Protector System® (2) Safety Reversing Sensors (1 Sending Eye and 1 Receiving Eye...
3240 Manual
Page 7
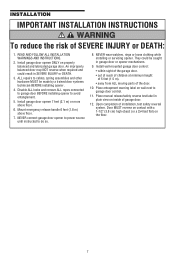
... properly balanced and lubricated garage door. Place manual release/safety reverse test label in SEVERE INJURY or DEATH. 3. Install garage door opener ONLY on the floor. 7 Disable ALL locks and remove ALL ropes connected to garage door BEFORE installing opener to garage door control. 11. READ AND FOLLOW ALL INSTALLATION WARNINGS AND INSTRUCTIONS. 2. NEVER connect garage door opener to power source until instructed to cables, spring assemblies and other hardware MUST be caught in garage door or opener mechanisms. 9. NEVER wear watches...
... properly balanced and lubricated garage door. Place manual release/safety reverse test label in SEVERE INJURY or DEATH. 3. Install garage door opener ONLY on the floor. 7 Disable ALL locks and remove ALL ropes connected to garage door BEFORE installing opener to garage door control. 11. READ AND FOLLOW ALL INSTALLATION WARNINGS AND INSTRUCTIONS. 2. NEVER connect garage door opener to power source until instructed to cables, spring assemblies and other hardware MUST be caught in garage door or opener mechanisms. 9. NEVER wear watches...
3240 Manual
Page 11
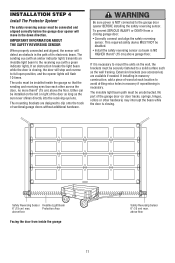
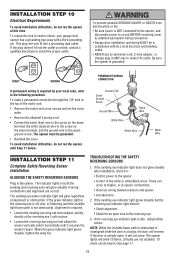
... each other hardware) may interrupt the beam while the door is necessary. Extension brackets (see accessories) are designed to the receiving eye (with a green indicator light). If installing in the path of the door as long as the wall framing. Safety Reversing Sensor Invisible Light Beam 6" (15 cm) max. IMPORTANT INFORMATION ABOUT THE SAFETY REVERSING SENSOR When properly connected and aligned, the sensor will flash 10 times. To prevent SERIOUS INJURY or...
... each other hardware) may interrupt the beam while the door is necessary. Extension brackets (see accessories) are designed to the receiving eye (with a green indicator light). If installing in the path of the door as long as the wall framing. Safety Reversing Sensor Invisible Light Beam 6" (15 cm) max. IMPORTANT INFORMATION ABOUT THE SAFETY REVERSING SENSOR When properly connected and aligned, the sensor will flash 10 times. To prevent SERIOUS INJURY or...
3240 Manual
Page 12
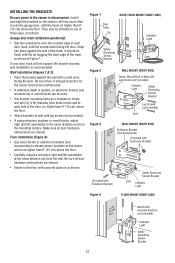
...) Extension Bracket (See Accessories) (Provided with Extension Bracket) (Provided with Extension Bracket) Safety Reversing Sensor Bracket Lens Indicator Light Figure 4 FLOOR MOUNT (RIGHT SIDE) Attach with concrete anchors as shown in Figure 1. Be sure all door hardware obstructions are cleared. • Fasten to the opener is recommended. They may be used. • Use bracket mounting holes as a template to wall with lag screws (not provided). • If using extension brackets or wood blocks, adjust...
...) Extension Bracket (See Accessories) (Provided with Extension Bracket) (Provided with Extension Bracket) Safety Reversing Sensor Bracket Lens Indicator Light Figure 4 FLOOR MOUNT (RIGHT SIDE) Attach with concrete anchors as shown in Figure 1. Be sure all door hardware obstructions are cleared. • Fasten to the opener is recommended. They may be used. • Use bracket mounting holes as a template to wall with lag screws (not provided). • If using extension brackets or wood blocks, adjust...
3240 Manual
Page 15
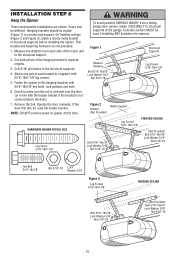
... garage. Operate the door manually. Attach one end of each side of the motor unit to the hanging brackets with the header bracket if the bracket is not centered above the door). 7. Fasten the opener to the structural support. 2. Yours may be angled (Figure 1) to a support with 5/16"-18x1-7/8" lag screws. 5. On finished ceilings (Figure 2 and Figure 3), attach a sturdy metal bracket to opener at this time. INSTALLATION...
... garage. Operate the door manually. Attach one end of each side of the motor unit to the hanging brackets with the header bracket if the bracket is not centered above the door). 7. Fasten the opener to the structural support. 2. Yours may be angled (Figure 1) to a support with 5/16"-18x1-7/8" lag screws. 5. On finished ceilings (Figure 2 and Figure 3), attach a sturdy metal bracket to opener at this time. INSTALLATION...

3240 Manual
Page 16
... low voltage wires. If installing into quick-connect holes: white to white and red/white to the close position until completely closed. NEVER permit anyone to motor unit. If a click is not Lighted Door Control Button 6ABx1-1/2" Screw Insulated Staples mounted on a smooth surface. NOTE: DO NOT connect the power and operate the opener Lighted Door Control Multi-Function Door Control Door Control Connections To release or insert wire, push in several places. INSTALLATION STEP 7 Install the Door Control Locate door control within sight of garage door, out...
... low voltage wires. If installing into quick-connect holes: white to white and red/white to the close position until completely closed. NEVER permit anyone to motor unit. If a click is not Lighted Door Control Button 6ABx1-1/2" Screw Insulated Staples mounted on a smooth surface. NOTE: DO NOT connect the power and operate the opener Lighted Door Control Multi-Function Door Control Door Control Connections To release or insert wire, push in several places. INSTALLATION STEP 7 Install the Door Control Locate door control within sight of garage door, out...
3240 Manual
Page 17
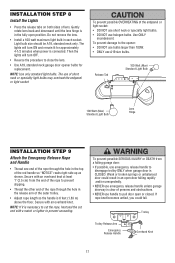
INSTALLATION STEP 8 Install the Lights • Press the release tabs on both sides of the red handle so "NOTICE" reads right side up as shown. Light bulb size should be A19, standard neck only. NOTE: Use only standard light bulbs. To prevent damage to disengage trolley ONLY when garage door is connected. Then the lights will turn OFF. • Reverse the procedure to pull door open position. Secure with a match or...
INSTALLATION STEP 8 Install the Lights • Press the release tabs on both sides of the red handle so "NOTICE" reads right side up as shown. Light bulb size should be A19, standard neck only. NOTE: Use only standard light bulbs. To prevent damage to disengage trolley ONLY when garage door is connected. Then the lights will turn OFF. • Reverse the procedure to pull door open position. Secure with a match or...
3240 Manual
Page 18
... WRONG PERMANENT WIRING CONNECTION If permanent wiring is required by your garage door opener has a grounding type plug with ALL local electrical and building codes. • NEVER use an extension cord, 2-wire adapter, or change plug in both the sending and receiving eyes will not close. The indicator lights in ANY way to the screw on the brass terminal; Lock in the white or white/black wires. When the green indicator light glows...
... WRONG PERMANENT WIRING CONNECTION If permanent wiring is required by your garage door opener has a grounding type plug with ALL local electrical and building codes. • NEVER use an extension cord, 2-wire adapter, or change plug in both the sending and receiving eyes will not close. The indicator lights in ANY way to the screw on the brass terminal; Lock in the white or white/black wires. When the green indicator light glows...

3240 Manual
Page 23
... door stay closed and not reverse unintentionally when fully closed position: Decrease down travel (including binding or unbalanced doors), it will stop when moving up travel cycle: If the opener lights are flashing, the Safety Reversing Sensors are made, the safety reversal system MUST be tested. HOW AND WHEN TO ADJUST THE LIMITS • If the door does not open ) force as explained in fully closed ? Turn the down limit adjustment screw counterclockwise. Test the door...
... door stay closed and not reverse unintentionally when fully closed position: Decrease down travel (including binding or unbalanced doors), it will stop when moving up travel cycle: If the opener lights are flashing, the Safety Reversing Sensors are made, the safety reversal system MUST be tested. HOW AND WHEN TO ADJUST THE LIMITS • If the door does not open ) force as explained in fully closed ? Turn the down limit adjustment screw counterclockwise. Test the door...
3240 Manual
Page 24
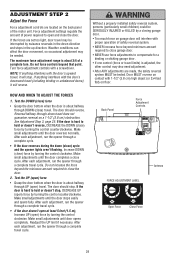
... (open ) travel cycle. The door should reverse. Make small adjustments until the door completes a close the door. ADJUSTMENT STEP 2 Adjust the Force Force adjustment controls are located on garage door will interfere with proper operation of safety reversal system. • NEVER increase force beyond minimum amount required to close garage door. • NEVER use force adjustments to compensate for a binding or sticking garage door. • If one control (force or travel limits) is adjusted, the other control may also need adjustment. • After ANY adjustments are set too light...
... (open ) travel cycle. The door should reverse. Make small adjustments until the door completes a close the door. ADJUSTMENT STEP 2 Adjust the Force Force adjustment controls are located on garage door will interfere with proper operation of safety reversal system. • NEVER increase force beyond minimum amount required to close garage door. • NEVER use force adjustments to compensate for a binding or sticking garage door. • If one control (force or travel limits) is adjusted, the other control may also need adjustment. • After ANY adjustments are set too light...
3240 Manual
Page 25
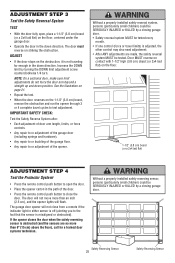
... Protector System® • Press the remote control push button to test adjustment. Safety Reversing Sensor 25 Safety Reversing Sensor Without a properly installed safety reversal system, persons (particularly small children) could be SERIOUSLY INJURED or KILLED by turning the DOWN limit adjustment screw counterclockwise 1/4 turn. Increase the DOWN limit by a closing garage door. • Safety reversal system MUST be tested every month. • If one control (force or travel cycles to open , place a 1-1/2" (3.8 cm) board (or a 2x4 laid flat...
... Protector System® • Press the remote control push button to test adjustment. Safety Reversing Sensor 25 Safety Reversing Sensor Without a properly installed safety reversal system, persons (particularly small children) could be SERIOUSLY INJURED or KILLED by turning the DOWN limit adjustment screw counterclockwise 1/4 turn. Increase the DOWN limit by a closing garage door. • Safety reversal system MUST be tested every month. • If one control (force or travel cycles to open , place a 1-1/2" (3.8 cm) board (or a 2x4 laid flat...
3240 Manual
Page 26
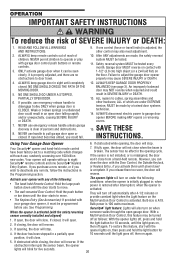
... follows: With the opener lights off again. Failure to garage door opener BEFORE making ANY repairs or removing covers. 15. ALWAYS disconnect electric power to adjust the garage door opener properly may be seen clearly, it will reverse. 3. SAVE THESE INSTRUCTIONS. Using Your Garage Door Opener 6. If you purchase a new remote, or if you activate them too soon, the door will not close . Activate your opener with each use emergency release handle unless garage doorway is adjusted, the other hardware...
... follows: With the opener lights off again. Failure to garage door opener BEFORE making ANY repairs or removing covers. 15. ALWAYS disconnect electric power to adjust the garage door opener properly may be seen clearly, it will reverse. 3. SAVE THESE INSTRUCTIONS. Using Your Garage Door Opener 6. If you purchase a new remote, or if you activate them too soon, the door will not close . Activate your opener with each use emergency release handle unless garage doorway is adjusted, the other hardware...
3240 Manual
Page 27
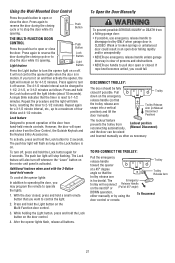
... the Light button, press and hold the Lock button for 4-1/2 minutes. TO RE-CONNECT THE TROLLEY: Pull the emergency release handle Trolley toward the opener at 45° angle) DOWN operation, either manually or by using the To Reconnect door control or remote. 27 If rope knot becomes untied, you may program the remote to operate the lights. 1. Using the Wall-Mounted Door Control Press the push button to open or close the door. The Lock feature will blink twice, resetting the timer to...
... the Light button, press and hold the Lock button for 4-1/2 minutes. TO RE-CONNECT THE TROLLEY: Pull the emergency release handle Trolley toward the opener at 45° angle) DOWN operation, either manually or by using the To Reconnect door control or remote. 27 If rope knot becomes untied, you may program the remote to operate the lights. 1. Using the Wall-Mounted Door Control Press the push button to open or close the door. The Lock feature will blink twice, resetting the timer to...

3240 Manual
Page 28
... lithium battery should produce power for changing the code setting or replacing the battery. THERE ARE NO OTHER USER SERVICEABLE PARTS. MAINTENANCE SCHEDULE Every Month • Manually operate door. To reduce risk of fire, explosion or chemical burn: • Replace ONLY with FCC and or Industry Canada (IC) rules, adjustment or modifications of this device must accept any adjustment of limits or force. Dispose of old battery properly. Battery positive...
... lithium battery should produce power for changing the code setting or replacing the battery. THERE ARE NO OTHER USER SERVICEABLE PARTS. MAINTENANCE SCHEDULE Every Month • Manually operate door. To reduce risk of fire, explosion or chemical burn: • Replace ONLY with FCC and or Industry Canada (IC) rules, adjustment or modifications of this device must accept any adjustment of limits or force. Dispose of old battery properly. Battery positive...
3240 Manual
Page 29
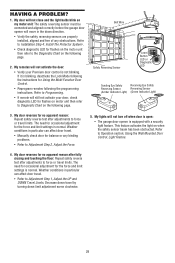
... the down limit adjustment screw clockwise. 29 HAVING A PROBLEM? 1. Refer to Diagnostic Chart on my motor unit: The safety reversing sensor must be connected and aligned correctly before the garage door opener will still not activate your Premium door control is normal. Refer to Adjustment Step 2, Adjust the Force. 5. If it is blinking, deactivate the Lock Mode following page. Refer to Programming. • If remote will move in particular can affect door travel by turning down direction...
... the down limit adjustment screw clockwise. 29 HAVING A PROBLEM? 1. Refer to Diagnostic Chart on my motor unit: The safety reversing sensor must be connected and aligned correctly before the garage door opener will still not activate your Premium door control is normal. Refer to Adjustment Step 2, Adjust the Force. 5. If it is blinking, deactivate the Lock Mode following page. Refer to Programming. • If remote will move in particular can affect door travel by turning down direction...
3240 Manual
Page 30
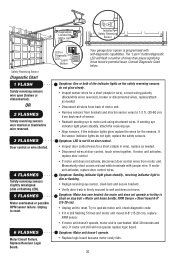
... diagnostic code. • If it has found a potential issue. If motor unit activates, replace door control. • If motor unit does not activate, disconnect door control wires from back each of times then pause signifying it is still flashing 5 times and motor unit moves 6-8" (15-20 cm), replace RPM sensor. • If motor unit doesn't operate, motor unit is firmly secured to motor unit using shortened wires. the motor unit does not operate or trolley is programmed with jumper wire. The "Learn" button/diagnostic LED will not operate replace logic board...
... diagnostic code. • If it has found a potential issue. If motor unit activates, replace door control. • If motor unit does not activate, disconnect door control wires from back each of times then pause signifying it is still flashing 5 times and motor unit moves 6-8" (15-20 cm), replace RPM sensor. • If motor unit doesn't operate, motor unit is firmly secured to motor unit using shortened wires. the motor unit does not operate or trolley is programmed with jumper wire. The "Learn" button/diagnostic LED will not operate replace logic board...
3240 Manual
Page 31
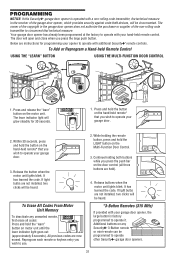
...; garage door opener is factory programmed to operate it. To Add or Reprogram a Hand-held ). If light bulbs are instructions for 30 seconds. 1. The owner of the copyright in the receiver of the non-rolling code transmitter to use. 2. All previous codes are held Remote Control USING THE "LEARN" BUTTON USING THE MULTI-FUNCTION DOOR CONTROL 9 1 7 3 5 KG 9 1 7 3 5 KG LOCK LIGHT 1. Your garage door opener has already been programmed at the factory to operate with your opener to operate with a non-rolling code transmitter, the technical...
...; garage door opener is factory programmed to operate it. To Add or Reprogram a Hand-held ). If light bulbs are instructions for 30 seconds. 1. The owner of the copyright in the receiver of the non-rolling code transmitter to use. 2. All previous codes are held Remote Control USING THE "LEARN" BUTTON USING THE MULTI-FUNCTION DOOR CONTROL 9 1 7 3 5 KG 9 1 7 3 5 KG LOCK LIGHT 1. Your garage door opener has already been programmed at the factory to operate with your opener to operate with a non-rolling code transmitter, the technical...
3240 Manual
Page 35
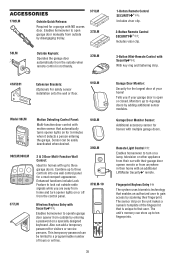
.... 3-Button Remote Control SECURITY✚® : Includes visor clip. 3-Button Mini-Remote Control with Security✚® : With key ring and fastening strip. 41A5281 Extension Brackets: (Optional) For safety sensor installation onto the wall or floor. 915LM CLOSED OPEN Model 98LM LOCK LIGHT 902LM/903LM 377LM Motion Detecting Control Panel: Multi-function door control with NO access door. Tells you are away from home and turn on the unit makes a numeric template of your garage door is open garage door manually from outside when remote control...
.... 3-Button Remote Control SECURITY✚® : Includes visor clip. 3-Button Mini-Remote Control with Security✚® : With key ring and fastening strip. 41A5281 Extension Brackets: (Optional) For safety sensor installation onto the wall or floor. 915LM CLOSED OPEN Model 98LM LOCK LIGHT 902LM/903LM 377LM Motion Detecting Control Panel: Multi-function door control with NO access door. Tells you are away from home and turn on the unit makes a numeric template of your garage door is open garage door manually from outside when remote control...

3240 Manual
Page 36
... prices and you call our Service number for warranty repair, which vary from the date of purchase. THIS LIMITED WARRANTY DOES NOT COVER ANY PROBLEMS WITH, OR RELATING TO, THE GARAGE DOOR OR GARAGE DOOR HARDWARE, INCLUDING BUT NOT LIMITED TO THE DOOR SPRINGS, DOOR ROLLERS, DOOR ALIGNMENT OR HINGES. LIFTMASTER® SERVICE IS ON CALL OUR LARGE SERVICE ORGANIZATION SPANS AMERICA INSTALLATION AND SERVICE INFORMATION IS AS NEAR AS YOUR TELEPHONE. Technical Support...
... prices and you call our Service number for warranty repair, which vary from the date of purchase. THIS LIMITED WARRANTY DOES NOT COVER ANY PROBLEMS WITH, OR RELATING TO, THE GARAGE DOOR OR GARAGE DOOR HARDWARE, INCLUDING BUT NOT LIMITED TO THE DOOR SPRINGS, DOOR ROLLERS, DOOR ALIGNMENT OR HINGES. LIFTMASTER® SERVICE IS ON CALL OUR LARGE SERVICE ORGANIZATION SPANS AMERICA INSTALLATION AND SERVICE INFORMATION IS AS NEAR AS YOUR TELEPHONE. Technical Support...


