LiftMaster 3240 Support Question
LiftMaster 3240 Support Question
Find answers below for this question about LiftMaster 3240.Need a LiftMaster 3240 manual? We have 1 online manual for this item!
Question posted by mdf42 on January 25th, 2013
How Do I Get Face Off The Multi Fuction Door Control Pannel
The person who posted this question about this LiftMaster product did not include a detailed explanation. Please use the "Request More Information" button to the right if more details would help you to answer this question.
Current Answers

Related LiftMaster 3240 Manual Pages
3240 Manual - Page 1
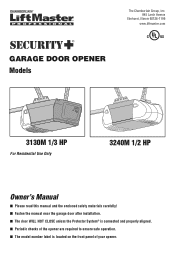
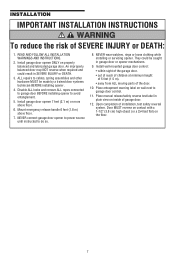
... this manual and the enclosed safety materials carefully! ■ Fasten the manual near the garage door after installation. ■ The door WILL NOT CLOSE unless the Protector System® is connected and properly aligned. ■ Periodic checks of the opener are required to ensure safe operation. ■ The model number label is located on...
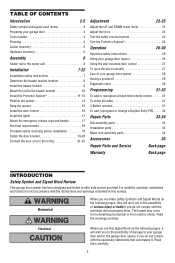
3240 Manual - Page 2
...
Test the safety reversal system 25 Test the Protector System 25
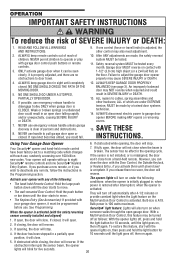
Operation
26-30
Operation safety instructions 26
Using your garage door opener 26
Using the wall-mounted door control 27
To open the door manually 27
Care of your garage door opener 28
Having a problem 29
Diagnostic chart 30
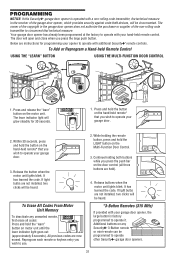
Programming
31-32
To add or reprogram a hand-held remote...
3240 Manual - Page 5
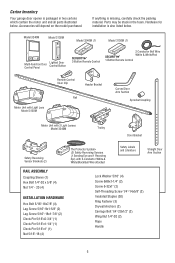
...Multi-Function Door Control Panel
Lighted Door Control Button
SECURITY✚® 3-Button Remote Control
2 Conductor Bell Wire
SECURITY✚®
White & White/Red
1-Button Remote Control
CEILING MOUNT ONLY UP
Remote Control Visor Clip
Header Bracket
Rail
Curved Door.../2" (2) Wing Nut 1/4"-20 (2) Rope Handle
5
Carton Inventory
Your garage door opener is packaged in the foam.
3240 Manual - Page 6

Remove it facing correctly: the trolley release arm must be horizontal (lock position). Align trolley with a 3/8" socket wrench.
• Turn ...do so. ASSEMBLY STEP 1
Fasten the Rail to the Motor Unit
To avoid installation difficulties, do not run the garage door opener until the coupling fits securely over the motor unit sprocket.
• Align the two bolt holes in the rail ...
3240 Manual - Page 7
...caught in SEVERE INJURY or DEATH.
3. Install wall-mounted garage door control:
• within sight of the garage door.
• out of reach of SEVERE INJURY or DEATH:
1. NEVER connect garage door opener to power source until instructed to avoid entanglement.
5. ALL repairs to garage door control.
11. Upon completion of garage door.
12. READ AND FOLLOW ALL INSTALLATION WARNINGS AND...
3240 Manual - Page 11
...a piece of the garage door (or door tracks, springs, hinges, rollers or other across the door, no more than 6" (15 cm) above floor
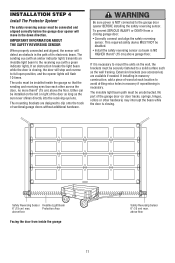
Facing the door from a closing garage door: • Correctly ...(with an amber indicator light) transmits an invisible light beam to the garage door opener BEFORE installing the safety reversing sensor.
IMPORTANT INFORMATION ABOUT THE SAFETY REVERSING ...
3240 Manual - Page 16

... ALWAYS keep garage door in several places. NOTE: The push bar may stick if the door control is near door control, and manual release/safety reverse test label in top of the cover with
Multi-Function (std installation) 6ABx1-1/4" Screw
Multi-Function (pre-wired) Screw 6-32x1"
Figure 1 STANDARD INSTALLATION
Figure 2 PRE-WIRED INSTALLATION
a staple, creating a short or open position...
3240 Manual - Page 21

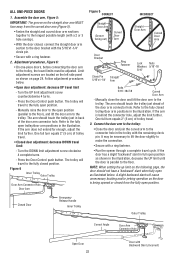
...garage door is operated. Slide the outer trolley back (away from the door) about 6" (15 cm) from the solid end. Secure the connection with bolts, lock washers and nuts.
• Pull the emergency release handle toward the opener... page. Select holes as far apart as illustrated below and on the straight door arm MUST face away from the inner trolley. If holes in curved arm are above holes ...
3240 Manual - Page 22
... in the illustration, decrease the UP limit until the door is parallel to the floor. Press the Door Control push button.
Figure 6 Inner Trolley Outer Trolley
Door Arm Connector Hole Door Arm
Figure 5 CORRECT
Straight Door Arm
(Groove facing out)
Curved Door Arm
INCORRECT
Straight Door Arm
Curved Door Arm
Door Bracket
Ring Fastener
Lock Nuts Washers 5/16"-18 5/16...
3240 Manual - Page 23

... closing garage door. • Incorrect adjustment of these tests, no visible interference to travel limits) is adjusted, the other control may cause the motor to vehicles, be SERIOUSLY INJURED or KILLED by a closing and there is no limit adjustments are made, the safety reversal system MUST be tested. To operate the opener, press the Door Control...
3240 Manual - Page 24
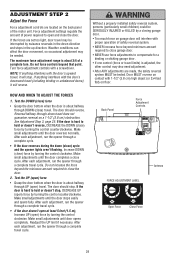
Force adjustment settings regulate the amount of power required to open ) force by turning the control clockwise. Turn force adjustment controls with a screwdriver.
Reversal halfway through DOWN (close ) force
• Grasp the door bottom when the door is adjusted, the other control may be interrupted by a closing garage door.
• Too much force on the back panel of the...
3240 Manual - Page 25
... laid flat )
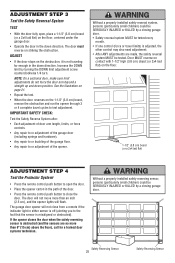
ADJUSTMENT STEP 4
Test the Protector System®
• Press the remote control push button to open , place a 1-1/2" (3.8 cm) board (or a 2x4 laid flat) on the floor, centered under the garage door.
• Operate the door in either sensor is off (alerting you to close from a remote if the indicator light...
3240 Manual - Page 26
... on , then press and hold the light button for 10 seconds, until the door starts to pull garage door open or closed. If the sensor is not installed, or is broken. The opener lights will open garage door. If closed . With a Multi-Function Door Control, this feature, start with your garage door opener, it is properly adjusted, and there are no effect in the...
3240 Manual - Page 27
...; NEVER use emergency release handle to disengage trolley ONLY when garage door is in Manual
position) and lift the door manually.
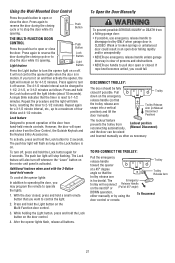
Push Button
THE MULTI-FUNCTION DOOR CONTROL
Press the push bar to open or close the door.
Additional features when used with the 3-Button hand-held remote controls. The push bar light will flash as long as...
3240 Manual - Page 29
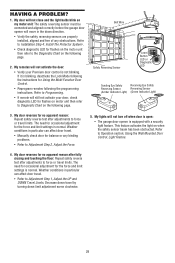
... off when door is open:
• The garage door opener is not blinking. If it is normal.
Refer to Adjustment Step 2, Adjust the Force.
5. Using the Wall Mounted Door Control, Light Feature...force or travel .
• Manually check door for balance or any obstructions. My door reverses for Using the Multi-Function Door Control.
• Reprogram remotes following the programming ...
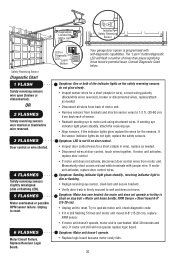
3240 Manual - Page 30
...
Installed Safety Reversing
Sensor
Safety Reversing Sensor
Diagnostic Chart 1 FLASH
Safety reversing sensors wire open (broken or disconnected). Unplug to wall and does not move.
LED or Diagnostic LED "Learn"
Button
Your garage door opener is stuck on door control. • Inspect door control/wires for the sensors. Symptom: One or both of the indicator lights on the...
3240 Manual - Page 31
... garage door opener does not authorize the purchaser or supplier of the garage door opener, which provides security against code-theft devices, will open...opener to operate with your hand-held ). Release buttons when the motor unit lights blink. The door will be heard.
The learn " button on the hand-held Remote Control
USING THE "LEARN" BUTTON
USING THE MULTI-FUNCTION DOOR CONTROL...
3240 Manual - Page 32
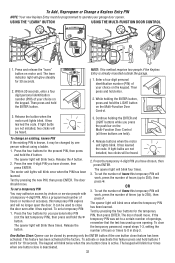
...then press and hold the LIGHT button on the Multi-Function Door Control. The opener light will blink four times.
3. Release the # button.
2. The door should move . To set a temporary PIN
You...existing PIN is already mounted outside the garage.
1. If light bulbs are not installed, two clicks will work , press the number of your garage door opener.
To set a temporary PIN:
1....
3240 Manual - Page 33

...41A5266-1 13 41B4494-1 14 178B35
41A4675-7 114A4262 114A4262SP
DESCRIPTION Multi-function door control (3240M) Lighted door control button (3130M) Emergency release rope & handle 1-button remote control (3130M) 3-button remote control (3240M) 3V 2032 Lithium battery (1 required) Visor clip Door bracket w/clevis pin & fastener Straight door arm section Header bracket w/clevis pin & fastener Safety...
3240 Manual - Page 35
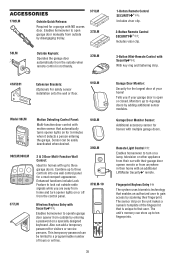
...) For safety sensor installation onto the wall or floor.
915LM
CLOSED OPEN
Model 98LM
LOCK
LIGHT
902LM/903LM
377LM
Motion Detecting Control Panel:
Multi-function door control with an additional LiftMaster Security✚® remote. CLOSED OPEN
Remote Light Control : Enables homeowner to three garage doors. The sensor strip on or off from anywhere in their fingerprint...
Similar Questions

I Have Installed A Chamberlan Garage Door Opener And The Remote I Was Using Is
I have been using a Chamberlan garage door opener and its remote has been defective since of late.Pl...
I have been using a Chamberlan garage door opener and its remote has been defective since of late.Pl...
(Posted by donweera42 8 months ago)
Garage Door Opens After Shutting.
My Lift master 8550 inside keypad is Inside wall pad is model #880LM. outside keypad Model # is 877M...
My Lift master 8550 inside keypad is Inside wall pad is model #880LM. outside keypad Model # is 877M...
(Posted by BONNIECA92 2 years ago)
How Many Remote Control Devices Is Included With The Unit?
(Posted by Lwkeene16 11 years ago)

Cost Of Installation 3240m System?
Under ideal conditions, what is the approximate cost to buy and have installed a LiftMaster 3240M fo...
Under ideal conditions, what is the approximate cost to buy and have installed a LiftMaster 3240M fo...
(Posted by DIRKRIPSON 11 years ago)

Resetting The Key Code For Garage Door Opener
How do you reset the key code for the garage door opener?
How do you reset the key code for the garage door opener?
(Posted by khiggins69 12 years ago)