Lexmark T650 Support Question
Lexmark T650 Support Question
Find answers below for this question about Lexmark T650.Need a Lexmark T650 manual? We have 9 online manuals for this item!
Question posted by sandbeangi on February 19th, 2014
How To Remove The Duplex Cover On Lexmark T650
The person who posted this question about this Lexmark product did not include a detailed explanation. Please use the "Request More Information" button to the right if more details would help you to answer this question.
Current Answers
Related Lexmark T650 Manual Pages
Clearing Jams Guide - Page 2
... the print cartridge. 7 Close the front cover. 8 Close the multipurpose feeder door. 9 Press .
202 and 203 paper jams
If the paper is exiting the printer, then pull the paper out, and then... exiting the printer: 1 Pull down the top rear door.
230 paper jam
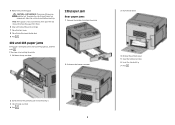
Rear paper jams
1 Remove the standard tray from the printer.
2 Pull down the bottom rear door.
3 Push the tab down.
4 Remove the jammed...
User's Guide - Page 35
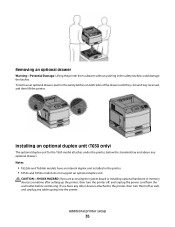
...; T652dn and T654dn models have any other devices attached to the printer, then turn the printer off as well, and unplug any optional drawers. To remove an optional drawer, push in the printer. • T652n and T654n models do not support an optional duplex unit. If you are accessing the system board or installing optional...
User's Guide - Page 74
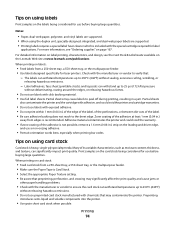
...samples on the leading and driver edge,
and use before buying large quantities. When printing on the Lexmark Web site at least 1 mm (0.04 in .) strip on the card stock being considered for... is not possible, remove a 1.6-mm (0.06-in .)
away from a 250-sheet tray, a 550-sheet tray, or the multipurpose feeder. • Use labels designed specifically for laser printers. The labels can ...
Service Manual - Page 1
Edition: September 17, 2009
Lexmark™ T650, T650n, T652dn, T654dn & T656dne Printer 4062-XXX
• Table of contents • Start diagnostics • Safety and notices • Trademarks • Index
Lexmark and Lexmark with diamond design are trademarks of Lexmark International, Inc., registered in the United States and/or other countries.
Service Manual - Page 29

...).
4 Optional external duplex unit for the T650 model.
CAUTION: Floor-mounted configurations require furniture for use either a printer stand or printer base if you are available with or without internal duplex unit. More information is available at our Lexmark Web site at www.lexmark.com/ multifunction printers. You must have a printer stand or printer base. General information...
Service Manual - Page 333

... cam gear removal (T650, T652, T654)" on
page 4-13. 3. Remove the connection bezel assembly, rear. Connection bezel assembly, rear removal (T650)
1. Remove the side cover, left.
Gently detach the two hinges (A) of the connection access cover, rear from the machine.
4062-XXX
A
2.
Go to "Cover assembly, rear lower removal (T650)" on page 4-37. 2. Remove the connection access cover, rear...
Service Manual - Page 335

...the machine. Repair Information 4-13
4062-XXX
Cover assembly, rear lower removal (T650)
1. A
4. Open the rear lower door. 2. Open the rear lower door. 3. Cover assembly, rear lower (T652, T654)
1. Remove the three screws (A) securing the cover assembly, rear lower to the machine. Go to "HVPS card assembly removal (T650, T652, T654)" on page 4-24.
2. Remove the cover assembly, rear lower.
Service Manual - Page 337

... shown in the picture. 4. Remove the two screws (A) securing the two retainers (B) to "Cover assembly, rear lower (T652, T654)" on its left or right until vertical, and pull the strap out of the slot. 3. Repair Information 4-15 Door assembly, rear removal (T650, T652, T654)
1. Go to the machine. 5. Gently place the printer on page 4-13. 2.
Service Manual - Page 341

...the cover from the duplex drive motor assembly.
Remove the fuser access door. Remove the cover assembly, rear lower. Remove the band (C) from the duplex drive motor assembly. 6. C
5. B
A
Note: When removing the duplex drive motor assembly, the upper duplex drive belt (B) will become detached. 4. Disconnect the connection (D) to the machine. Go to "HVPS card assembly removal (T650, T652...
Service Manual - Page 367

..., T654)" on page 4-44.
2. Detach the switch (B) from the operator panel hinge assembly, left removal (T650, T652, T654)
1.
4. C
D
Operator panel hinge assembly, left .
Go to the assembly. 7. Remove the cover. 4. Remove the USB socket. 8. Repair Information 4-45 Detach the operator panel door assembly from the assembly. Disconnect the connector (D) from the machine...
Service Manual - Page 380
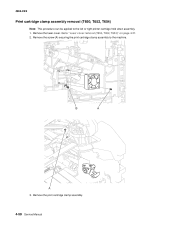
...securing the print cartridge clamp assembly to the left or right printer cartridge hold down assembly. 1. B
A
A
3. Remove the laser cover.
Remove the print cartridge clamp assembly.
4-58 Service Manual 4062-XXX
Print cartridge clamp assembly removal (T650, T652, T654)
Note: This procedure can be applied to the machine. Go to "Laser cover removal (T650, T652, T654)" on page 4-27. 2.
Service Manual - Page 382

.... 4. Disconnect the connections (B) from the printhead assembly.
Remove the six screws (A) securing the metal cover to "Laser cover removal (T650, T652, T654)" on page 4-4. 1. Remove the laser cover. 4062-XXX
Printhead assembly removal (T650)
Note: When replacing the printhead assembly, ensure that the printhead is properly calibrated, or print quality issues will occur.
B 4-60...
Service Manual - Page 383

...Remove the printhead assembly.
A
A
Repair Information 4-61
C
4062-XXX
6. Printhead assembly removal (T652, T654)
WARNING: When replacing the printhead assembly, ensure that the printhead is properly adjusted, or print quality issues will occur. Remove the laser cover. Remove... the six screws (A) securing the metal cover to the machine...
Service Manual - Page 385

Remove the laser cover. Go to the machine. While pressing the two tabs (B), pull the redrive assembly from the machine. B
4062-XXX
A B
Redrive motor assembly removal (T652, T654)
1. A Repair Information 4-63 Remove the six screws (A) securing the metal cover to "Laser cover removal (T650, T652, T654)" on page 4-27. 2.
5.
Service Manual - Page 388

... panel door assembly. 3. Go to "Cover assembly, rear lower removal (T650)" on
page 4-13 or "Cover assembly, rear lower (T652, T654)" on page 4-13. 4. Remove the four screws (A) securing the side cover, left . Remove the side cover, left to the machine.
Go to "Cover assembly, rear lower removal (T650)" on page 4-13.
4-66 Service Manual Side cover, left away from the machine...
Service Manual - Page 389

Swing the side cover, left .
Side cover, right removal (T650)
1.
4. Open the MPF tray door assembly. 3. Go to the machine.
4062-XXX
A
A
5. Remove the four screws (A) securing the side cover, left to "Cover assembly, rear lower removal (T650)" on
page 4-13. Remove the cover assembly, rear lower. Remove the side cover, left away from the machine. 6. Repair Information 4-67 ...
Service Manual - Page 395

... sensor (standard bin exit).
Repair Information 4-73 A 3. Go to "Laser cover removal (T650, T652, T654)" on page 4-27. 2. Go to "Sensor shield assembly removal (T650, T652, T654)" on page 4-73.
2. 4062-XXX
Sensor (standard bin exit) removal (T650, T652, T654)
1.
B
A
Standard bin actuator assembly removal (T650, T652, T654)
1. Disconnect the connection (A) from the standard bin...
Service Manual - Page 527

..., and T654) Access cover (T656) Side cover, left (T650) Side cover, left (T652) Side cover, left (T654) Side cover, left (T656) Connection access cover, rear (T650) Connection access cover, rear (T652, T654, and T656) Connection bezel assembly, rear (T650) Connection bezel assembly, rear (T652, T654, and T656) Laser cover assembly, 250 sheet output (T650 and T652) Laser cover assembly, 500 sheet...
Service Manual - Page 578
... Fuser access door assembly (T652, T654, and T656 7-11 40X4319 Fuser access door assembly (T650 7-11 40X4320 Laser cover assembly, 250 sheet output (T650 and T652 7-3 40X4321 Laser cover assembly, 500 sheet output (T654 7-3 40X4322 Inner cover, left (T650, T652, and T654 7-3 40X4323 Side cover, left (T654 7-3
I-6 Service Manual 4062-XXX
40X1991 Output expander media bin latch 7-41
40X1998...
Service Manual - Page 579

... assembly, rear lower (T652, T654, and T656 7-3 40X4336 Inner cover, right (T650, T652, and T654 7-3 40X4337 Side cover, right (T654 7-3 40X4338 Side cover, right (T650 7-3 40X4339 Access door 7-3 40X4343 Redrive motor assembly (T652, T654, and T656 7-9 40X4344 Duplex drive motor assembly (T652, T654, and T656 7-9 40X4345??Duplex (input) sensor assembly (T652, T654, and T656 7-9 40X4346...
Similar Questions


Lexmark Ms711 Laser Printer Weight
what does the ms711 laser printer weigh without additional trays?
what does the ms711 laser printer weigh without additional trays?
(Posted by cathyrose2 10 years ago)