Lenovo G575 Support Question
Lenovo G575 Support Question
Find answers below for this question about Lenovo G575.Need a Lenovo G575 manual? We have 2 online manuals for this item!
Question posted by jack2nelng on October 18th, 2013
Os Wont Install On Lenovo G575
The person who posted this question about this Lenovo product did not include a detailed explanation. Please use the "Request More Information" button to the right if more details would help you to answer this question.
Current Answers
Related Lenovo G575 Manual Pages
Hardware Maintenance Manual - Page 18

If one of these drives is installed, it is certified in hazardous radiation exposure. O uso de controles, ajustes ou desempenho de procedimentos diferentes daqueles aqui especificados pode resultar em perigosa exposição à radiação. Werden Steuer-
Do not open.
14 Lenovo G470/G475/G570/G575 Hardware Maintenance Manual
Laser compliance statement...
Hardware Maintenance Manual - Page 20
Lenovo G470/G475/G570/G575 Hardware Maintenance Manual
Important service information
This chapter presents the following ...is loaded to http://consumersupport.lenovo.com/. 2. The BIOS and device drivers are customer-installable. Select the BIOS/Driver/Applications and download. 4. Follow the directions on the customer support site: http://consumersupport.lenovo.com/. Enter a serial number...
Hardware Maintenance Manual - Page 24
...name and part number 7. Lenovo G470/G475/G570/G575 Hardware Maintenance Manual
What to... do first
When you do return an FRU, you must include the following information in the parts exchange form or parts return form that you attach to excessive force, or dropped.
20 Date on laptop...installation of service 3. Date of
an incompatible card •• ...
Hardware Maintenance Manual - Page 25

... the computer. 6. Measure the output voltage at the plug of the total power remaining when installed in the computer.
21 If the voltage is acceptable, do the following figure:
Pin
Voltage (V ...AC adapter and install the charged battery pack. 7. See the
following : •• Replace the system board. •• If the problem continues, go to "Lenovo G470/G475/G570/G575" on page ...
Hardware Maintenance Manual - Page 27
... information
This chapter presents the following information: •• "Restoring the factory contents by using OneKey Recovery Restore of factory default
The Lenovo G470/G475/G570/G575 computers come with pre-installed OneKey Rescue System.In order to a previous backup status. Note: This will delete all the new data on page 25
Restoring...
Hardware Maintenance Manual - Page 28

... the whole recovery process. Exception: If only an SVP is installed, the password prompt does not appear when the operating system is turned on. If any Lenovo computer: the power-on password (POP) and the supervisor password (SVP). Lenovo G470/G475/G570/G575 Hardware Maintenance Manual
When you use the recovery discs to boot...
Hardware Maintenance Manual - Page 32
Lenovo G470/G475/G570/G575 Hardware Maintenance Manual
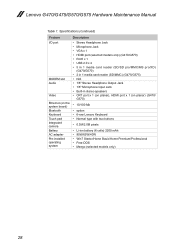
Table 1. Specifications (continued)
Feature I/O port
MODEM slot Audio
Video Ethernet (on the system board) Bluetooth Keyboard Touch pad Integrated camera Battery AC adapter Pre-installed operating system
Description
• Stereo Headphone Jack • Microphone Jack • VGA x 1 • HDMI port (selected models only) (G470/G570) ...
Hardware Maintenance Manual - Page 38
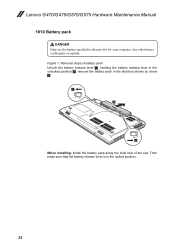
... your computer. Removal steps of the slot. Lenovo G470/G475/G570/G575 Hardware Maintenance Manual 1010 Battery pack
DANGER Only... use the battery specified in the locked position.
34 Holding the battery release lever in the unlocked position 2, remove the battery pack in the direction shown by arrow 3.
1 3
2
When installing: Install...
Hardware Maintenance Manual - Page 43

Lenovo G470/G475/G570/G575
3
Step
1
Screw (quantity) M2.0 × 4 mm, flat-head, nylon-coated (2)
Color Black
Torque 2.0kgfcm
When installing: Make sure that the HDD connector is attached firmly.
39
Hardware Maintenance Manual - Page 44

... servicing, the card must be moved.
40
Make sure that it snaps into the socket. Lenovo G470/G475/G570/G575 Hardware Maintenance Manual
1060 DIMM
For access, remove these FRUs in the slot and difficult to be installed in SLOT-0 ( a : lower slot), but not in SLOT-1 ( b : upper slot). Removal steps of DIMM Release...
Hardware Maintenance Manual - Page 45

...-coated (3)
Silver
M2.0 × 3.2 mm, with spring, nylon-coated (4) Black
Torque 2.0kgfcm 2.0kgfcm
41 Lenovo G470/G475/G570/G575
1070 Fan assembly and Heat Sink assembly
For access, remove these FRUs in the direction shown by arrow 3.
1
1
2
2
2
1
2
3
When installing: Make sure that the fan connector is attached firmly to the system board.
Removal...
Hardware Maintenance Manual - Page 47

... application can cause a thermal problem due to the a part shown in the figure above. Removal steps of fan assembly and heat sink assembly (continued)
a
When installing: •• Before you attach the fan assembly to the computer, apply thermal grease,
at an amount of 0.2 grams, to imperfect contact with a component.
43...
Hardware Maintenance Manual - Page 48

Lenovo G470/G475/G570/G575 Hardware Maintenance Manual
1080 CPU
For access, remove these FRUs in the direction shown by arrow a , and then rotate the head of rough handling. When you service the CPU, avoid any kind of the screw in the direction shown by arrow 2.
1
a b
2
When installing: Place the CPU on the CPU...
Hardware Maintenance Manual - Page 50
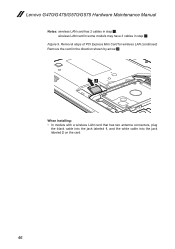
... for wireless LAN (continued)
Remove the card in step 1. wireless LAN card in some models may have 3 cables in the direction shown by arrow 3.
3
When installing: •• In models with a wireless LAN card that has two antenna connectors, plug
the black cable into the jack labeled 1, and the white cable...
Hardware Maintenance Manual - Page 52

Lenovo G470/G475/G570/G575 Hardware Maintenance Manual
Figure 10. Removal steps of keyboard (continued)
Lift the keyboard a little 3, unlock the FPC connector and then detach the connector in the direction shown by arrows 4 5.
3
4 5
When installing: Make sure that the FPC connector is attached firmly and then lock the FPC connector.
48
Hardware Maintenance Manual - Page 54

Lenovo G470/G475/G570/G575 Hardware Maintenance Manual
Figure 11. Removal steps of keyboard bezel (continued)
Remove one screw 5 and detach three FPC connectors in the direction shown by arrows 6.
6 5
6
Step
5
Screw (quantity) M2.5 × 8 mm, flat-head, nylon-coated (1)
Color Black
Torque 2.0kgfcm
When installing: Make sure that all the FPC connectors are attached firmly.
50
Hardware Maintenance Manual - Page 57
... • Be careful not to put it only on page 49
Figure 13. Lenovo G470/G475/G570/G575
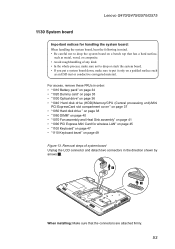
1130 System board
Important notices for handling the system board: When handling the system ...board Unplug the LCD connector and detach two connectors in the direction shown by
arrows 1.
1
1
When installing: Make sure that has a hard surface,
such as an ESD mat or conductive corrugated material.
Removal ...
Hardware Maintenance Manual - Page 58

Removal steps of system board (continued)
Remove five screws 2 and detach a connector in the direction shown by arrow 3.
2 32
2 2 2
3
When installing: Make sure that the connector is attached firmly. Lenovo G470/G475/G570/G575 Hardware Maintenance Manual
Figure 13. Step
2
Screw (quantity) M2.5 × 4 mm, flat-head, nylon-coated (5)
Color Black
Torque 2.0kgfcm
54
Hardware Maintenance Manual - Page 59
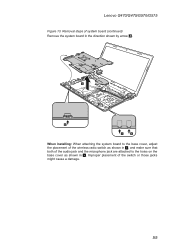
Lenovo G470/G475/G570/G575
Figure 13. Removal steps of system board (continued)
Remove the system board in the direction shown by arrow 4.
4
b
a
a
When installing: When attaching the system board to the holes on the base cover as shown in a . Improper placement of the audio jack and the microphone jack ...
Hardware Maintenance Manual - Page 61

... that they are not subjected to be damaged by the cable guides, or a wire to any tension. Tension could cause the cables to be broken. Lenovo G470/G475/G570/G575
Figure 14. Removal steps of LCD unit (continued)
33
33 2
2
When installing:
•• Route the antenna cables along the cable guides.
Similar Questions

What To Do When A Lenovo G575 Laptop Wont Work And Restarting Doesn't Help
(Posted by joshpuzld 9 years ago)

I Wont To By Laptop Lenovo T201i
Bonjour, je suis Emmanuel KANDATE de Bukavu, RD Congo. Je souhaite acheter une machine Laptop LENOVO...
Bonjour, je suis Emmanuel KANDATE de Bukavu, RD Congo. Je souhaite acheter une machine Laptop LENOVO...
(Posted by emmanuelkandate 10 years ago)


Why Wont My Lenovo G575 Laptop Detect To Wireless Connection?
Trying to clean up my laptop..I think I have deleted a program....could this affect it??
Trying to clean up my laptop..I think I have deleted a program....could this affect it??
(Posted by littleclaireh 12 years ago)