
Lenovo G555 Support Question
Lenovo G555 Support Question
Find answers below for this question about Lenovo G555.Need a Lenovo G555 manual? We have 3 online manuals for this item!
Question posted by jawebruthp on January 13th, 2014
Why Do I Have A Black Screen On My Lenovo G555 Laptop
The person who posted this question about this Lenovo product did not include a detailed explanation. Please use the "Request More Information" button to the right if more details would help you to answer this question.
Current Answers
Related Lenovo G555 Manual Pages
Lenovo G455/G555 SetupPoster V1.0 - Page 1
...
2
3
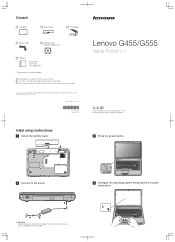
Attention: Connect the power cord to the AC adapter.
4 Configure the operating system following the on-screen instructions
G555
Setup Poster - User Guide - Lenovo, Lenovo logo, IdeaPad, VeriFace, OneKey are either registered trademarks or trademarks of Lenovo in this manual are not listed. 2 If any item is missing or damaged, please contact your computer.
Lenovo G555 Hardware Maintenance Manual V2.0 - Page 3

... of factory default 23 Using recovery discs 23 Passwords 24 Power-on password 24 Supervisor password 24 Power management 25 Screen blank mode 25 Sleep (standby) mode 25 Hibernation mode 26
Lenovo G555 27 Specifications 27 Status indicators 29 Fn key combinations 31 FRU replacement notices 32
Screw notices 32 Removing and replacing...
Lenovo G555 Hardware Maintenance Manual V2.0 - Page 10

...that the ESD protective devices you are wearing a wrist strap. •• Use the black side of a grounding system to guard against ESD damage is especially useful when handling ESD-...the ESD ground clip to any frame ground, ground braid, or greenwire ground.
- Lenovo G555 Hardware Maintenance Manual
Handling devices that are sensitive to electrostatic discharge
Any computer part containing...
Lenovo G555 Hardware Maintenance Manual V2.0 - Page 20

... downloading. 3. Follow the directions on page 17 - "Important notice for replacing a hard disk drive" on the screen and install the necessary software.
16 The BIOS and device drivers are installed before completing the service action.
Lenovo G555 Hardware Maintenance Manual
Important service information
This chapter presents the following important service information: ••...
Lenovo G555 Hardware Maintenance Manual V2.0 - Page 24

...unauthorized service or modification. •• If the spindle of an incorrect AC adapter on laptop products
The following symptoms might indicate damage caused by nonwarranted activities: •• Missing ...onto the keyboard •• Use of a hard disk drive becomes noisy, it : 1. Lenovo G555 Hardware Maintenance Manual
What to do first
When you do return an FRU, you attach to ...
Lenovo G555 Hardware Maintenance Manual V2.0 - Page 28

If any Lenovo computer: the power-on password (POP) and the supervisor password (SVP).
Passwords
As many as two passwords may... and cannot be needed for a scheduled fee.
24 Lenovo G555 Hardware Maintenance Manual
When you use the recovery discs to boot your computer, the system will enter the user interface for it appears on the screen whenever the computer is turned on. Note: The recovery...
Lenovo G555 Hardware Maintenance Manual V2.0 - Page 35

... the system request. Increase/Decrease sound volume.
31 Start/Pause playback of the LCD screen. Table 4. Skip to the next track. Turn on/off the backlight of Windows ...devices. Increase/Decrease display brightness. Enable/Disable the touchpad. Activate the break function. Lenovo G555
Fn key combinations
The following table shows the function of each combination of Windows ...
Lenovo G555 Hardware Maintenance Manual V2.0 - Page 43
... order: •• "1010 Battery pack" on page 34 •• "1040 Memory/Wireless module/CPU (central processing unit) compartment
cover" on page 38
Figure 5. Lenovo G555
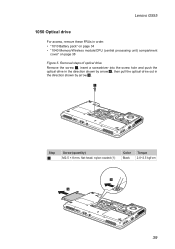
1050 Optical drive
For access, remove these FRUs in the direction shown by arrow 3.
1
Step
1
Screw (quantity) M2.5 × 8 mm, flat-head, nylon-coated (1)
Color...
Lenovo G555 Hardware Maintenance Manual V2.0 - Page 45

...
Figure 7. Step
1 2 3
Screw (quantity)
Color
M2.0 × 4 mm, flat-head, nylon-coated (3)
Black
M2.0 × 3 mm, flat-head, nylon-coated (1)
Black
M2.0 × 3.2 mm, with spring, nylon-coated (4) Silver
Torque 1.5~2.0 kgf·cm 1.0~1.5 kgf·cm 2.0~2.5 kgf·cm
41 Lenovo G555
1070 Fan assembly and Heat Sink assembly
For access, remove these FRUs...
Lenovo G555 Hardware Maintenance Manual V2.0 - Page 49

... in step 1. Removal steps of PCI Express Mini Card for wireless LAN/WAN
1 1
2 2
Disconnect the two wireless LAN cables (black, white) in order: •• "1010 Battery pack" on page 34 •• "1040 Memory/Wireless module/CPU (central ...LAN/WAN
For access, remove these FRUs in the direction shown
by arrows.
Lenovo G555
1090 PCI Express Mini Card for wireless WAN card.
Lenovo G555 Hardware Maintenance Manual V2.0 - Page 50

Lenovo G555 Hardware Maintenance Manual
Figure 9. Removal steps of PCI Express Mini Card for wireless LAN/WAN (continued)
Remove the wireless LAN card in the direction shown by arrow 3.
3
When installing: •• Plug the black cable into the jack labeled 1, and the white cable into the jack
labeled 2 on the card.
46
Lenovo G555 Hardware Maintenance Manual V2.0 - Page 51

Lenovo G555
1100 Keyboard cover and power board
For access, remove this FRU: •• "1010 Battery pack" on page 34
Note: Power board is attached to the keyboard cover. Removal steps of Keyboard cover and power board
Remove the screws 1.
1 1 1 1
Step
1
Screw (quantity) M2.0 × 2.5 mm, flat-head, nylon-coated (4)
Color Black
Torque 1.0~1.5 kgf·cm
47
Figure 10.
Lenovo G555 Hardware Maintenance Manual V2.0 - Page 54

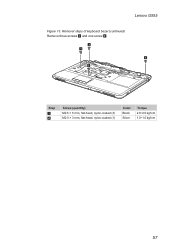
Removal steps of keyboard
Remove the screws 1.
1 1 1 1
Step
1
Screw (quantity) M2.0 × 2.5 mm, flat-head, nylon-coated (4)
Color Black
Torque 1.0~1.5 kgf·cm
50 Lenovo G555 Hardware Maintenance Manual
1110 Keyboard
For access, remove these FRUs in order: •• "1010 Battery pack" on page 34 •• "1100 Keyboard cover and power board" on page 47 Figure 11.
Lenovo G555 Hardware Maintenance Manual V2.0 - Page 56

Lenovo G555 Hardware Maintenance Manual
1120 LCD unit
For access, remove these FRUs in order: •• "1010 Battery pack" on page 34 •• "1040 Memory/.... Removal steps of LCD unit
Remove the two screws 1 and detach the LCD connector 2.
1
2
1
Step
1
Screw (quantity) M2.5 × 8 mm, flat-head, nylon-coated (2)
Color Black
Torque 2.0~2.5 kgf·cm
52
Lenovo G555 Hardware Maintenance Manual V2.0 - Page 58

Removal steps of LCD unit (continued)
Color Black
Torque 2.0~2.5 kgf·cm
54 Removal steps of LCD unit (continued)
Remove two screws 6.
6 6
Step
6
Screw (quantity) M2.5 × 8 mm, flat-head, nylon-coated (2)
Figure 12. Lenovo G555 Hardware Maintenance Manual
Figure 12.
Lenovo G555 Hardware Maintenance Manual V2.0 - Page 60

Lenovo G555 Hardware Maintenance Manual
1130 Keyboard bezel
For access, remove these FRUs in...1 1
1 1
1
Step
1 2
Screw (quantity) M2.5 × 8 mm, flat-head, nylon-coated (14) M2.0 × 2.5 mm, flat-head, nylon-coated (3)
Color Black Black
Torque 2.0~2.5 kgf·cm 1.0~1.5 kgf·cm
56 Removal steps of keyboard bezel
Remove fourteen screws 1 and three screws 2 on page 52
Figure 13.
Lenovo G555 Hardware Maintenance Manual V2.0 - Page 61
Removal steps of keyboard bezel (continued)
Remove three screws 3 and one screw 4.
3 4
3 3
Step
3 4
Screw (quantity) M2.5 × 5 mm, flat-head, nylon-coated (3) M2.0 × 3 mm, flat-head, nylon-coated (1)
Color Black Silver
Torque 2.0~2.5 kgf·cm 1.0~1.5 kgf·cm
57 Lenovo G555
Figure 13.
Lenovo G555 Hardware Maintenance Manual V2.0 - Page 65

Lenovo G555
Figure 14. Removal steps of system board (continued) Unplug two connectors (bluetooth connector and speakers connector) in the
direction shown by arrow 2, and remove two screws 3.
3
3
2
When installing: Make sure that the connectors are attached firmly. Step
3
Screw (quantity) M2.5 × 6 mm, flat-head, nylon-coated (2)
Color Black
Torque 2.0~2.5 kgf·cm
61
Lenovo G555 Hardware Maintenance Manual V2.0 - Page 68

Removal steps of Bluetooth daughter card, speakers and base cover (continued)
Remove four screws 3, release the speaker cables from the cable guides, and then remove the speakers 4.
3 3
3 3
4
4
Step
1
Screw (quantity) M2.5 × 5.7 mm, flat-head, nylon-coated (4)
Color Black
Torque 6 kgf·cm
64 Lenovo G555 Hardware Maintenance Manual
Figure 15.
Lenovo G555 Hardware Maintenance Manual V2.0 - Page 72

Lenovo G555 Hardware Maintenance Manual
1170 LCD panel and hinges
For access, remove these FRUs in order: •• "1010 Battery pack" on page 34 •• "... of LCD panel and hinges
Remove two screws 1, and then release the LCD panel.
1
1
Step
1
Screw (quantity) M2.5 × 5 mm, flat-head, nylon-coated (2)
Color Black
Torque 2.0~2.5 kgf·cm
68
Similar Questions


Lenovo B575 Black Screen When I Start Up My Laptop Nuffink Else
when i start up my laptop the light are on it makes the starty up noise and all i get is the black s...
when i start up my laptop the light are on it makes the starty up noise and all i get is the black s...
(Posted by callumisastar 11 years ago)
I Have A Black Screen?
i put my pc into disctete mode from the biosand when i booted up it just is a black screen. what can...
i put my pc into disctete mode from the biosand when i booted up it just is a black screen. what can...
(Posted by ediz369 11 years ago)