Lenovo B560 Support Question
Lenovo B560 Support Question
Find answers below for this question about Lenovo B560.Need a Lenovo B560 manual? We have 6 online manuals for this item!
Question posted by sanAb on February 1st, 2014
B560 Lenovo How To Remove Lcd
The person who posted this question about this Lenovo product did not include a detailed explanation. Please use the "Request More Information" button to the right if more details would help you to answer this question.
Current Answers
Related Lenovo B560 Manual Pages
Lenovo B560/V560 Hardware Maintenance Manual V2.0 - Page 3
... mode 25 Hibernation mode 26
Lenovo V560/B560 27 Specifications 27 Status indicators 29 Fn key combinations 31 FRU replacement notices 32
Screw notices 32 Removing and replacing an FRU 33
...speakers and bluetooth card 57 1150 LCD front bezel 61 1160 LCD panel, LCD cable and hinges...........62 1170 Integrated camera 65 1180 Antenna assembly and LCD cover ..........66 Locations 67 Front ...
Lenovo B560/V560 Hardware Maintenance Manual V2.0 - Page 6
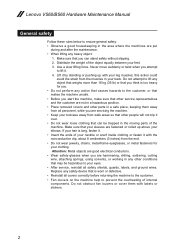
...the weight of the object equally between your back. Lenovo V560/B560 Hardware Maintenance Manual
General safety
Follow these rules below to...conductors. •• Wear safety glasses when you are not in a hazardous position. •• Place removed covers and other service representatives and the customer are hammering, drilling, soldering, cutting wire, attaching springs, using ...
Lenovo B560/V560 Hardware Maintenance Manual V2.0 - Page 8
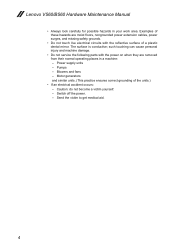
...Motor generators and similar units. (This practice ensures correct grounding of these hazards are removed from their normal operating places in your work area. Caution: do not become ...Do not touch live electrical circuits with the reflective surface of a plastic dental mirror. Lenovo V560/B560 Hardware Maintenance Manual
•• Always look carefully for possible hazards in a machine...
Lenovo B560/V560 Hardware Maintenance Manual V2.0 - Page 24
...items that are not covered under warranty: •• LCD panel cracked from the application of excessive force or from ... computer damage was detected 6. Date of purchase 5. Date on laptop products
The following information in which the machine failed 4. Machine... servicer 2. Failing FRU name and part number 7. Lenovo V560/B560 Hardware Maintenance Manual
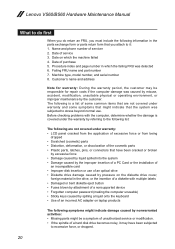
What to do first
When you ...
Lenovo B560/V560 Hardware Maintenance Manual V2.0 - Page 25
...following : •• Replace the system board. •• If the problem continues, go to "Lenovo V560/B560" on the
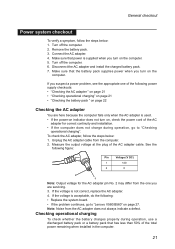
computer. Disconnect the AC adapter and install the charged battery pack. 7. To check the AC...the AC adapter pin No. 2 may differ from the one you turn on page 27. Remove the battery pack. 3. Note: Noise from the computer. 2. If the voltage is supplied when...
Lenovo B560/V560 Hardware Maintenance Manual V2.0 - Page 26

... it cools down, reinstall and recharge it is still off the computer. 2. Remove the battery pack and measure the voltage between battery terminals 5 and 7.
If ... figure:
Terminal Voltage (V DC)
3 4 5 6(-) 7(-) 2(+) 1(+)
1
+0 to room temperature. Lenovo V560/B560 Hardware Maintenance Manual
Perform operational charging.
Turn off , replace the battery pack. If the voltage is not...
Lenovo B560/V560 Hardware Maintenance Manual V2.0 - Page 31

...5400rpm) • 2.5" SATA 320/500GB (7200rpm) • 12.7mm Tray Rambo
27 Lenovo V560/B560
Lenovo V560/B560
This chapter presents the following product-specific service references and product-specific parts information: •&#... on page 31 •• "FRU replacement notices" on page 32 •• "Removing and replacing an FRU" on page 33 •• "Locations" on page 67 •...
Lenovo B560/V560 Hardware Maintenance Manual V2.0 - Page 35
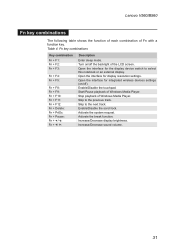
.... Open the interface for integrated wireless devices settings (on /off ). Increase/Decrease display brightness. Increase/Decrease sound volume.
31 Lenovo V560/B560
Fn key combinations
The following table shows the function of each combination of the LCD screen. Turn on /off the backlight of Fn with a function key. Enable/Disable the scroll lock.
Lenovo B560/V560 Hardware Maintenance Manual V2.0 - Page 36

...Lenovo computer, this problem is addressed with special nylon-coated screws that have the following characteristics: •• They maintain tight connections. •• They do not easily come loose, even with shock or vibration. •• They are calibrated correctly following when you removed...;• Each one . Lenovo V560/B560 Hardware Maintenance Manual
FRU replacement...
Lenovo B560/V560 Hardware Maintenance Manual V2.0 - Page 53

Unplug the LCD connector in the direction shown by arrow 2. Step
1
Screw (quantity) M2 × 4 mm, flat-head, nylok-coated (5)
Color White
Torque 1.6 ... and the USB connector in the direction shown by arrows 3.
3
2 1
1
3
1 1
1
When installing: Make sure that all the connectors are attached firmly. Removal steps of system board
Remove five screws 1. Lenovo V560/B560
Figure 10.
Lenovo B560/V560 Hardware Maintenance Manual V2.0 - Page 55

... do not pinch the antenna cables when you attach the LCD assembly. Route the LCD cable along the cable guides. Lenovo V560/B560
1110 LCD unit
For access, remove these FRUs in the direction shown by the cable guides, or a wire to any tension. Removal steps of LCD unit Release the antenna cables from the cable guides in...
Lenovo B560/V560 Hardware Maintenance Manual V2.0 - Page 56

Lenovo V560/B560 Hardware Maintenance Manual
Figure 11. Removal steps of LCD unit (continued)
Remove the LCD unit in the direction shown by arrows 3.
3 3
52
Lenovo B560/V560 Hardware Maintenance Manual V2.0 - Page 61

Lenovo V560/B560
1140 base cover, speakers and bluetooth card
For access, remove these FRUs in the direction shown by arrows 2.
1
2
Step
1
Screw (quantity) M2 × 4 mm, flat-head, nylok-coated (1)
Color White
Torque 1.6 kgfcm
When installing: Make sure that the power connector is attached firmly.
57 Removal...; "1110 LCD unit" on page 51 •• "1100 System board" on page 48
Figure...
Lenovo B560/V560 Hardware Maintenance Manual V2.0 - Page 65

... (quantity) M2.5 × 4 mm, flat-head, nylok-coated (4)
Color White
Torque 3.0 kgfcm
Remove the LCD front bezel in order: •• "1010 Battery pack" on page 34 •• "1020..."1100 System board" on page 48 •• "1110 LCD unit" on page 51
Figure 15. Lenovo V560/B560
1150 LCD front bezel
For access, remove these FRUs in the direction shown by arrows 2.
2 2
2 2
61
Lenovo B560/V560 Hardware Maintenance Manual V2.0 - Page 66

...
1
Screw (quantity) M2.5 × 4 mm, flat-head, nylok-coated (4)
Color White
Torque 3.0 kgfcm
62 Lenovo V560/B560 Hardware Maintenance Manual
1160 LCD panel, LCD cable and hinges
For access, remove these FRUs in the direction shown by arrow 2. Lift the LCD panel in order: •• "1010 Battery pack" on page 34 •• "1020 Dummy...
Lenovo B560/V560 Hardware Maintenance Manual V2.0 - Page 67

Lenovo V560/B560
Figure 16. Removal steps of LCD panel, LCD cable and hinges (continued)
Remove four screws 4 and remove the hinges in the direction shown by arrow 5.
4 5 4
4 5 4
Step
4
Screw (quantity) M2 × 2.5 mm, flat-head, nylok-coated (4)
Color White
Torque 1.6 kgfcm
63
Lenovo B560/V560 Hardware Maintenance Manual V2.0 - Page 68

Peel off the adhesive tape and detach the connector in the direction shown by a metal connector. Lenovo V560/B560 Hardware Maintenance Manual
Figure 16. Removal steps of LCD panel, LCD cable and hinges (continued) Note: The LCD cables are attached to the LCD panel by
arrow 6.
6
When installing: Make sure that the metal connector is attached firmly.
64
Lenovo B560/V560 Hardware Maintenance Manual V2.0 - Page 69
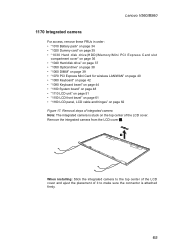
... 1.
1
When installing: Stick the integrated camera to the top center of the LCD cover and ajust the placement of it to make sure the connector is stuck on page 62 Figure 17. Lenovo V560/B560
1170 Integrated camera
For access, remove these FRUs in order: •• "1010 Battery pack" on page 34 •...
Lenovo B560/V560 Hardware Maintenance Manual V2.0 - Page 70

... Figure 18. When installing: Route the antenna cables along the cable guides and secure the antenna boards with adhesive tapes.
Lenovo V560/B560 Hardware Maintenance Manual
1180 Antenna assembly and LCD cover
For access, remove these FRUs in the
direction shown by the cable guides, or a wire to be damaged by arrows 1. Tension could...
Lenovo B560/V560 Hardware Maintenance Manual V2.0 - Page 81
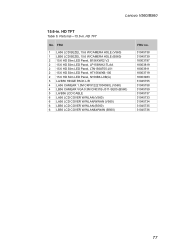
HD TFT
No. Lenovo V560/B560
15.6-in . HD TFT
Table 6. FRU
1 LA56 LCD BEZEL 15.6 W/CAMERA HOLE (V560) 1 LB56 LCD BEZEL 15.6 W/CAMERA HOLE (B560) 2 15.6 HD Slim LED Panel, B156XW02 V2 2 15.6 HD Slim LED Panel, LP156WH2-TLAA 2 15.6 HD Slim LED Panel, LTN156AT05-J01 2 15.6 HD Slim LED ...
Similar Questions

Hello I Forgot My System Password/bios How Can I Reset It?
(Posted by jeandamoureba250 1 year ago)


I Have Lenovo B560.
Problem Is That My Laptop Became Very Hot And Create A Nois
problem is that my laptop became very hot and create a noise from heatsing please provide solution h...
problem is that my laptop became very hot and create a noise from heatsing please provide solution h...
(Posted by ssikandarsattar 11 years ago)

Hdmi Port On Levovo B560 Laptop
How do I connect my laptop to HDMI TV. I dont think my laptop has a HDMI port . The specs of of the ...
How do I connect my laptop to HDMI TV. I dont think my laptop has a HDMI port . The specs of of the ...
(Posted by piyushsopory1 12 years ago)