
Kenmore HE2t Support Question
Kenmore HE2t Support Question
Find answers below for this question about Kenmore HE2t - 3.7 cu. Ft. Front Load Washer.Need a Kenmore HE2t manual? We have 1 online manual for this item!
Question posted by karpijem1 on July 4th, 2014
Kenmore He2t How Do You Initiate A Diagnostic Test
The person who posted this question about this Kenmore product did not include a detailed explanation. Please use the "Request More Information" button to the right if more details would help you to answer this question.
Current Answers
Related Kenmore HE2t Manual Pages
User Guide - Page 3

...2-1 Installation Instructions 2-6
PRODUCT OPERATION 3-1 Features And Benefits 3-1 Washer Use 3-3 Washer Care 3-12 Troubleshooting 3-15
COMPONENT ACCESS 4-1 Component Locations ...Basket Drive Pulley 4-27 Removing The Tub & Basket And Baffle 4-28
COMPONENT TESTING 5-1 Inlet Valve Solenoids 5-1 Pressure Switch 5-2 Line Filter 5-3 Detergent Dispenser Motor & Switch 5-4 Door ...
User Guide - Page 4
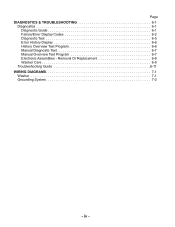
...Removal Or Replacement 6-8 Washer Care 6-9
Troubleshooting Guide 6-11 WIRING DIAGRAMS 7-1
Washer 7-1 Grounding System 7-2
- Page DIAGNOSTICS & TROUBLESHOOTING 6-1
Diagnostics 6-1 Diagnostic Guide 6-1 Failure/Error Display Codes 6-2 Diagnostic Test 6-5 Error History Display 6-6 History Overview Test Program 6-6 Manual Diagnostic Test 6-7 Manual Overview Test Program 6-7 Electronic...
User Guide - Page 8
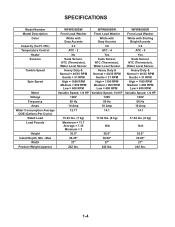
Max
Width Product Weight (approx)
WFW8300SW
WFW8500SW
WFW8500SR
Front Load Washer
Front Load Washer
Front Load Washer
White with Gray Accents
White with Gray Accents
White with Sterling Bright Accents
3.3
3.6
3.6... Water Consumption Average DOE (Gallons-Per-Cycle) Rated Load Load Pounds
Height Install Depth: Min - SPECIFICATIONS
Model Number Model Description
Color
Capacity (Cu.Ft.
User Guide - Page 17
...." 9. Allow the washer to clean your tools.
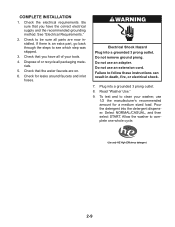
4. Check the electrical requirements. Check that the water faucets are now installed. See "Electrical Requirements."
2.
To test and to complete one whole cycle. Be sure that you have all of or recycle all parts are on.
6. Check for a medium sized load. Pour the detergent into the...
User Guide - Page 22
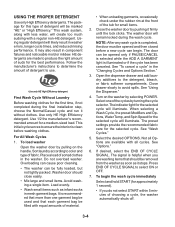
...Use only HE High Efficiency detergent. This initial cycle serves to use.
It is illuminated or if the cycle has been canceled. The washer door will illuminate. Close drawer slowly to... Open the dispenser drawer and add laundry additives to avoid spills.
To load washer
Open the washer door by turning the cycle selector. Do not overload washer. Load evenly.
• Wash small items...
User Guide - Page 71
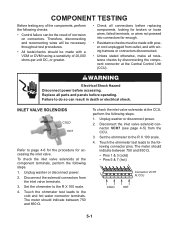
...; Check all connections before replacing components, looking for accessing the inlet valve.
Disconnect the solenoid connectors from the CCU.
3. Touch the ohmmeter test leads to the R X 100 scale. 4.
Unplug washer or disconnect power. 2. The meter should indicate between 750 and 850 Ω. Disconnect the inlet valve solenoid connector VCH7 (see page 4-5) from...
User Guide - Page 72
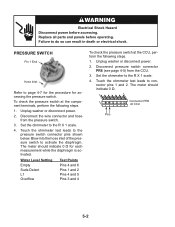
...the pressure switch.
The meter should indicate 0 Ω. Water Level Setting
Empty Suds Detect L1 Overflow
Test Points
Pins 4 and 6 Pins 1 and 2 Pins 4 and 5 Pins 3 and 4
To .... 1. Touch the ohmmeter test leads to activate the diaphragm. Connector PR6 1 2 3 4 5 6 At CCU
Pins
5-2
Electrical Shock Hazard Disconnect power before operating. Unplug washer or disconnect power. 2. To...
User Guide - Page 73

...the line filter.
To check the line filter at the CCU, perform the following steps. 1. Touch the ohmmeter test leads to the R X 1 scale. 4. Pins A and B Pins C and D
To check the line... and 2. Touch the ohmmeter test leads to do so can result in death or electrical shock. Unplug washer or disconnect power. 2. lowing connector pins (shown above). Unplug washer or disconnect power.
2. Set...
User Guide - Page 74

... parts and panels before accessing. Touch the ohmmeter test leads to the
following connector pins. Touch the ohmmeter test leads to the following connector terminals (shown above...Shock Hazard Disconnect power before operating. Disconnect the two wire connectors from the CCU. 3. Unplug washer or disconnect power. 2. To check the motor at the CCU, perform the following steps. 1....
User Guide - Page 75

.../unlock sole- Electrical Shock Hazard Disconnect power before operating. Failure to the indicated pins on connector DL3. To test the door switch, touch the ohmmeter test leads to pins 3 and 1 at the CCU, perform the following steps. 1. Lock Sol. Pins 2 .... Connector DS2 At CCU
5-5 The meter should indicate as follows:
Door Unlock Solenoid -
Unplug washer or disconnect power. 2.
User Guide - Page 76
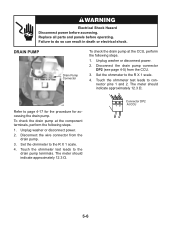
... CCU, perform the following steps.
1. Connector DP2 1 2 At CCU
5-6
Touch the ohmmeter test leads to connector pins 1 and 2. Disconnect the wire connector from the CCU.
3. Electrical Shock... all parts and panels before accessing. The meter should indicate approximately 12.3 Ω. Unplug washer or disconnect power.
2. Set the ohmmeter to page 4-17 for the procedure for accessing ...
User Guide - Page 79
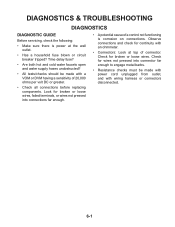
DIAGNOSTICS & TROUBLESHOOTING
DIAGNOSTICS
DIAGNOSTIC GUIDE
Before servicing, check the following:
• Make sure there is power at top of a control not functioning is corrosion on connections. Time delay fuse?
• Are both hot and cold water faucets open and water supply hoses unobstructed?
• All tests/checks should be made with wiring harness or connectors...
User Guide - Page 80
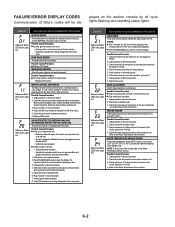
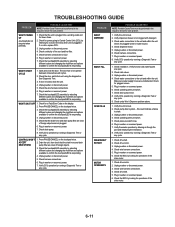
... the water temperature sensor (NTC) value is not a siphon problem.
2. NOTE: To find correct Ohm reading refer to it is running a Diagnostic Test or any cycle.
Possible Causes/Procedure 1. Unplug washer or disconnect power. 2. Check the water temperature sensor and connection to the Water Temperature Sensor section. Check resistance of the WASH cycle...
User Guide - Page 81
... pump runs constantly, even if PAUSE/CANCEL is pressed twice and the display is broken.
Unplug washer or disconnect power. 3. Check the MCU by running a Diagnostic Test or any worn or failed components. 5. Plug in washer or reconnect power. 6. LOAD INSIDE DRUM DURING CLEANING WASHER CYCLE
If at the MCU is not mounted upside down . Unplug...
User Guide - Page 82
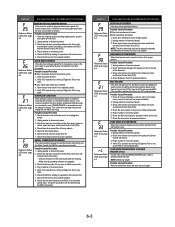
... pump. 7. Verify CCU operation by the pressure switch during the drain or spin phases, the washer will fill 4 liters of water and during 5 minutes the unit will rest without adding any
...(OVERDOSE OF DETERGENT DETECTED DURING THE WASH CYCLE)
If suds are detected continuously by running a Diagnostic Test or any detergent. Check the pressure switch. 8. They use the status lights on the touchpad...
User Guide - Page 83
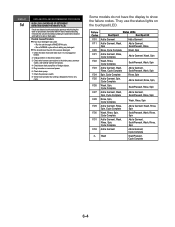
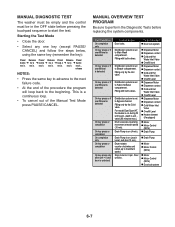
... the program.)
Starting Diagnostic Test and bypassing the Service History Mode:
Execute this procedure with an empty drum. Starting Service History Mode & Diagnostic Test:
NOTE: The washer must be empty and...appliance.
• Run through an automated test.
• Run loads to assist in the OFF state before pressing the touchpad sequence to start the test.
1.
NOTES: This program recalls the...
User Guide - Page 85
...-clockwise and ramps up to Bleach compartment. Door unlocks.
On key press or if overfill level is detected
Distribution system is on (4 min).
MANUAL DIAGNOSTIC TEST
The washer must be empty and the control must be Checked
Door lock system
Dispenser Motor Dispenser contact Cold and Hot Water Inlet Valve Overfill level Dispenser...
User Guide - Page 86
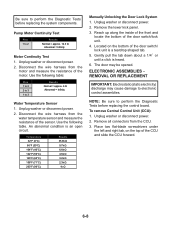
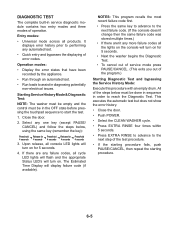
... the CCU forward.
6-8 Gently pull the tab down about a 1/4˝ or until a click is a teardrop shaped tab. 5.
Pump Motor Continuity Test
Pins 1 to perform the Diagnostic Tests before replacing the system components. Unplug washer or disconnect power.
2. An abnormal condition is an open circuit. NOTE: Be sure to 2
Results Normal = approx. 12.3 Ω
Abnormal...
User Guide - Page 89
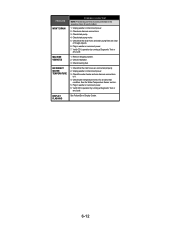
... different cycles and changing the modifiers and options available to Central Control Unit (CCU) by running a Diagnostic Test or
any cycle. Unplug washer or disconnect power.
5. Plug in washer or reconnect power.
7. Check for plugged screen. 5. Plug in washer or reconnect power.
7. Check drain pump.
8. Press PAUSE/CANCEL on the touchpad twice.
3. Drain the unit...
User Guide - Page 90
... power.
6. See the Water Temperature Sensor section .
5. Check that the inlet hoses are clear
of foreign objects. 6. Verify CCU operation by running a Diagnostic Test or
any cycle. Unplug washer or disconnect power. 2. Verify CCU operation by running a Diagnostic Test or any cycle. Check that the drain hose and drain pump filter are connected properly.
2. Unplug...
Similar Questions

How Can I Clean My Kennmore Washer Machine?
(Posted by Mariavargas1102 9 years ago)

Where Is The Mcu Located On A Kenmore He2t Front Loading Washer
(Posted by DRobRoha 10 years ago)

Kenmore He2t 3.7-cubic-foot Front-loading Washer Wont Start
(Posted by flFe 10 years ago)

What Is The Purpose Of Running A Diagnostic Test On Kenmore Front Load Washer
(Posted by dabawa 10 years ago)

Kenmore He2t Front Loading Washer Model# 110.4756
When I turn power on the front panel lights up, but when I push start it all shuts down. Tried unplu...
When I turn power on the front panel lights up, but when I push start it all shuts down. Tried unplu...
(Posted by cpcalder 11 years ago)