Get support for Hoover Hoover IMPULSE Cordless Stick Vacuum

Hoover Hoover IMPULSE Cordless Stick Vacuum Support Question

Hoover Hoover IMPULSE Cordless Stick Vacuum Support Question

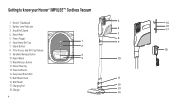
Find answers below for this question about Hoover Hoover IMPULSE Cordless Stick Vacuum.
Need a Hoover Hoover IMPULSE Cordless Stick Vacuum manual? We have 1 online manual for this item!
Question posted by tdkipswich on November 30th, 2023

How Can You Dismantle And Replace Battery For Model #53020

The person who posted this question about this Hoover product did not include a detailed explanation. Please use the "Request More Information" button to the right if more details would help you to answer this question.

Current Answers

Answer #1: Posted by SonuKumar on November 30th, 2023 11:56 PM
This answer was accepted by the poster of the original question.
SonuKumar

Member since:
May 9th, 2021

Points: 16,619,300
1,100
points
Replacing the battery for a Hoover Impulse Cordless Stick Vacuum, Model #53020, requires a few simple steps. Here's a detailed guide:

Tools and Materials:

Phillips-head screwdriver

Replacement battery for Hoover Impulse Cordless Stick Vacuum, Model #53020

Clean, dry workspace

Steps:

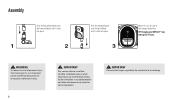
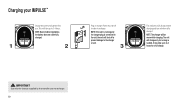
Power Off and Disconnect: Ensure the vacuum is turned off and unplugged from any power source.

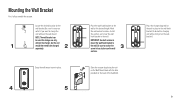
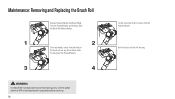
Locate the Battery Compartment: The battery compartment is situated on the back of the vacuum, near the handle. It's covered by a plastic panel.

Remove the Battery Compartment Cover: Use a Phillips-head screwdriver to remove the screws securing the battery compartment cover. Gently pry open the cover to reveal the battery.

Disconnect the Battery Harness: Carefully detach the battery harness from the battery by unplugging the connector.

Remove the Battery: Lift the battery straight up out of the compartment.

Prepare the Replacement Battery: Unpack the new battery and ensure it's compatible with your Hoover Impulse Cordless Stick Vacuum, Model #53020.

Install the Replacement Battery: Carefully insert the replacement battery into the compartment, aligning it with the battery guides.

Connect the Battery Harness: Securely plug the battery harness connector into the replacement battery.

Reattach the Battery Compartment Cover: Align the battery compartment cover with the screw holes and use the Phillips-head screwdriver to tighten the screws.

Power On and Test: Plug the vacuum back into a power source and turn it on. Check if the vacuum is functioning properly with the new battery.

Additional Tips:

Handle the battery with care to avoid damaging it.

Dispose of the old battery responsibly according to local regulations.

If you encounter any difficulties during the replacement process, consult the user manual or contact Hoover customer support for assistance.


Please respond to my effort to provide you with the best possible solution by using the "Acceptable Solution" and/or the "Helpful" buttons when the answer has proven to be helpful.

Regards,
Sonu
Your search handyman for all e-support needs!!

Related Hoover Hoover IMPULSE Cordless Stick Vacuum Manual Pages

Product Manual - Page 1

If used commercially the warranty is intended for household use only. CORDLESS VACUUM USER MANUAL This product is void. All Rights Reserved. IMPORTANT: READ CAREFULLY BEFORE ASSEMBLY AND USE. REPLACEMENT PARTS: Filter: 440012835 Charger: 440010414 ©2018 Techtronic Floor Care Technology Limited.
Product Manual - Page 2

Register your vacuum by: Visiting Hoover.com or Hoover.ca Calling 888 679-2121 IT'S GUARANTEED. See warranty for up to Hoover® ownership. Get cleaning confidence for complete details. 2 Make it official. Welcome to 2 years with the Hoover limited warranty.
Product Manual - Page 3

Table of Contents Safety Instructions...4 Getting to know your Hoover® IMPULSECordless Vacuum...6 What's in the Box? ...7 Assembly...8 Mounting the Wall Bracket...9 Charging your IMPULSE™...10 The Hoover® Dashboard...11 Quick Start ...12 Using your Vacuum...13 Using your Vacuum as a Handheld...14 Using your Vacuum to Clean Up High...15 Maintenance: Emptying the Dirt Cup...
Product Manual - Page 4

... Do not unplug charger by children age 12 and under. Do not place vacuum on cord. The batteries can explode in this appliance before removing or installing brush roll. • ... in a fire. • This product includes rechargeable Lithium-Ion Batteries. Close supervision is for use only. Use only Hoover® recommended attachments and products. • Do not use with wet ...
Product Manual - Page 5

... quickly with heavy insulating tape to collect and recycle these batteries at temperatures outside of in the instructions. Seek medical attention immediately. • Use only the charger (Hoover Model #440010414) supplied by a qualified repair person using only identical replacement parts. • Leaks from battery cells can occur under extreme conditions. Prior to cause...
Product Manual - Page 6

...® Dashboard 5 15 2. Empty Button 2 8. Wall Mount 17. Charging Port 12 18. Getting to know your Hoover® IMPULSECordless Vacuum 1. Battery Level Indicator 3. Boost Mode 6 16 17 7 5. Wand Release Button 12. Handheld Release Button HARD BOOST FLOOR MODE 3 10. Power Trigger 6. Swivel Steering 13. Easy Clean ...
Product Manual - Page 7

What's in the Box? CONTENTS VARY DEPENDING ON THE MODEL PURCHASED. Unit Model BH53000 BH53010CDI BH53020 Crevice Tool ü ü ü Dusting Brush ü ü ü Upholstery Tool Pet Upholstery Tool ü ü All models come with a Handheld, Powered Nozzle, Reach Wand, Charger and Wall Mount. 7
Product Manual - Page 8

TIP: Charging your IMPULSE™ may take up to fully charge the battery. In between uses or when carrying out any maintenance always lie flat on the floor in a suitable location so it clicks ... to recharge. IMPORTANT Use only the charger supplied by the manufacturer to OFF and disconnect all accessories before servicing. 8 IMPORTANT This vacuum cleaner is not free standing.
Product Manual - Page 9

Store the vacuum by placing the unit on the Wall Mount Hook with the hole provided on the wall bracket). 9 Be sure it on the back of the ... near an outlet if you want to the wall. Locate the desired location for the wall bracket. Mounting the Wall Bracket First, fully assemble the vacuum.
Product Manual - Page 10

... be off in charger. NOTE: The charger will take up to 3-4 hours for as long as needed. Charging your IMPULSE™ Charge the battery fully before first use. IMPORTANT Use only the charger supplied by the manufacturer to recharge. NOTE: Due to the...will all pulse when charging and turn off to prevent damage to federal regulations the battery does not come fully charged.
Product Manual - Page 11

..., the selection is ON. 11 IMPORTANT Standard Mode helps reserve battery power for hard to remove debris. Boost Mode: Provides powerful suction for longer runtime. Hard Floor: Light ON Helps reduce scatter of debris on hard floors. The Hoover® Dashboard Battery Level Indicator HARD BOOST FLOOR MODE Select desired cleaning mode...
Product Manual - Page 13

NOTE: When power is getting low, recharge the battery. 4 HARD BOOST FLOOR MODE WARNING Never leave the vacuum cleaner in use, the Hoover® Dashboard will illuminate. 1 Select modes by pressing the buttons on the dashboard. WARNING To reduce the risk of time as this may damage the &#...
Product Manual - Page 14

NOTE: See page 7 to see what accessories are included with your Vacuum as a Handheld Press the Handheld Release Button. Pull to be attached directly onto ...oor in a suitable location so it clicks into place. TIP: All available accessories can be stepped on. Using your IMPULSE™. 3 Push the chosen accessory into the Handheld until it does not become a trip hazard or can be ...
Product Manual - Page 15

... the Reach Wand. 1 2 Choose an accessory (all accessories not available on . IMPORTANT This vacuum cleaner is not free standing. In between uses or when carrying out any maintenance always lie &#...clicks into place. TIP: The Reach Wand can be used for overhead cleaning. 15 Using your IMPULSE™. 3 Push the chosen accessory into the Reach Wand until it does not become a ...
Product Manual - Page 16

... of the trash can to remove excess dirt. 3 The dirt cup can be removed to OFF and disconnect all accessories before servicing. 16 IMPORTANT This vacuum cleaner is not free standing. Maintenance: Emptying the Dirt Cup Hold the Handheld over a trash bin. 1 2 Press the Dirt Empty Button. In between uses or...
Product Manual - Page 17

... filters to dry for up to remove dirt. Dry filters completely, for 24 hours or until water is clear. IMPORTANT Do not use vacuum without the filters or separator in place. 17 Rinse filters under warm water until completely dry before servicing. Clean dirt and debris by...
Product Manual - Page 18

Maintenance: Removing and Replacing the Brush Roll Remove Powered Nozzle from the Powered Nozzle. Slide the Brush Roll Release Button. 1 2 Clear any threads or hair from both ends of ...
Product Manual - Page 19

... dirty. 3. Nozzle/dirt passage clogged. 1. Review dirt cup removal and replacement. (see page 17) 3. Remove filter and clean. (see page 17...battery may be done by an authorized service representative. Charge battery. (see page 16) 2. POSSIBLE SOLUTION 1. WARNING To reduce the risk of personal injury from vacuum Vacuum tools won't pick up Poor suction Vacuum running warm Vacuum...
Product Manual - Page 20

... Part #440012840 Dusting Brush Part #440012841 WHAT TO BUY: Buy Genuine Hoover® Parts & Accessories: If you are in need of a new part, attachment or accessory, visit Hoover.com or Hoover.ca for more information. Having trouble locating an item or model on our site, contact Customer Care at 888 679-2121. Upholstery Tool...
Product Manual - Page 21

...model number and manufacturing code when requesting information or ordering replacement parts. (The model number and manufacturing code for the vacuum appears behind the dirt cup for model... this product. Military Exchange and Canada. SERVICE & WARRANTY FOR HOOVER® IMPULSECORDLESS VACUUM PRODUCT & BATTERY SERVICE INFORMATION ANY SERVICING SHOULD BE DONE BY AN AUTHORIZED SERVICE ...

Similar Questions

Can I Buy A Replacement Battery For This Vacuum?
I need a new battery
(Posted by pmh5555 10 months ago)
How To Replace Battery In Hoover Impulse In Bh53020
I cannot figure out how to replace the battery. Is it replaceable. The lights keep blinking g and wo...
(Posted by Schutt6 1 year ago)
Hoover S1120 Battery
Where can I get a replacement battery? How much does it cost?
(Posted by kpcarlson 11 years ago)
Ask a New Question
Use the box below to post a new question about this Hoover product .
Points & Prizes
  • You can earn points for nearly everything you do on HelpOwl.com
  • You can trade in those points for gift cards at leading retailers such as Amazon.com and Walmart
  • It's that simple!
See How it Works
Create a Free Account

Hoover Manuals

Find free Hoover Hoover IMPULSE Cordless Stick Vacuum manuals and user guides available at ManualOwl.com. Try out our unique manual viewer allowing you to interact with manuals from directly within your browser!

Hoover Reviews

View thousands of Hoover user reviews and customer ratings available at ReviewOwl.com.

Contact Information

Complete Hoover customer service contact information including steps to reach representatives, hours of operation, customer support links and more from ContactHelp.com.

Scoreboard Ratings

See detailed Hoover customer service rankings, employee comments and much more from our sister site.

Hoover Recalls

Find comprehensive Hoover recall information updated hourly on RecallOwl.com.