Get support for HealthRider H79t Treadmill

HealthRider H79t Treadmill Support Question

HealthRider H79t Treadmill Support Question

Find answers below for this question about HealthRider H79t Treadmill.
Need a HealthRider H79t Treadmill manual? We have 1 online manual for this item!
Question posted by mwilley25 on February 28th, 2020

Incline

Incline does not lower, it's at the highest point and nothing happens when I try to lover it

Current Answers

Answer #1: Posted by techyagent on February 29th, 2020 11:25 AM
techyagent

Member since:
June 17th, 2014

Points: 4,799,800
100
points
If the incline moves but only just a bit, it could be a problem as simple as the gearbox on the motor being jammed. We remove the motor from the treadmill, reconnect the wiring, and then try to run the incline motor outside the treadmill. ... If you have voltage but the motor won't move, you need to replace the motor.

Check this link for help

https://www.treadmilldoctor.com/incline-motor-problems

Thanks


Techygirl
Answer #2: Posted by imashu on February 29th, 2020 11:19 AM
imashu

Member since:
February 29th, 2020

Points: 15,570
90
points
The most common symptoms we hear about are that the incline is just running up and/or down and the treadmill won't start. If this is the case or if you cannot get the incline to work, use the incline calibration instructions from our troubleshooting section first. If you have tried recalibration, follow the next steps.
  1. If the incline moves but you it will not operate normally nor calibrate, check the wiring from the incline sensor to the power board. If all looks normal, put it back in calibration and see if you see a blinking "- -" symbol in the incline window when you are calibrating. If not, the incline sensor is bad. We now carry the most common incline sensors in stock so you don't have to replace the entire motor.
  2. If the incline moves but only just a bit, it could be a problem as simple as the gearbox on the motor being jammed. We remove the motor from the treadmill, reconnect the wiring, and then try to run the incline motor outside the treadmill. Many times, this will unjam it if that is the problem and then reinstalling it in the treadmill will get it to work. If you have the same problem or it doesn't run outside the machine and you can hear it try to work, you need to replace the incline motor.
  3. If the incline motor does not move, we need to figure out if the motor is getting voltage. Use a simple multi-meter and set it to AC volts. When you put it into calibration, it tries to calibrate the directions one at a time. Measure across the white and black wires first, then measure across the white and red wires second. If the motor is getting voltage you will read 120VAC (or thereabouts) one one of the measurements. If you have voltage but the motor won't move, you need to replace the motor.
If the incline motor does not move and you have done the voltage test and you do not have any voltage present, there is a problem in the electronics board that supplies the power. If the console is powering the drive motor as normal, you can bet it is getting an incline signal and the power board needs to be replaced (some models have an integrated power board/controller) so if there is only a single board the whole board has to be replaced. It is possible the console is not giving the proper signal but we've never seen it happen in thousands of treadmills.ICON CALIBRATION INSTRUCTIONS- INCLINE

The standard calibration procedure to calibrate an Icon treadmill is done by holding down the speed up and stop keys while inserting the safety key or putting the key in place (if magnetic). If your keypad is not responding, please contact our service dept. because your treadmill keypad has failed or the console computer has failed. In these cases, the keypad can be replaced in limited instances or the console has to be replaced.
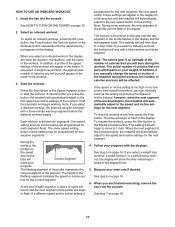
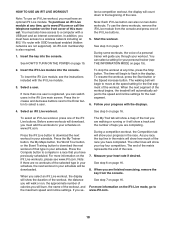
STEP 1

Press the Stop and the Speed Up buttons down at the same time, while inserting the safety key. After you hear two beeps, release the Stop and Speed increase buttons.

STEP 2

Press the Stop key one time. The Time window should read EP:2P. Some newer models may also say FP, Pass, or the like. This means that it passes the EPROM test.

STEP 3

Press either the incline or decline key only once and the incline should calibrate automatically. Let the treadmill raise and lower until it comes to a complete stop.

STEP 4

THIS IS A VERY IMPORTANT STEP BECAUSE YOU WILL GET AN ERROR MESSAGE IF THIS STEP IS SKIPPED. After completing calibration of incline, press the Stop key and then remove the safety key.

STEP 5

Your treadmill should be ready to incline and decline properly now. Test it out!

OR

1. remove safety key
2. press and hold the speed+ and stop keys at the same time
3. Put the safety key in/on and release the keys
4. press stop once
5. hit the incline + arrow and let the incline go the whole way up and down
6. remove safety key and try

OR

Sometimes incline motors will get frozen in position and need broke free. Try this:
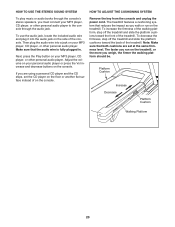
take the motor cover off and take the screw out of the bottom of the incline motor that is attached to the screw assembly. Once you remove the screw you should be able to break the incline motor free. run the incline up and down with the screw still off( laying the treadmill on its side may make this easier). Once it goes up and down (hold the screw so it goes in and out) reattach it then run the calibration described below. If it was just stuck it should work fine.1. remove safety key
2. press and hold the speed+ and stop keys at the same time
3. Put the safety key in/on and release the keys
4. press stop once
5. hit the incline + arrow and let the incline go the whole way up and down
6. remove safety key and tryIf these instructions do not work to fix the incline motor
check your main harness running down the right leg for breaks in the wires or a loose connection if nothings found you can switch the red and black wires on the incline motor terminal block and see if it goes down. If it does you know you are only getting voltage to one side of the motor. There is a schematic under the motor hood that tells you what the voltage should be when you press the up or down keys. Use a multi-meter to see if you are getting the correct voltage coming from the console to the motor control board and then from the board to the motor. If no voltage from console-replace console if you have voltage from console but not from board - replace board and finally if you have voltage from console and from board replace motor. You will need to test the voltage both when pressing the up key and the down key.

Related HealthRider H79t Treadmill Manual Pages

English Manual - Page 2

... decal. TABLE OF CONTENTS WARNING DECAL PLACEMENT 2 IMPORTANT PRECAUTIONS 3 BEFORE YOU BEGIN 5 ASSEMBLY 6 OPERATION AND ADJUSTMENT 13 HOW TO FOLD AND MOVE THE TREADMILL 21 TROUBLESHOOTING 22 EXERCISE GUIDELINES 25 PART LIST 26 EXPLODED DRAWING 28 ORDERING REPLACEMENT PARTS Back Cover LIMITED WARRANTY Back Cover WARNING DECAL PLACEMENT This drawing shows the...
English Manual - Page 3

... front cover of this manual and all times. 15. To purchase a surge suppressor, see your physician. Wear appropriate exercise clothes when using the treadmill. 18. Never use an extension cord. 12. Place the treadmill on the treadmill at a time. 10. carrying 15 or more than one person on a level surface, with pre-existing health...
English Manual - Page 4

... while it is holding the frame securely in -home use , before cleaning the treadmill, and before performing the mainte- less instructed to raise, lower, or move the treadmill until it is not in a commercial, rental, or institutional setting. 27. Over exercising may result in this manual. Never remove the motor hood un- nance and...
English Manual - Page 5

...exercising, the unique treadmill can be folded up, requiring less than half the floor space of this manual. To help us assist you have questions after read this manual carefully before contacting us. And when you for selecting the revolutionary HEALTHRIDER® H79T treadmill...workouts at home more enjoyable and effective. The H79T treadmill offers an impressive selection of this manual. ...
English Manual - Page 6

...Some small parts may be transferred to identify the assembly hardware. Note: The underside of the treadmill walking belt is the key number of the part, from the PART LIST near the end ...is the quantity needed for assembly. ASSEMBLY To hire an authorized service technician to assemble the treadmill, call 1-800-445-2480. Extra hardware may have been preassembled. Do not dispose of ...
English Manual - Page 11

.... 11. Press the Left and Right Base Covers (83, 84) onto the Base (91) until they snap into place. 83 7 8 91 13. Then, press the Incline increase button once. Firmly tighten the four 3/8" x 2 3/4" Patch Bolts (7) and then the four 3/8" x 1 1/4" Patch Bolts 12 84 (8) (only one side is shown...
English Manual - Page 12

... included. the hex key is completed. If there are sheets of the Storage Latch (58) to adjust the walking belt (see HOW TO LOWER THE TREADMILL FOR USE on the treadmill decals, remove the plastic. Raise the Frame (57) to the position shown. 14 Have a second person hold the Frame until this step...
English Manual - Page 13

... substances will not fit the outlet, have a UL-suppressed voltage rating of 400 volts or less and a minimum surge dissipation of electric shock. IMPORTANT: The treadmill is for use ...- Check with AFCI-equipped outlets. Grounded Outlet Box Surge Suppressor Grounding Pin Grounding Pin Your treadmill, like extending from the adapter must be used only until a properly grounded outlet (see ...
English Manual - Page 14

...see page 19. Note: The console can even measure your wireless network through an effective exercise session. To turn on the front cover of this manual refer to miles. To use... time you can change the speed and incline of the treadmill with your heart rate using the treadmill. CONSOLE DIAGRAM FEATURES OF THE CONSOLE The treadmill console offers an impressive array of features ...
English Manual - Page 15

... Speed buttons. As you hold down the button, the speed setting will be selected automatically. 3. if you exercise, change the incline of the treadmill, press the Incline increase or decrease button or one of the numbered Quick Incline buttons. Select the manual mode. Find the clip at the left. 2. The time will light. Reset IMPORTANT...
English Manual - Page 16

... set the default menu). The Calorie tab will show a profile of the incline settings of the treadmill 6. As you have burned. The Speed tab will show the strength of your progress. Next, remove the key from the console. When you exercise, the flashing rectangle will indicate the approximate intensity level of your palms...
English Manual - Page 17

...will sound and the next segment of calories that you manually change the speed or incline of the treadmill during the workout, the number of the elapsed time. 5. Note: During some ...When the next segment of the workout begins, the treadmill will appear in the display. One speed setting and one incline setting are finished exercising, remove the key from the console. ting for...
English Manual - Page 18

... workout of the workout begins, the treadmill will download, you must have completed. To stop the workout at any time, go to the speed and incline settings for the first segment of the...your top four competitors. For more information on www.iFit.com. Note: If there are finished exercising, remove the key from the console and press one of the race. To purchase an iFit...
English Manual - Page 19

... connected, you plug in a store. Press the Incline increase and decrease buttons to check the status of hours the treadmill has been used if the treadmill is turned on or turn on , the word ON... Press the Enter button repeatedly to a stop. To view distance in miles, select ENGLISH. The lower display will show the words USB/SD MODULE. THE COOL DOWN MODE To select the cool down the...
English Manual - Page 20

... or other personal audio player. To increase the firmness of the walking platform, step off the treadmill and slide the platform cushions toward the front of on your MP3 player, CD player, or ... sure that reduces the impact as you weigh, the firmer the walking platform should be. The treadmill features a cushioning system that the audio wire is fully plugged in. To use the audio jack...
English Manual - Page 21

...F (30° C). 2. Place one foot against a wheel, and carefully lower the treadmill. See drawing 2. Hold the metal frame firmly in the storage position. CAUTION...treadmill will roll on the frame, and do not drop the frame. HOW TO FOLD AND MOVE THE TREADMILL HOW TO FOLD THE TREADMILL To avoid damaging the treadmill, adjust the incline to the lowest position before you fold the treadmill...
English Manual - Page 22

...press the switch back in . 22 If the power cord is plugged into the console. IMPORTANT: The treadmill is plugged in a store. c Tripped Reset c. If the displays are still lit, see the ... switch back in , make sure that applies, and follow the steps listed. TROUBLESHOOTING Most treadmill problems can be solved by following the simple steps below. Use only a single-outlet surge...
English Manual - Page 23

... Magnet and the Reed Switch is calibrated, remove the key from the console. b 2-3 in . Idler Roller Screws c. The treadmill will recalibrate the incline system. Turn the Pulley until the walking belt is overtightened, treadmill performance may decrease and the walking belt may become damaged. Reattach the Motor Hood (not shown) and run the...
English Manual - Page 24

If the walking belt is off -center or slips when walked on the treadmill for a few minutes. Using the hex key, turn both idler roller screws clockwise, 1/4 of a ...Repeat until the walking belt is centered. If lines appear in the power cord, insert the key, and run the treadmill for a few minutes. SYMPTOM: The walking belt is off -center, first remove the key and UNPLUG THE POWER...
English Manual - Page 26

... Magnet Reed Switch Wire Tie Frame Storage Latch Drive Motor Motor Belt Right Rear Foot Right Frame Cover Left Frame Cover Hex Key Incline Frame Spacer Incline Motor Spacer Incline Motor Incline Frame Frame Spacer Controller Electronics Plate Belly Pan Post Power Switch Power Cord Grommet Belly Pan Upright Wire Left Upright Cap Right...

Similar Questions

My Healthrider R65 Powers Up But Can't Adjust Time And Incline.
Healthrider R65 powers up but can't adjust the speed or incline. Can I fix it myself?
(Posted by trudycondon 1 year ago)
Help Me Fix My Incline
hi guys!I have just picked up an old health rider H85T in pristine condition, the walking belt it br...
(Posted by jessicalouise31 2 years ago)
Incline System
how to recalibrate incline sy
(Posted by Anonymous-156805 8 years ago)
Groundwire Assembly
groundwire on console frame hooks up to what H79t
(Posted by fish0213 10 years ago)
Ask a New Question
Use the box below to post a new question about this HealthRider product .
Points & Prizes
  • You can earn points for nearly everything you do on HelpOwl.com
  • You can trade in those points for gift cards at leading retailers such as Amazon.com and Walmart
  • It's that simple!
See How it Works
Create a Free Account

HealthRider Manuals

Find free HealthRider H79t Treadmill manuals and user guides available at ManualOwl.com. Try out our unique manual viewer allowing you to interact with manuals from directly within your browser!

HealthRider Reviews

View thousands of HealthRider user reviews and customer ratings available at ReviewOwl.com.

Contact Information

Complete HealthRider customer service contact information including steps to reach representatives, hours of operation, customer support links and more from ContactHelp.com.

Scoreboard Ratings

See detailed HealthRider customer service rankings, employee comments and much more from our sister site.