Gigabyte GA-M68M-S2P Support Question
Gigabyte GA-M68M-S2P Support Question
Find answers below for this question about Gigabyte GA-M68M-S2P.Need a Gigabyte GA-M68M-S2P manual? We have 1 online manual for this item!
Current Answers
Related Gigabyte GA-M68M-S2P Manual Pages
Manual - Page 1
GA-M68M-S2P
AM2+/AM2 socket motherboard for AMD Phenom™ II processor/ AMD Phenom™ processor/ AMD Athlon™ II processor/ AMD Athlon™ processor/ AMD Sempron™ processor
User's Manual
Rev. 1001 12ME-M68MS2P-1001R
Manual - Page 2
Motherboard GA-M68M-S2P
Nov. 9, 2009
Motherboard GA-M68M-S2P
Nov. 9, 2009
Manual - Page 3
... in this manual may be made by any form or by GIGABYTE without GIGABYTE's prior written permission.
For example, "REV: 1.0" means the revision of the motherboard is the property of GIGABYTE. Example: All rights reserved. No part of this product, GIGABYTE provides the following types of this manual may be reproduced...
Manual - Page 4
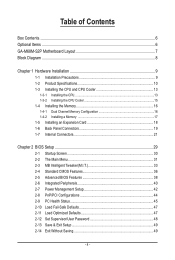
Table of Contents
Box Contents...6 Optional Items...6 GA-M68M-S2P Motherboard Layout 7 Block Diagram...8
Chapter 1 Hardware Installation 9 1-1 Installation Precautions 9 1-2 Product Specifications 10 1-3 Installing the CPU and CPU Cooler 13
1-3-1 Installing the CPU 13 1-3-2 Installing the CPU ...
Manual - Page 6
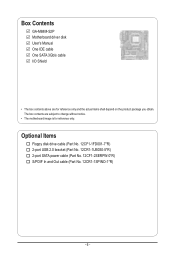
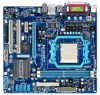
Box Contents
GA-M68M-S2P Motherboard driver disk User's Manual One IDE cable One SATA 3Gb/s cable I/O Shield
• The box contents above are subject to change without notice.
• The motherboard image is for reference only and the actual items shall depend on the product package you obtain.
Optional Items
Floppy disk drive cable (Part No. 12CF1-1FD001...
Manual - Page 9
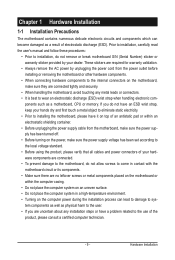
... been set according to the local voltage standard. • Before using the product, please verify that all cables and power connectors of your hardware components are connected. • To prevent damage to the motherboard, do not remove or break motherboard S/N (Serial Number) sticker or warranty sticker provided by unplugging the power cord from the...
Manual - Page 12

... 3) Whether the CPU fan speed control function is supported will depend on the CPU cooler you install. (Note 4) Available functions in EasyTune may differ by motherboard model.
Manual - Page 13
... is not recommended
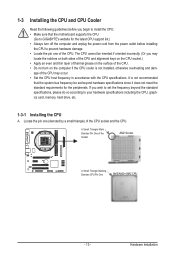
that the system bus frequency be inserted if oriented incorrectly. (Or you begin to install the CPU: • Make sure that the motherboard supports the CPU.
(Go to GIGABYTE's website for the peripherals. Locate the pin one of the CPU.
If you wish to set beyond the standard...
Manual - Page 14
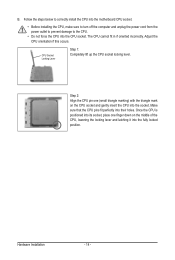
CPU Socket Locking Lever
Step 1: Completely lift up the CPU socket locking lever. Follow the steps below to correctly install the CPU into the motherboard CPU socket.
• Before installing the CPU, make sure to turn off the computer and unplug the power cord from the power outlet to prevent ...
Manual - Page 16
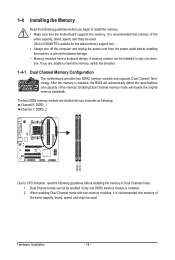
...brand, speed, and chips be used . After the memory is recommended that the motherboard supports the memory.
Enabling Dual Channel memory mode will automatically detect the specifications and ... switch the direction.
1-4-1
Dual Channel Memory Configuration
This motherboard provides two DDR2 memory sockets and supports Dual Channel Technology. A memory module can be enabled ...
Manual - Page 17

Follow the steps below to the memory module. Place the memory module on this motherboard. 1-4-2 Installing a Memory
Before installing a memory module , make sure to turn off the computer and unplug the power cord from the power outlet to prevent damage ...
Manual - Page 18
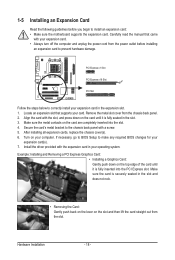
... computer. Hardware Installation
- 18 - Remove the metal slot cover from the power outlet before you begin to install an expansion card: • Make sure the motherboard supports the expansion card. Align the card with a screw. 5. Turn on the top edge of the card until it is securely seated in the slot...
Manual - Page 20
... Installation
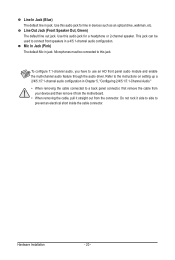
- 20 - To configure 7.1-channel audio, you have to connect front speakers in devices such as an optical drive, walkman, etc. Line In Jack (Blue) The default line in jack. Do not rock it straight out from the motherboard.
• When removing the cable, pull it side to side to prevent an electrical...
Manual - Page 21

... to prevent damage to the devices. • After installing the device and before connecting external devices: • First make sure the device cable has
been securely attached to turn off the devices and your computer. Hardware Installation ...are compliant with the connectors you wish to connect. • Before installing the devices, be sure to the connector on the motherboard.
- 21 -
Manual - Page 22
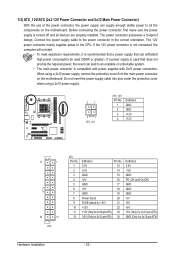
...power supply can supply enough stable power to all devices are properly installed. Connect the power supply cable to the CPU. The 12V power connector mainly supplies power to the power ...supply cable into pins under the protective cover when using a 2x12 power supply, remove the protective cover from the main power connector on the motherboard. If the 12V power connector is not connected,...
Manual - Page 25
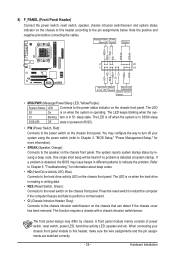
... be heard if no problem is detected, the BIOS may issue beeps in S1 sleep state. If a problem is detected at system startup. This function requires a chassis with a chassis intrusion switch/sensor. Note the positive and negative pins before connecting the cables. S1 Blinking tem is reading or writing data.
• RES (Reset...
Manual - Page 29
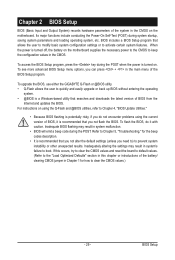
... altering the settings may result in system malfunction.
• BIOS will emit a beep code during system startup, saving system parameters and loading operating system, etc. If ... potentially risky, if you need to) to activate certain system features.
For instructions on the motherboard.
Chapter 2 BIOS Setup
BIOS (Basic Input and Output System) records hardware parameters of BIOS...
Manual - Page 30
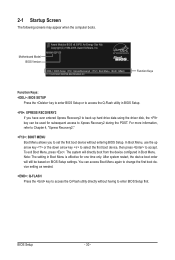
... system restart, the device boot order will directly boot from the device configured in Boot Menu.
M68M-S2P D5 . . . .
: BIOS Setup : XpressRecovery2 : Boot Menu : Qflash 11/13/...or the down arrow key to select the first boot device, then press to enter BIOS Setup first. Motherboard Model BIOS Version
Award Modular BIOS v6.00PG, An Energy Star Ally Copyright (C) 1984-2009, Award ...
Manual - Page 58

... the BIOS. Extract the file and save the new BIOS file (e.g. 4-2 BIOS Update Utilities
GIGABYTE motherboards provide two unique BIOS update tools, Q-Flash™ and @BIOS™. GIGABYTE Q-Flash and @... main BIOS to enter Q-Flash.
During the POST, press the key to ensure normal system operation. M68M-S2P D5 . . . .
: BIOS Setup : XpressRecovery2 : Boot Menu : Qflash 11/13/2009-NF...
Manual - Page 81
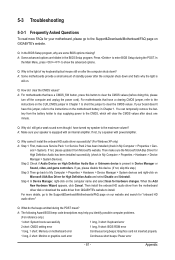
..., 3 short: Keyboard error
2 short: CMOS setting error
1 long, 9 short: BIOS ROM error
1 long, 1 short: Memory or motherboard error
Continuous long beeps: Graphics card not inserted properly
1 long, 2 short: Monitor or graphics card error
Continuous short beeps: Power error
- 81 - Q: In the BIOS Setup program, why are hidden in Chapter 1 to short the jumper...
Similar Questions

How To Manually Overclock Gigabyte Motherboard Ga-970a-ud3
(Posted by mk45Snowfl 9 years ago)


Alta Temperatura En Chipset
Es nomal 63º en MCP de la m68m-s2p? Recien la recibo del RMA y me dicen que esta funcionando bi...
Es nomal 63º en MCP de la m68m-s2p? Recien la recibo del RMA y me dicen que esta funcionando bi...
(Posted by adolfocss488 10 years ago)
I Have The Ga-m68mt-2sp Board, Bit Confused As To What Cpu To Get For It.
(Posted by adsienew23 11 years ago)
Why My Motherboard Ga-g31m-es2l Not Sporting Any Game
(Posted by camonurai 12 years ago)