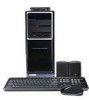
Gateway LX6810-01 Support Question
Gateway LX6810-01 Support Question
Find answers below for this question about Gateway LX6810-01 - LX - 8 GB RAM.Need a Gateway LX6810-01 manual? We have 5 online manuals for this item!
Question posted by lalizzy on April 3rd, 2014
How Upgrade Gateway Lx6810-01 Processor
The person who posted this question about this Gateway product did not include a detailed explanation. Please use the "Request More Information" button to the right if more details would help you to answer this question.
Current Answers
Related Gateway LX6810-01 Manual Pages
User Guide - Page 17

...try adding more memory. Storage Devices If you need a tape backup (TBU) drive.
www.gateway.com
9 Laser printers are better than inkjet printers. If you probably need additional storage space ...than inkjet printers when you want to store data. Tape drive cartridges can store 2 GB, 20 GB, 40 GB, 130 GB, or more information about setting up a UPS, see "Creating CDs and DVDs" on...
User Guide - Page 37
Gateway Web site
Support Home
To get the latest software updates for BIOS and driver upgrades.
Click Support Home, then click General Tutorials to access an extensive...Tools to access utilities to help you get a list of Gateway telephone numbers for non-technical issues, like the status of how-to locate your system. www.gateway.com
29 By entering your serial number, you manage your ...
User Guide - Page 198
...dilution of screws ■ A grounding wrist strap (available at most electronic stores)
190
www.gateway.com
The telephone must be directly connected to a telephone jack and cannot be connected to place... which to set your computer. ■ Has enough room to your computer.
Chapter 11: Upgrading Your Computer
Tips & Tricks
When cleaning the case, do not use abrasive or solvent cleaners ...
User Guide - Page 200
Chapter 11: Upgrading Your Computer
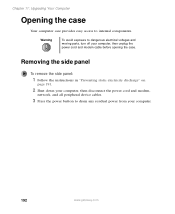
Opening the case
Your computer case provides easy access to drain any residual power from your computer.
192
www.gateway.com
Removing the side panel
To remove the side panel:
1 Follow the instructions in "Preventing static electricity discharge" on
page 191.
2 Shut down your computer, ...
User Guide - Page 202
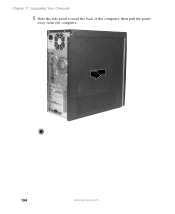
Chapter 11: Upgrading Your Computer
5 Slide the side panel toward the back of the computer, then pull the panel
away from the computer.
194
www.gateway.com
User Guide - Page 204
Chapter 11: Upgrading Your Computer
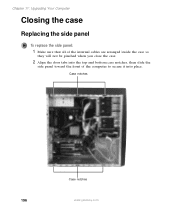
Closing the case
Replacing the side panel
To replace the side panel:
1 Make sure that all of the internal cables are arranged inside ... bottom case notches, then slide the
side panel toward the front of the computer to secure it into place. Case notches
Case notches
196
www.gateway.com
User Guide - Page 206
Chapter 11: Upgrading Your Computer
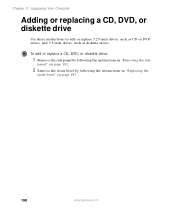
Adding or replacing a CD, DVD, or diskette drive
Use these instructions to add or replace 5.25-inch drives, such as CD or DVD ... "Removing the side
panel" on page 192.
2 Remove the front bezel by following the instructions in "Replacing the
front bezel" on page 197.
198
www.gateway.com
User Guide - Page 208
Chapter 11: Upgrading Your Computer
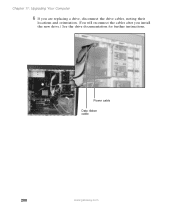
6 If you are replacing a drive, disconnect the drive cables, noting their
locations and orientation. (You will reconnect the cables after you install the new drive.) See the drive documentation for further instructions.
Power cable Data ribbon cable
200
www.gateway.com
User Guide - Page 210

... connection). The red-striped
edge of the data ribbon cable indicates Pin 1 and corresponds with Pin 1 on the drive (typically on
page 196.
202
www.gateway.com Chapter 11: Upgrading Your Computer
11 Reconnect the drive cables using your notes from Step 3.
User Guide - Page 212

... locks the hard drive into the left rear mounting screw hole in the new drive.
6 Slide the new drive in the drive bay. Chapter 11: Upgrading Your Computer
3 Press the drive release latch, then slide the drive out of the drive bay.
4 Set the jumpers on the drive. See the drive...
User Guide - Page 214
... for further instructions.
4 If you are replacing a card, disconnect any cables that secures the
card to the system. Chapter 11: Upgrading Your Computer
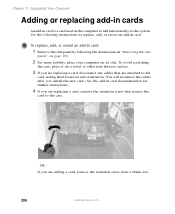
Adding or replacing add-in cards
An add-in card is a card used in the computer to add functionality to the case... or other non-abrasive surface.
3 If you are adding a card, remove the retention screw from a blank slot.
206
www.gateway.com
User Guide - Page 216
...196.
11 See the documentation that you install the correct type of the add-in card with the retention screw.
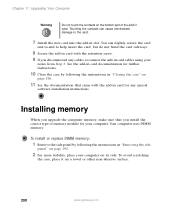
9 If you upgrade the computer memory, make sure that came with the add-in card for further instructions.
10 Close the case by following the instructions ... Install the new card into the add-in "Removing the side
panel" on a towel or other non-abrasive surface.
208
www.gateway.com
User Guide - Page 218
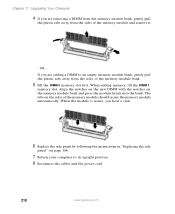
... memory module and remove it.
- If you are adding a DIMM to its upright position.
8 Reconnect the cables and the power cord.
210
www.gateway.com Chapter 11: Upgrading Your Computer
4 If you are removing a DIMM from the memory module bank, gently pull
the plastic tabs away from the sides of the memory...
User Guide - Page 220
Chapter 11: Upgrading Your Computer
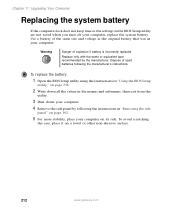
Replacing the system battery
If the computer clock does not keep time or the settings in your ...the side
panel" on page 192.
5 For more stability, place your computer on a towel or other non-abrasive surface.
212
www.gateway.com
Use a battery of the same size and voltage as the original battery that was in the BIOS Setup utility are not saved when...
User Guide - Page 222
Chapter 11: Upgrading Your Computer
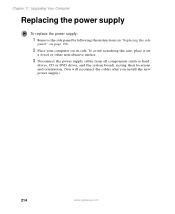
Replacing the power supply
To replace the power supply:
1 Remove the side panel by following the instructions in "Replacing the side
panel" ...DVD drives, and the system board), noting their locations and orientation. (You will reconnect the cables after you install the new power supply.)
214
www.gateway.com To avoid scratching the case, place it on its side.
User Guide - Page 224
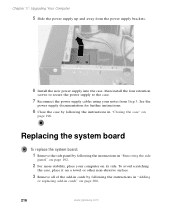
Chapter 11: Upgrading Your Computer
5 Slide the power supply up and away from Step 3. To avoid scratching
the case, place ... the system board:
1 Remove the side panel by following the instructions in "Closing the case" on page 206.
216
www.gateway.com See the
power supply documentation for further instructions.
8 Close the case by following the instructions in "Removing the side
panel"...
User Guide - Page 226

Chapter 11: Upgrading Your Computer
7 Lift the system board up and out of the case. 8 Align the new system board on
page 196.
218
www.gateway.com See
the system board documentation for further instructions.
10 Reinstall the memory modules by following the instructions in "Installing
memory" on page 208.
11 ...
User Guide - Page 247
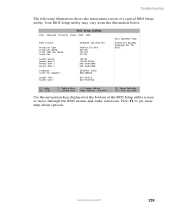
... BIOS Setup utility. Press F1 to move through the BIOS menus and make selections.
www.gateway.com
239 BIOS Setup Utility Main Advanced Security Power Boot Exit
BIOS Version
Processor Type Processor Speed Front Side Bus Speed Cache Ram
System Memory Memory Bank 0 Memory Bank 1 Memory Bank 2
Language: Cache ECC Support:
System Time: System...
User Guide - Page 275
...power supply (UPS) 9,
15, 136
updating device drivers 28
updating Norton AntiVirus 166 upgrading 189
UPS 9, 15, 136 USB port 3, 5, 24
user accounts adding 129 switching...59 Web site 59
connecting to 60 downloading files 61 Gateway 28 window 36 close button 37
closing 37, 53
maximize ...37 minimize button 37 title bar 37
Windows clipboard 41 desktop 32
Files and Settings Transfer Wizard 154
installing 186 ...
Recovery Guide - Page 13

...This option saves your data files. Files are done. You are restored to date. www.gateway.com
13 Your computer restarts, and Windows finishes its setup and installation. 9 Reconnect your hard drive except...- Make sure that you back up to your hard drive.
You still need at least 4 GB of Windows XP. Caution
The Full System Restore option deletes all files on your Internet cable and...
Similar Questions

How To Install Coprocessor For Gateway Lx6810-01
(Posted by IMtper 9 years ago)

What Extra Hard Drive Works For Gateway Lx6810-01
(Posted by Ruscacou 9 years ago)

Gateway Lx6810-01 Screen Does Not Come On
(Posted by datgrgei 10 years ago)

Can't Get To Bios On Gateway Lx6810-01
(Posted by agGreg 10 years ago)
