Electrolux EIED55HIW Support Question
Electrolux EIED55HIW Support Question
Find answers below for this question about Electrolux EIED55HIW - 8.0 cu. Ft. Electric Dryer.Need a Electrolux EIED55HIW manual? We have 6 online manuals for this item!
Question posted by barclayn6 on January 24th, 2022
How Do I Get The 'key Stuck' Button To Stop. I Get This On A Number Of Differen
The "key stuck" warning is popping up with 3 different cycle options. how do you get this to stop?
Current Answers
Answer #1: Posted by techyagent on January 24th, 2022 4:02 PM
techyagent

Member since:
June 17th, 2014 Points: 4,799,800

Member since:
June 17th, 2014 Points: 4,799,800
Answer #2: Posted by SonuKumar on January 25th, 2022 9:06 AM
SonuKumar

Member since:
May 9th, 2021 Points: 16,596,890
Member since:
May 9th, 2021 Points: 16,596,890
https://www.hunker.com/13407547/key-stuck-message-on-an-electrolux-dryer
How to reset my Electrolux dryer?
To reset your Electrolux dryer, press and hold the "temperature" and "dryness" buttons simultaneously. Keep these buttons depressed for at least six seconds to reset the machine. If this doesn't clear your error code, you likely need service.
https://www.manualslib.com/manual/408360/Electrolux-Eied55hiw-8-0-Cu-Ft-Electric-Dryer.html?page=2
Please respond to my effort to provide you with the best possible solution by using the "Acceptable Solution" and/or the "Helpful" buttons when the answer has proven to be helpful.
Regards,
Sonu
Your search handyman for all e-support needs!!
Related Electrolux EIED55HIW Manual Pages
Complete Owner's Guide (English) - Page 2

...• Normal Operating Sounds 7 • Operating Your Dryer 8-9 • Cycle Selection 10-12 • Drying Temperature 13 • Dryness Level 14
• Options 15-16 • Dryer Features 13 • Dryer Settings Chart 14 Care & Cleaning 19 Solutions to Common... quick reference
Purchase date
Electrolux model number
Electrolux serial number
NOTE
Registering your new appliance.
Complete Owner's Guide (English) - Page 5
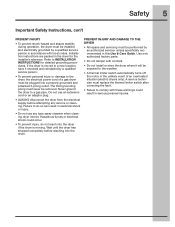
... person.
• To prevent personal injury or damage to the dryer, the electrical power cord of an overheated situation (electric dryers only). Installation instructions are packed in serious personal injuries. Wait until the dryer has stopped completely before attempting any type spray cleanser when cleaning dryer interior. A service technician must be plugged into a properly grounded and...
Complete Owner's Guide (English) - Page 8
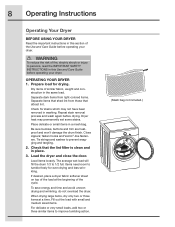
WARNING
To reduce the risk of fire, electric shock or injury to persons, read the IMPORTANT SAFETY INSTRUCTIONS in place.
3.
Dryer heat may not have been removed in this Use and Care Guide before operating your dryer. fasten hooks and Velcro®-like fasteners.
If desired, place a dryer fabric softener sheet on top of the Use...
Complete Owner's Guide (English) - Page 9
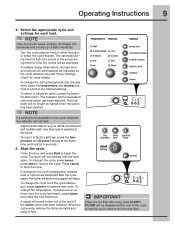
... displayed at the end of static electricity.
NOTE
If a setting is selected in either direction to stop the cycle.
Turn the cycle selector knob in the future. A suitable drying temperature, dryness level and options will be indicated for 5 seconds.
5. Start the cycle. To change the temperature, dryness level or options once the cycle has begun, press pause and...
Complete Owner's Guide (English) - Page 10
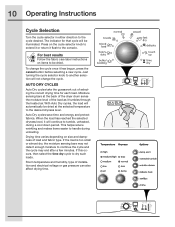
...has begun, press the cancel button before selecting a new cycle. Just turning the cycle selector knob to tumble, unheated, during unloading. Auto Dry cycles save time and energy and ...Cycle Selection
Turn the cycle selector in either direction to dry such loads. Press on the cycle selector knob to the console. AUTO DRY CYCLES
Auto Dry cycles take the guesswork out of installation and electrical...
Complete Owner's Guide (English) - Page 12
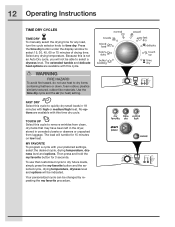
... loads, simply press the my favorite button and the selected cycle, drying temperature, dryness level and options will tumble for 3 seconds. WARNING
FIRE HAZARD
To avoid fire hazard, do not use that may have been left in the dryer, stored in 18 minutes with your preferred settings, select the desired cycle, drying temperature, dryness level and...
Complete Owner's Guide (English) - Page 13
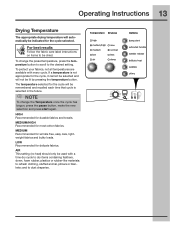
... free, easy care, lightweight fabrics and bulky loads. AIR This setting (no heat) should only be used with every cycle. To change the Temperature once the cycle has begun, press the pause button, make the new selection and press start again. MEDIUM Recommended for delicate fabrics.
To protect your fabrics, not all temperatures...
Complete Owner's Guide (English) - Page 14
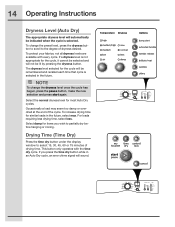
... increase drying time for similar loads in an Auto Dry cycle, an error chime signal will not be lit by pressing the dryness button. This button only operates with every cycle. Select the normal dryness level for the cycle will automatically be indicated when the cycle is selected. If you wish to partially dry before hanging...
Complete Owner's Guide (English) - Page 15
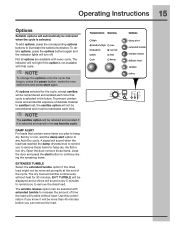
... will not light if the option is selected in the my favorite cycle.
The wrinkle release option can remove the load. To add options, press the corresponding options buttons to any Auto Dry cycle. NOTE
To change the options once the cycle has begun, press the pause button, make the new selections and press start button to remind you know it...
Complete Owner's Guide (English) - Page 16
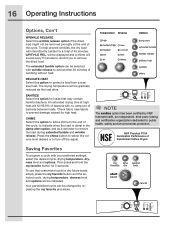
... promptly at high heat will be selected with your preferred settings, select the desired cycle, drying temperature, dryness level and options.
Your personalized cycle can be indicated. CHIME Select this option to remove the dried load. Press the chime button to select the volume level desired or to prevent damage caused by high heat. WRINKLE...
Complete Owner's Guide (English) - Page 17
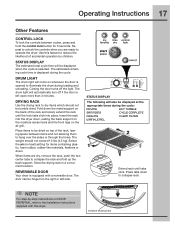
...(4.5 kg).
Insert the rack into place.
Extend rack until the lock tabs click into the dryer drum, resting the back support on the moisture sensor bars and the front legs on the...operation by -step instructions on the back of the rack, leaving space between cycles, press and hold the control lock button for items containing plastic, foam rubber, rubber-like materials, feathers or down....
Complete Owner's Guide (English) - Page 21
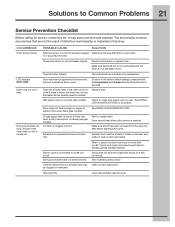
... and hold the temperature and dryness buttons at least 4 inches in INSTALLATION INSTRUCTIONS. See INSTALLATION INSTRUCTIONS for replacement. LP gas supply tank is open (gas models). Exhaust duct requirements have enough air supply to temporarily perform a repeating demo cycle. Exhaust duct must be clogged or restricted. Electric dryer is blown, the drum may save...
Complete Owner's Guide (English) - Page 22
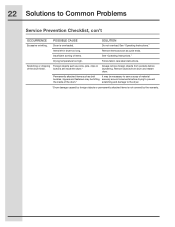
.... buttons are inside the dryer.*
Always remove foreign objects from drum and restart dryer. ...Permanently attached items such as belt
It may be necessary to sew a scrap of items.
See "Operating Instructions." Items left in dryer too long. Drying temperature too high.
SOLUTION
Do not overload. Scratching or chipping Foreign objects such as cycle ends.
22 Solutions to the dryer...
Complete Owner's Guide (English) - Page 23
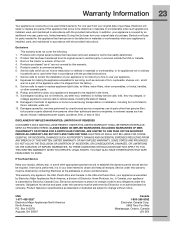
...Product features or specifications as -is covered by contacting Electrolux at the addresses or phone numbers below. In addition, your appliance. 8. Products purchased "as described or illustrated are ...OR ANY IMPLIED WARRANTY.
This warranty only applies in accordance with original serial numbers that has been transferred from persons other cosmetic parts. 10. Obligations for this...
Wiring Diagram (All Languages) - Page 1
... Board.
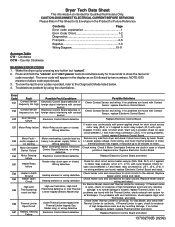
Laundry load too Remove any load from dryer and check if drum turns freely by pressing any button but "cancel". 2. Check if Motor Centripetal Switches are stuck in the...-2, J7-1, J7-3) with cycle
Wiring defective
stopped. NOTE: E00 means no wiring problems
found , replace Electronic Control Board and retest. Troubleshoot problem by two numbers. If no further damage...
Wiring Diagram (All Languages) - Page 2
... Thermistor and Inlet Control Thermistor
EF8
Key Stuck
Console button or Interface Board Check buttons for activation when pressed. Exhaust Control...button to save time at wake up, the welcome screen can be between 4.9K Ohm and 6.2K Ohm at terminal block for 6 seconds. 3. Within 10 seconds after pressing "cancel", press any load from the dryer and press "start pause" to wake up " cycle...
Wiring Diagram (All Languages) - Page 3

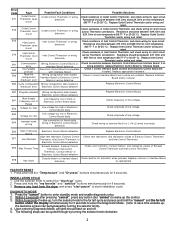
... error code (s): Press and hold the far left button under the display and "cancel" buttons simultaneously for 6 seconds.
3 Press the "cancel" and far left key under the display simultaneously for 3 seconds.
6. Look for beep and button ID number in clockwise direction
"MOTOR CW"
4
Lights / Buttons test + Motor CW
Lights / Buttons test + Motor CW +
igniter
Check all Lights...
Installation Instructions (All Languages) - Page 5
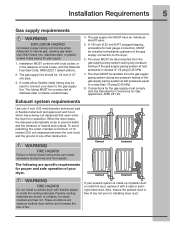
...testing of the gas supply connection to natural gas, causing gas leaks.
WARNING
FIRE HAZARD
Failure to installing dryer duct. Also, ensure the present duct is in operation. If codes ... Installation MUST conform with flexible plastic or metal foil venting materials. When the dryer stops, the dampers automatically close to prevent drafts and the entrance of any lint prior to...
Installation Instructions (All Languages) - Page 6
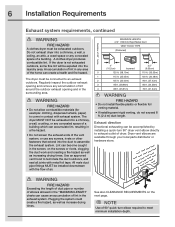
... ft. (30.48m)
2
105 ft. (32.00m)
90 ft. (27.43m)
3
95 ft. (28.96m)
80 ft. (24.38m)
4
85 ft. (25.91m)
70 ft. (21.34m)
WARNING
FIRE HAZARD
• Do not install flexible plastic or flexible foil venting material.
• If installing semi-rigid venting, do not exceed 8 ft. (2.4 m) duct length.
A clothes dryer produces combustible lint.
Number...
Installation Instructions (All Languages) - Page 18

... (on electric models) and presence of cycle completion.
18 Installation Instructions
WARNING
FIRE HAZARD
Before operating the dryer, make the necessary corrections before you attempt to use the dryer.
3.Your dryer will exit the Installation Cycle and return to normal operation the next time you wish to immediately run the dryer through a drying cycle, press the cancel button to put...
Similar Questions

Frigerdaire Dryer
model fer641fs0 wiring diagram. Where does green and double red wire g
model fer641fs0 wiring diagram. Where does green and double red wire g
(Posted by fredporche7 8 years ago)
Error Code E63 For Electrolux Dryers Model Number Eied55hiwo. What Is The Part
most often used to repair the problem?
most often used to repair the problem?
(Posted by arlenbobwy 9 years ago)

What Does It Mean When Dryer Will Not Stop When Door Is Open
(Posted by gniesanm 9 years ago)

Dryer Stopped Turning.
Dryer stopped spinning after finding clothing wedged inbetween door and drum. After pulling out wedg...
Dryer stopped spinning after finding clothing wedged inbetween door and drum. After pulling out wedg...
(Posted by scotehoffman 10 years ago)

Key Stuck Code
During a wash cycle the washer stops and displays "Key Stuck" on the screen. When i hit cancel or pa...
During a wash cycle the washer stops and displays "Key Stuck" on the screen. When i hit cancel or pa...
(Posted by john3 11 years ago)