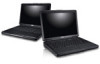
Dell Vostro 1540 Support Question
Dell Vostro 1540 Support Question
Find answers below for this question about Dell Vostro 1540.Need a Dell Vostro 1540 manual? We have 2 online manuals for this item!
Question posted by kirIbr on August 27th, 2013
How To Remove Vostro 1540 Remove Key Board
The person who posted this question about this Dell product did not include a detailed explanation. Please use the "Request More Information" button to the right if more details would help you to answer this question.
Current Answers
Related Dell Vostro 1540 Manual Pages
User Manual - Page 3
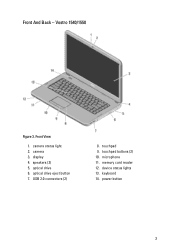
Front And Back - camera 3. speakers (2) 5. microphone 11. display 4. optical drive 6. touchpad buttons (2) 10. memory card reader 12. power button
3 Front View
1. camera status light 2. device status lights 13. keyboard 14. optical drive eject button 7. USB 2.0 connectors (2)
8. Vostro 1540/1550
Figure 3. touchpad 9.
User Manual - Page 6

... Support and select the option to view information about your computer at least once before you turn on system board integrated video
• Intel HD Graphics 2000 • Intel HD Graphics 3000
Discrete:
Vostro 1440/Vostro 1540
Vostro 1440 Vostro 1450
Intel HD graphics
AMD Radeon HD6450M AMD Radeon HD6470M
Memory Memory connector
two SODIMM slots
6
User Manual - Page 7
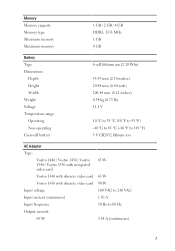
... 95 °F) -40 °C to 65 °C (-40 °F to 149 °F) 3 V CR2032 lithium ion
AC Adapter Type:
Vostro 1440 / Vostro 1450 / Vostro 1540 / Vostro 1550 with integrated video card Vostro 1440 with discrete video card Vostro 1450 with discrete video card Input voltage Input current (maximum) Input frequency Output current: 65 W
65 W
65 W 90 W 100...
User Manual - Page 8
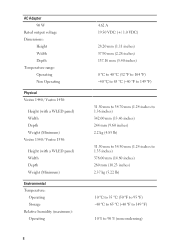
AC Adapter 90 W
Rated output voltage Dimensions:
Height Width Depth Temperature range: Operating Non Operating
Physical Vostro 1440 / Vostro 1450:
Height (with a WLED panel) Width Depth Weight (Minimum) Vostro 1540 / Vostro 1550:
Height (with a WLED panel) Width Depth Weight (Minimum)
Environmental Temperature:
Operating Storage Relative humidity (maximum): Operating
8
4.62 A 19.50 VDC (+/ 1.0 ...
Owners Manual - Page 4
..............31
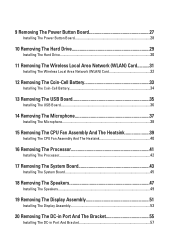
Installing The Wireless Local Area Network (WLAN) Card 32
12 Removing The Coin-Cell Battery 33
Installing The Coin-Cell Battery 34
13 Removing The USB Board 35
Installing The USB Board 36
14 Removing The Microphone 37
Installing The Microphone 38
15 Removing The CPU Fan Assembly And The Heatsink 39
Installing The CPU...
Owners Manual - Page 8
....
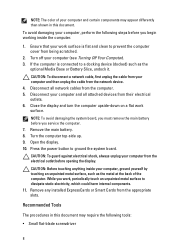
CAUTION: To disconnect a network cable, first unplug the cable from being scratched.
2. Remove any installed ExpressCards or Smart Cards from the electrical outlet before you begin working inside your ... NOTE: The color of the computer. NOTE: To avoid damaging the system board, you must remove the main battery before you work, periodically touch an unpainted metal surface to ...
Owners Manual - Page 17
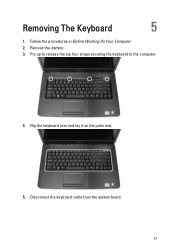
Pry up to release the top four snaps securing the keyboard to the computer.
4. Disconnect the keyboard cable from the system board. 17 Remove the battery. 3. Removing The Keyboard
5
1. Follow the procedures in Before Working On Your Computer. 2. Flip the keyboard over and lay it on the palm rest.
5.
Owners Manual - Page 18
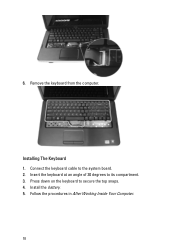
Insert the keyboard at an angle of 30 degrees to the system board. 2. Connect the keyboard cable to its compartment. 3. Remove the keyboard from the computer. Follow the procedures in After Working Inside Your Computer.
18 Install the battery. 5. 6.
Installing The Keyboard 1. Press down on the keyboard to secure the top snaps. 4.
Owners Manual - Page 23
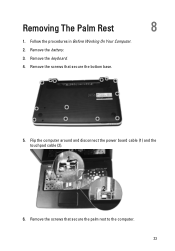
Follow the procedures in Before Working On Your Computer. 2. Remove the keyboard. 4. Remove the screws that secure the palm rest to the computer. 23 Flip the computer around and disconnect the power board cable (1) and the touchpad cable (2).
6. Remove the screws that secure the bottom base.
5. Remove the battery. 3. Removing The Palm Rest
8
1.
Owners Manual - Page 27
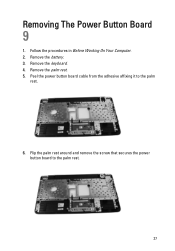
Flip the palm rest around and remove the screw that secures the power button board to the palm
rest.
6. Remove the keyboard. 4. Peel the power button board cable from the adhesive affixing it to the palm rest.
27 Remove the battery. 3. Follow the procedures in Before Working On Your Computer. 2. Removing The Power Button Board
9
1. Remove the palm rest. 5.
Owners Manual - Page 33
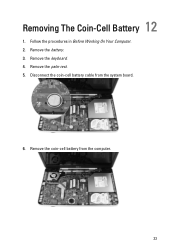
Remove the keyboard. 4. Follow the procedures in Before Working On Your Computer. 2. Remove the coin-cell battery from the system board.
6. Remove the palm rest. 5. Removing The Coin-Cell Battery 12
1. Disconnect the coin-cell battery cable from the computer.
33 Remove the battery. 3.
Owners Manual - Page 35
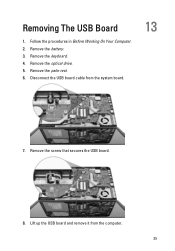
Removing The USB Board
1. Remove the optical drive. 5. Disconnect the USB board cable from the computer. 35 Remove the keyboard. 4. Remove the screw that secures the USB board.
8. Follow the procedures in Before Working On Your Computer. 2. Remove the battery. 3. Remove the palm rest. 6. Lift up the USB board and remove it from the system board.
13
7.
Owners Manual - Page 37
Remove the palm rest. 5. Disconnect the microphone cable from its compartment.
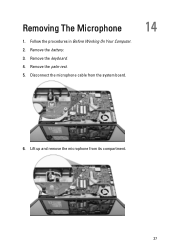
37 Remove the keyboard. 4. Remove the battery. 3. Removing The Microphone
1. Lift up and remove the microphone from the system board.
14
6. Follow the procedures in Before Working On Your Computer. 2.
Owners Manual - Page 39
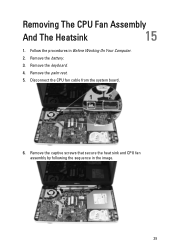
Remove the battery. 3. Remove the palm rest. 5. Remove the captive screws that secure the heat sink and CPU fan assembly by following the sequence in Before Working On Your Computer. 2. Remove the keyboard. 4. Disconnect the CPU fan cable from the system board.
6. Follow the procedures in the image.
39 Removing The CPU Fan Assembly
And The Heatsink
15
1.
Owners Manual - Page 40

Place and align the heat sink and CPU fan assembly. 2. Install the battery. 7. Remove the heat sink and the CPU fan assembly from the computer.
Tighten the captive screws to the system board. 4. Connect the CPU fan cable to secure the heat sink and the CPU fan
assembly. 3. Follow the procedures in After...
Owners Manual - Page 43
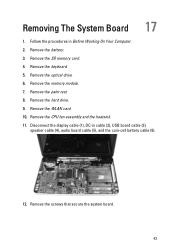
... the SD memory card. 4. Remove the WLAN card. 10. Remove the palm rest. 8. Disconnect the display cable (1), DC-in Before Working On Your Computer. 2. Remove the keyboard. 5. Remove the memory module. 7. Remove the screws that secure the system board.
43 Removing The System Board 17
1. Remove the hard drive. 9. Remove the optical drive. 6. Remove the CPU fan assembly and the...
Owners Manual - Page 79
Specifications
27
NOTE: Offerings may vary by law to ship with your computer. System Information Chipset
Vostro 1450/Vostro 1550 Vostro 1440/Vostro 1540 DRAM bus width Flash EPROM
Intel HM67 Intel HM57 64-bit SPI 32 Mbits
Processor Types
L2 cache External bus frequency
• Intel Celeron • ...
Owners Manual - Page 81
... internal wireless local area network (WLAN)
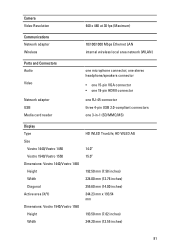
Ports and Connectors Audio
Video
Network adapter USB Media card reader
one 3-in-1 (SD/MMC/MS)
Display Type Size
Vostro 1440/Vostro 1450 Vostro 1540/Vostro 1550 Dimensions: Vostro 1440/Vostro 1450 Height Width Diagonal Active area (X/Y)
Dimensions: Vostro 1540/Vostro 1550 Height Width
HD WLED TrueLife;
Owners Manual - Page 83

... 95 °F) -40 °C to 65 °C (-40 °F to 149 °F) 3 V CR2032 lithium coin cell
AC Adapter Type:
Vostro 1440 / Vostro 1450 / Vostro 1540 / Vostro 1550 with integrated video card Vostro 1440 with discrete video card Vostro 1450 with discrete video card Input voltage Input current (maximum) Input frequency Output power Output current 65 W 90 W Rated...
Owners Manual - Page 84
AC Adapter Operating Non-Operating
Physical Vostro 1440 / Vostro 1450:
Height (with a WLED panel)
Width Depth Weight (Minimum) Vostro 1540 / Vostro 1550: Height (with a WLED panel)
Width Depth Weight (Minimum)
Environmental Temperature:
Operating Storage Relative humidity (maximum): Operating Storage Altitude (maximum): Operating Non-Operating Airborne contaminant ...
Similar Questions

What Do The Function Keys Mean On The Dell Vostro 1540 Notebook
(Posted by baldist 9 years ago)

Dell Vostro 1540 Screen Brightness Not Working After Clean Install Of Win 7 Prof
Dell vostro 1540 screen brightness not working after clean install of Win 7 prof
Dell vostro 1540 screen brightness not working after clean install of Win 7 prof
(Posted by deepaksharma2189 10 years ago)


