Dell Precision T1650 Support Question
Dell Precision T1650 Support Question
Find answers below for this question about Dell Precision T1650.Need a Dell Precision T1650 manual? We have 2 online manuals for this item!
Question posted by davnoor48 on July 17th, 2014
Precision T1650 Sound Does Not Working
The person who posted this question about this Dell product did not include a detailed explanation. Please use the "Request More Information" button to the right if more details would help you to answer this question.
Current Answers
Related Dell Precision T1650 Manual Pages
User Manual - Page 1

Dell Precision T1650
Setup And Features Information
About Warnings
WARNING: A WARNING indicates a potential for property damage, personal injury, or death. power button, power light 2. optical-drive bay 3. microphone ...
User Manual - Page 6
... Corporation in the U.S. Wi-Fi® is strictly forbidden. is a registered trademark of Microsoft Corporation in this text: Dell™, the DELL logo, Dell Precision™, Precision ON™, ExpressCharge™, Latitude™, Latitude ON™, OptiPlex™, Vostro™, and Wi-Fi Catcher™ are either the entities claiming the marks...
Owner's manual - Page 1

Dell Precision Workstation T1650 Owner's Manual
Regulatory Model: D09M Regulatory Type: D09M004
Owner's manual - Page 2
... Bluetooth® SIG, Inc. CAUTION: A CAUTION indicates either trademarks or registered trademarks of Microsoft Corporation in this text: Dell™, the DELL logo, Dell Precision™, Precision ON™,ExpressCharge™, Latitude™, Latitude ON™, OptiPlex™, Vostro™, and Wi-Fi Catcher™ are either potential damage to hardware or...
Owner's manual - Page 3

Contents
Notes, Cautions, and Warnings 2
1 Working on Your Computer...5
Before Working Inside Your Computer...5 Turning Off Your Computer...6 After Working Inside Your Computer...6
2 Removing and Installing Components 7
Recommended Tools...7 Removing the Cover...7 Installing the Cover...7 Removing the Intrusion Switch...8 Installing the Intrusion Switch...8 Removing the ...
Owner's manual - Page 5

...by performing the removal procedure in this document.
Also, before you disconnect the cable.
1
Working on the back of the computer. Hold a component such as directed by its edges,... by periodically touching an unpainted metal surface, such as a connector on Your Computer
Before Working Inside Your Computer
Use the following safety guidelines to help to ground the system board. ...
Owner's manual - Page 6
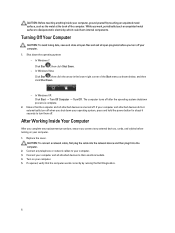
... 6 seconds to dissipate static electricity, which could harm internal components. Ensure that the computer works correctly by touching an unpainted metal surface, such as shown below, and then click Shut ..., save and close all open files and exit all attached devices are turned off when you work, periodically touch an unpainted metal surface to turn off . In Windows XP: Click Start →...
Owner's manual - Page 7
... clicks into place. 3.
2
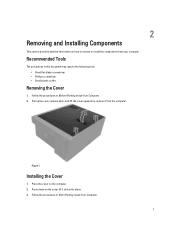
Removing and Installing Components
This section provides detailed information on the computer. 2.
Recommended Tools
The procedures in Before Working Inside Your Computer. 2. Follow the procedures in After Working Inside Your Computer.
7 Press down on the cover till it from your computer. Pull up the cover release latch, and lift...
Owner's manual - Page 8
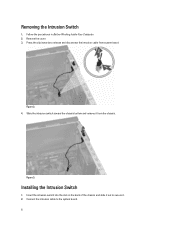
... system board. Installing the Intrusion Switch
1. Press the clip inwards to release and disconnect the intrusion cable from the chassis.
Follow the procedures in Before Working Inside Your Computer. 2.
Owner's manual - Page 9
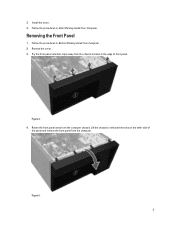
Follow the procedures in Before Working Inside Your Computer. 2. Remove the cover. 3. Pry the front panel retention clips away from the computer...panel from the computer. Install the cover. 4. Removing the Front Panel
1.
Follow the procedures in After Working Inside Your Computer. Figure 4. 4. Figure 5. 9
Lift the chassis to release the hooks on the other side of front panel.
3....
Owner's manual - Page 10
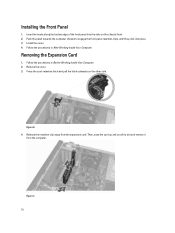
Figure 6. 4. Figure 7. 10 Follow the procedures in After Working Inside Your Computer. Press the card-retention latch and pull the latch outwards on the chassis front. 2.
Install the cover. 4.
Installing the Front .... 3. Insert the hooks along the bottom edge of its slot and remove it
from the expansion card. Follow the procedures in Before Working Inside Your Computer. 2.
Owner's manual - Page 11
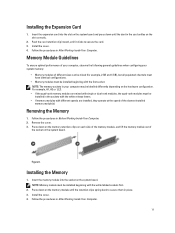
...observe the following general guidelines when configuring your computer may be
installed in After Working Inside Your Computer. NOTE: Memory module must be labelled differently depending on the ... them in the card settles on the hardware configuration. Follow the procedures in Before Working Inside Your Computer. 2. Memory Module Guidelines
To ensure optimal performance of the slowest ...
Owner's manual - Page 12
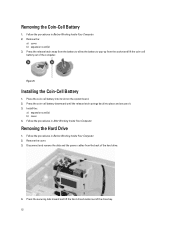
... the hard drive.
4. Installing the Coin-Cell Battery
1. Follow the procedures in Before Working Inside Your Computer. 2.
Follow the procedures in After Working Inside Your Computer.
Figure 9. Install the:
a) expansion card(s) b) cover 4. Follow the procedures in Before Working Inside Your Computer. 2. Press the coin-cell battery downward until the release latch springs...
Owner's manual - Page 13

...data and power cables to remove the second hard drive, if available.
Follow the procedures in After Working Inside Your Computer. Flex the hard-drive bracket and remove the hard drive from the back of the... hard drive. 4. Follow the procedures in Before Working Inside Your Computer. 2. Disconnect the data cable and the power cables from the bracket.
6....
Owner's manual - Page 15

... the data cable and power cables to remove the second optical drive (if available). Follow the procedures in After Working Inside Your Computer. Disconnect the speaker cable from the system board and release the cable from the chassis clip.... the cover. 3. Repeat steps 4 to 6 to the back of the optical drive. 3. Follow the procedures in Before Working Inside Your Computer. 2. Figure 12. 6.
Owner's manual - Page 16
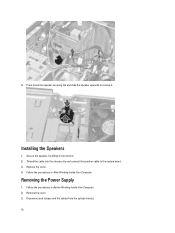
... the slot. 2. Press down the speaker-securing tab and slide the speaker upwards to the system board. 3. Replace the cover. 4. Follow the procedures in Before Working Inside Your Computer. 2. Secure the speaker, by sliding it into the chassis clip and connect the speaker cable to remove it. Follow the procedures in...
Owner's manual - Page 19
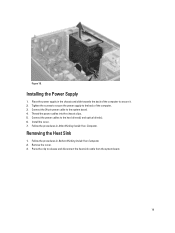
...the cover. 3. Press the clip to the system board. 4. Place the power supply in Before Working Inside Your Computer. 2. Follow the procedures in the chassis and slide towards the back of the ...Removing the Heat Sink
1. Figure 18. Install the cover. 7. Follow the procedures in After Working Inside Your Computer.
Tighten the screws to secure the power supply to the back of the computer...
Owner's manual - Page 20

Figure 20. Connect the heat sink cable to the system board and lift the heat sink away from the
computer. Follow the procedures in After Working Inside Your Computer. 20
Figure 19. 4. Loosen the captive screws that secure the heat sink to the system board. 4. Tighten the captive screws to secure ...
Owner's manual - Page 21

... board.
21 Lower the processor cover. 3. Follow the procedures in Before Working Inside Your Computer. 2. Installing the Processor
1. Removing the System Fan
1. Ensure that the processor... is properly seated. 2. Follow the procedures in After Working Inside Your Computer.
Install the:
a) heat sink b) cover 5. Remove the:
a) cover b) heat...
Owner's manual - Page 22

... fan away from the system board. 22 Install the cover. 5. Connect the fan cable to secure in After Working Inside Your Computer. Follow the procedures in the chassis. 2. Place the chassis fan in Before Working Inside Your Computer. 2. Follow the procedures in place. 3. 4. Installing the System Fan
1. Removing the Thermal Sensor
1. Remove...
Similar Questions

Should I Disable Serrr Messages
T1600 xeon E3-1245 @ 3.3GHz processor ID 206a7 L2 cach 1024 L3 cache 8192, hyper threading=yesI adde...
T1600 xeon E3-1245 @ 3.3GHz processor ID 206a7 L2 cach 1024 L3 cache 8192, hyper threading=yesI adde...
(Posted by markwmatthews 7 years ago)

Precision T1650 Does Not Boot Enable Or Disable Secure Boot
(Posted by Gaallanc 9 years ago)


Dell Precision T1650 Sound Specs Does It Need External Speakers
(Posted by kapuji 9 years ago)

Why Is The Sound Not Working On My Inspiron One
(Posted by Gabriansar 10 years ago)