Dell PowerEdge T310 Support Question
Dell PowerEdge T310 Support Question
Find answers below for this question about Dell PowerEdge T310.Need a Dell PowerEdge T310 manual? We have 6 online manuals for this item!
Question posted by ababd on November 3rd, 2013
Dell Poweredge T310 How To Order Bezel Lock Key
The person who posted this question about this Dell product did not include a detailed explanation. Please use the "Request More Information" button to the right if more details would help you to answer this question.
Current Answers
Related Dell PowerEdge T310 Manual Pages
Getting Started Guide - Page 3
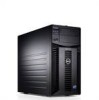
Dell™ PowerEdge™ T310 Systems
Getting Started With Your System
Regulatory Model E09S Regulatory Type E09S001
Getting Started Guide - Page 4
.... Other trademarks and trade names may be used in this text: Dell, the DELL logo, and PowerEdge are not followed.
Information in this document to refer to either trademarks or registered trademarks of Dell Inc.;
is a registered trademark of your computer. Microsoft, Windows, Windows Server, and Hyper-V are registered trademarks of Intel Corporation in this...
Hardware Owner's Manual - Page 2
... reserved. Other trademarks and trade names may be used in this text: Dell, the DELL logo, and PowerEdge are trademarks of data if instructions are either the entities claiming the marks and names or their products. MS-DOS, Microsoft, Windows, and Windows Server are not followed. disclaims any manner whatsoever without notice. © 2009...
Hardware Owner's Manual - Page 12

Front Panel Features and Indicators 10
9 1
8
7 6 5 4
2 3
Item Indicator, Button, or Icon Description Connector
1 Front bezel lock
Secures the front bezel to the system.
2 Tape drive/Optical drive (optional)
One optional internal half-height tape backup device or an optical drive
3 Optical drive (optional)
Optional internal ...
Hardware Owner's Manual - Page 45
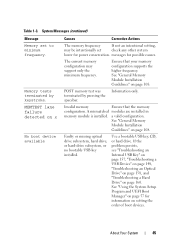
...memory test was terminated by keystroke. If the problem persists, see "Troubleshooting an Internal USB Key" on page 157, "Troubleshooting a USB Device" on page 148, "Troubleshooting an Optical Drive" on ...page 158, and "Troubleshooting a Hard Drive" on setting the order of boot devices. MEMTEST lane failure detected on x
No boot device available
Causes
Corrective ...
Hardware Owner's Manual - Page 68

...settings for the TPM are cleared. On an ACPI-compliant operating system, the system performs an orderly shutdown before power is disabled.
CAUTION: Clearing the TPM will lose all TPM contents are ...field is read -only when TPM Security is enabled to default settings.
Back up the TPM keys prior to enabling this button halts the operating system and displays a diagnostic screen. The No...
Hardware Owner's Manual - Page 70
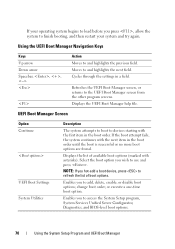
...before you wish to use and press . Using the UEFI Boot Manager Navigation Keys
Keys Up arrow Down arrow Spacebar,
Action Moves to and highlights the next field.... through the settings in the boot order. If the boot attempt fails, the system continues with asterisks). Enables you to access the System Setup program, System Services Unified Server Configurator, Diagnostics, and BIOS-level ...
Hardware Owner's Manual - Page 72
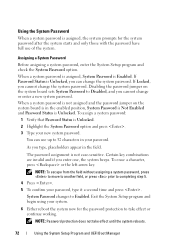
... password. The password assignment is Enabled. To erase a character, press or the left-arrow key. Assigning a System Password
Before assigning a system password, enter the System Setup program and check...3 Type your password, type it a second time and press . If Locked, you enter one, the system beeps. Certain key combinations are invalid and if you cannot change the system password. NOTE: To...
Hardware Owner's Manual - Page 79
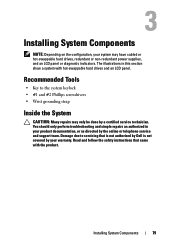
... authorized in this section show a system with the product.
Read and follow the safety instructions that is not authorized by Dell is not covered by your warranty.
Recommended Tools
• Key to servicing that came with hot-swappable hard drives and an LCD panel. Installing System Components
NOTE: Depending on the configuration...
Hardware Owner's Manual - Page 81
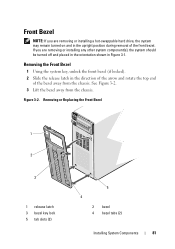
...the direction of the arrow and rotate the top end
of the front bezel. Figure 3-2.
Removing or Replacing the Front Bezel
1
2
3
1 release latch 3 bezel key lock 5 tab slots (2)
5 4
2 bezel 4 bezel tabs (2)
Installing System Components
81 See Figure 3-2. 3 Lift the bezel away from the chassis. Front Bezel
NOTE: If you are removing or installing a hot-swappable hard drive, the system...
Hardware Owner's Manual - Page 82
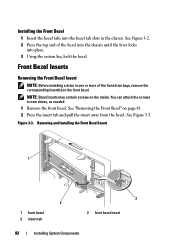
...the Front Bezel
1 Insert the bezel tabs into place. 3 Using the system key, lock the bezel.
Figure 3-3. Removing and Installing the Front Bezel Insert
1
2
1 front bezel 3 insert tab
3 2 front bezel insert
82
Installing System Components NOTE: Bezel inserts may contain screws on page 81. 2 Press the insert tab and pull the insert away from the bezel. Front Bezel Inserts
Removing...
Hardware Owner's Manual - Page 84
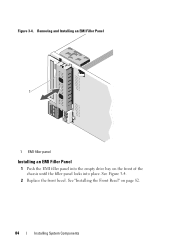
See Figure 3-4.
2 Replace the front bezel. Figure 3-4. See "Installing the Front Bezel" on the front of the chassis until the filler panel locks into the empty drive bay on page 82.
84
Installing System Components Removing and Installing an EMI Filler Panel
1
1 EMI filler panel
Installing an EMI Filler Panel
1 Push the EMI filler panel into place.
Hardware Owner's Manual - Page 85
...cover away from the system.
Read and follow the safety instructions that is not authorized by Dell is not covered by the online or telephone service and support team. Installing System Components
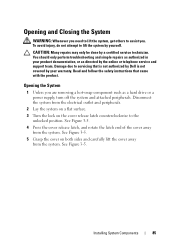
...system from the electrical outlet and peripherals.
2 Lay the system on a flat surface.
3 Turn the lock on both sides and carefully lift the cover away from the system.
To avoid injury, do not ...
Hardware Owner's Manual - Page 93
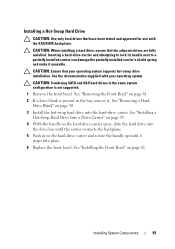
... a HardDrive Blank" on page 82.
Inserting a hard-drive carrier and attempting to lock its handle next to a partially installed carrier can damage the partially installed carrier's shield spring and make...hard drive into the drive bay until it snaps into place.
6 Replace the front bezel.
CAUTION: When installing a hard drive, ensure that your operating system. See the documentation...
Hardware Owner's Manual - Page 99

...safety instructions that is not authorized by Dell is being permanently removed:
a Install an EMI filler panel into the empty drive bay. See "Installing the Front Bezel Insert" on page 81. 3 Open... Drive" on page 100. See Figure 3-12. 5 Slide the drive release latch in the front bezel. See "Installing an EMI Filler Panel" on the system and attached peripherals.
See "Opening the System...
Hardware Owner's Manual - Page 101

...requirement that SCSI ID numbers be assigned sequentially or that all devices in order by ID number. See "Removing the Front Bezel Insert" on page 115.
Set the drive's SCSI ID to the ...into an empty bay:
a Remove the EMI filler panel. See "Removing the Front Bezel" on page 85.
4 Remove the front bezel.
If you are installing a SAS tape drive, you must have an integrated SAS storage...
Hardware Owner's Manual - Page 112

...to install the remaining memory modules. NOTE: The memory module socket has an alignment key that have memory modules installed.
12 Repeat step 8 through step 11 of the ...Table 3-2.
13 Replace the cooling shroud. See "Closing the System" on the other sockets that allows you to lock the memory module into the socket. When the memory module is properly seated in the socket, the ejectors on ...
Hardware Owner's Manual - Page 124

.... Removing a VFlash Media
To remove the VFlash media, push inward on the module. Read and follow the safety instructions that is not authorized by Dell is keyed to lock it and pull the card from the electrical outlet. 2 Open the system. NOTE: The slot is not covered by the Internal USB Port option...
Hardware Owner's Manual - Page 142
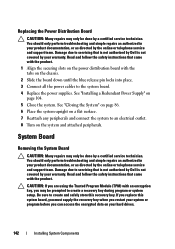
...covered by your warranty.
Damage due to servicing that is not authorized by Dell is not covered by your warranty. You should only perform troubleshooting and ... on your system or program before you replace this recovery key. If you can access the encrypted data on the chassis.
2 Slide the board down until the blue release pin locks into place. 3 Connect all the power cables to an...
Hardware Owner's Manual - Page 189
..., 177 control panel assembly
features, 12 installing, 138 LCD panel features, 14 removing, 136 cooling fans troubleshooting, 154
cover closing, 86
D
damaged systems troubleshooting, 152
Dell contacting, 177
Dell PowerEdge Diagnostics using, 165
diagnostics advanced testing options, 167 testing options, 167 using Dell PowerEdge Diagnostics, 165 when to use, 166
DIMMs See memory modules (DIMMs).
Similar Questions


Memory Error When Upgrading Dell Poweredge T310 Server
(Posted by zsgmpablit 10 years ago)

Dell Server Poweredge T310 Can't Find The Raid Drive
(Posted by monSERM 10 years ago)

How To Change The Perc Battery Server Dell Poweredge T310
(Posted by Wsp7St 10 years ago)