Dell PowerEdge 1950 Support Question
Dell PowerEdge 1950 Support Question
Find answers below for this question about Dell PowerEdge 1950.Need a Dell PowerEdge 1950 manual? We have 7 online manuals for this item!
Question posted by Fobmurp on April 29th, 2014
How To Update Poweredge 1950 Bios In Rhel
The person who posted this question about this Dell product did not include a detailed explanation. Please use the "Request More Information" button to the right if more details would help you to answer this question.
Current Answers
Related Dell PowerEdge 1950 Manual Pages
Installing a SATA Optical Drive - Page 3

See your Hardware Owner's Manual.
4 PowerEdge 1950 systems only: Disconnect and remove the SAS controller daughter card. Installing a SATA Optical Drive
3 See ... slide the drive tray out of the system. Installing a SATA Optical Drive
These instructions apply to Dell™ PowerEdge™ systems to remove the system cover and access any of the components inside the system. All Systems
1 ...
Installing a SATA Optical Drive - Page 4

... the drive into the corresponding holes in the same carrier. On PowerEdge 1950 systems, the existing optical drive tray must remove the old drive and interposer card from the tray.
4 Attach the SATA optical drive to lock it into place.
The PowerEdge 2900 and 1900 systems do not reuse the interposer board attached...
Installing a SATA Optical Drive - Page 5

...5 SATA power cable 7 optical drive carrier
2 interposer release latch 4 SATA cable 6 carrier latch
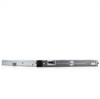
Replacing a PowerEdge 1950 Optical Drive
NOTE: The replacement drive tray provided in the installation kit must be used with the holes in ...tray until the pins on the carrier align with PowerEdge 1950 systems. If you are replacing an existing optical drive, do not reuse the interposer ...
Installing a SATA Optical Drive - Page 6

a Route the cable through the power cable cutout in a PowerEdge 1950 Drive Tray 2 3
1 4
5
1 optical drive 3 SATA power cable 5 optical drive carrier
2 SATA cable 4 ...may need to replace the existing power cable with the branching power cable) to the power supply connector. PowerEdge 1950
1 Insert the optical drive tray into the system until it is fully inserted and locked into the cable...
Installing a SATA Optical Drive - Page 7

...power supply connector. Figure 1-3. Installing a SATA Optical Drive
7 See "Closing the System" in the PowerEdge 1950 2
1
3
4
6
5
1 SATA data cable 3 chipset shroud 5 SATA power cable
2 SATA_A connector on the ...system and attached peripherals. Installing the SATA Optical Drive -
PowerEdge 2970 or 2950
1 Insert the optical drive tray into the system until it ...
Information Update - Page 1
Dell™ PowerEdge™ 1950 Systems
Information Update
Information Update - Page 3
... III Systems 9 Processor Upgrades - Safeguarding Encrypted Data 10 System Message Update 10 LCD Status Messages Update 15
Contents
3 Contents
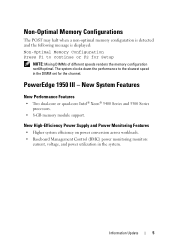
Non-Optimal Memory Configurations 5 PowerEdge 1950 III - PowerEdge 1950 II and PowerEdge 1950 III Systems 9 System Board Replacement - New System Features 5
New Performance Features 5 New High-Efficiency Power Supply and Power Monitoring...
Information Update - Page 5
...
New Performance Features
• Two dual-core or quad-core Intel® Xeon® 5400 Series and 5300 Series processors.
• 8-GB memory module support. PowerEdge 1950 III -
Information Update
5 The system clocks down the performance to continue or F2 for the channel.
Information Update - Page 6
... an optional
bootable USB flash drive or USB memory key. • Support for optional SAS 6i/R and PERC 6/i adapters.
Optional Internal USB Memory Key
The PowerEdge 1950 III system provides an internal USB connector located on page 22.
6
Information Update
Information Update - Page 9
...is installed, the system only recognizes and displays 63.75 GB during POST.
Information Update
9 For
more than 4 GB of memory is fully supported. Support for the ... the latest system BIOS version is labeled with your
system. PowerEdge 1950 III Systems
PowerEdge 1950 III systems have added support for 8-GB Memory Modules - PowerEdge 1950 II and PowerEdge 1950 III Systems
•...
Information Update - Page 10
... to secure the contents of the components inside the computer, and protecting against electrostatic discharge
10
Information Update Safeguarding Encrypted Data
On PowerEdge 1950 III systems using the TPM with an encryption application, you are using Windows Server® 2008, you can use encryption programs, such as the BitLocker utility, to remove the system...
Information Update - Page 15
... on the SEL and configuring system management settings, see the system documentation on the PowerEdge 1950 III system and the probable cause for each message.
Table 1-1. For more information on... configuration. Replace the faulty media. Information Update
15 LCD Status Messages Update
Table 1-2 lists updates to events recorded in the Hardware Owner's Manual. Reseat the USB...
Information Update - Page 23
... measurements.
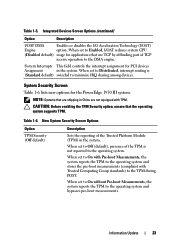
Integrated Devices Screen Options (continued)
Option
Description
I/OAT DMA
Enables or disables the I/O Acceleration Technology (I /OAT reduces system CPU
(Disabled default) usage for the PowerEdge 1950 III system. When set to Off (default), presence of TCP
receive operation to minimize IRQ sharing among devices. Table 1-5. Information...
Information Update - Page 25
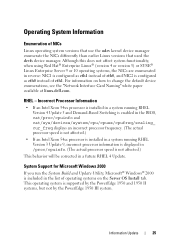
...PowerEdge 1950 and 1950 II systems, but not by the PowerEdge 1950 III system.
Incorrect Processor Information
• If an Intel Xeon 54xx processor is installed in a system running RHEL Version 4 Update 5 and Demand-Based Switching is enabled in the BIOS...® (version 4 or version 5) or SUSE® Linux Enterprise Server 9 or 10 operating systems, the NICs are enumerated in the list of...
Information Update - Page 31
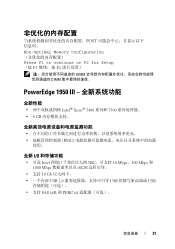
POST Non-Optimal Memory Configuration Press F1 to continue or F2 for Setup (按 F1 F2
DIMM DIMM
PowerEdge 1950 III
全新性能
Intel® Xeon® 5400 系列和 5300 8 GB
BMC
使用。
全新 I/O
• 可选 Intel ...
Information Update - Page 36
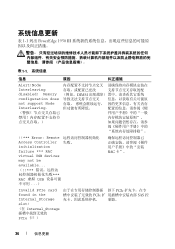
... PCIe card
found in the
Internal_Storage
slot! (在 Internal_Storage PCIe 卡!)
PCIe PCIe SAS
36
信息更新 表 1-1 列出 PowerEdge 1950 III
表 1-1
信息
原因
纠正措施
Alert!Node
Interleaving
disabled!
Information Update - Page 49
...Intel Xeon 54xx BIOS cat/proc/cpuinfo 和 cat/sys/devices/system/cpu/cpuxx/cpufreq/scaling_ cur_freq
RHEL 版本 3 更新 9 Intel Xeon 54xx proc/cpuinfo
RHEL 4
Microsoft Windows 2000
System Build and Update Utility Microsoft® Windows® 2000 将位于 Server OS Install PowerEdge 1950 和 1950 II PowerEdge 1950 III
信...
Information Update - Page 115
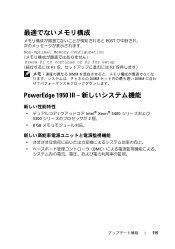
POST Non-Optimal Memory Configuration Press F1 to continue or F2 for Setup F1 F2
DIMM DIMM DIMM
PowerEdge 1950 III
Intel® Xeon® 5400 5300 2 個。
• 8 GB
BMC
115
Information Update - Page 137

...Intel Xeon 54xx BIOS で Demand-Based Switching cat/proc/cpuinfo および cat/sys/devices/system/cpu/cpuxx/cpufreq/scaling_ cur_freq
• RHEL 3 9 Intel Xeon 54xx proc/cpuinfo
RHEL 4
Microsoft Windows 2000
System Build and Update Utility Server OS Install OS OS Microsoft® Windows® 2000 PowerEdge 1950/1950 II OS PowerEdge 1950 III
137
Information Update - Page 162
... Xeon 54xx RHEL 버전 4 5 BIOS cat/proc/cpuinfo 및 cat/sys/devices/system/cpu/ cpuxx/cpufreq/scaling_cur_freq
• Intel Xeon 54xx RHEL 버전 3 9 proc/cpuinfo
RHEL 4 Update
Microsoft Windows 2000
Microsoft® Windows® 2000 이 Server OS Install (서버 OS PowerEdge 1950 III 대신 PowerEdge 1950 및 1950 II...
Similar Questions


