Dell Latitude E6430 Support Question
Dell Latitude E6430 Support Question
Find answers below for this question about Dell Latitude E6430.Need a Dell Latitude E6430 manual? We have 5 online manuals for this item!
Question posted by siwillj on April 15th, 2014
How To Ghost Dell E6430 Hard Drive
The person who posted this question about this Dell product did not include a detailed explanation. Please use the "Request More Information" button to the right if more details would help you to answer this question.
Current Answers
Related Dell Latitude E6430 Manual Pages
User Manual - Page 11
... Celeron® are registered trademarks or trademarks of Intel Corporation in this text: Dell™, the DELL logo, Dell Precision™, Precision ON™, ExpressCharge™, Latitude™, Latitude ON™, OptiPlex™, Vostro™, and Wi-Fi Catcher™ are trademarks of Dell Inc. is a registered trademark of Advanced Micro Devices, Inc. Microsoft®, Windows...
Owner's Manual - Page 2
...174; are registered trademarks or trademarks of Intel Corporation in this text: Dell™, the DELL logo, Dell Precision™, Precision ON™,ExpressCharge™, Latitude™, Latitude ON™, OptiPlex™, Vostro™, and Wi-Fi Catcher™ are trademarks of Dell Inc. CAUTION: A CAUTION indicates either trademarks or registered trademarks of Microsoft Corporation...
Owner's Manual - Page 3
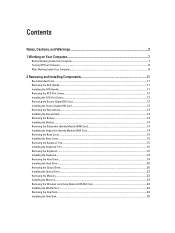
... Removing the Keyboard Trim...15 Installing the Keyboard Trim...16 Removing the Keyboard...16 Installing the Keyboard...18 Removing the Hard Drive...19 Installing the Hard Drive...20 Removing the Optical Drive...20 Installing the Optical Drive...22 Removing the Memory...22 Installing the Memory...23 Removing the Wireless Local Area Network (WLAN) Card 23 Installing...
Owner's Manual - Page 4
... Modem Connector...35 Installing the Modem Connector...37 Removing the Input/Output (I/O) Board...37 Installing the Input Output (I/O) Board...38 Removing the Hard-Drive Support Plate...38 Installing the Hard-Drive Support Plate...39 Removing the Palmrest...40 Installing the Palmrest...41 Removing the System Board...42 Installing the System Board...45 Removing the...
Owner's Manual - Page 19
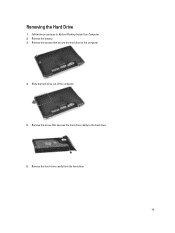
Slide the hard drive out of the computer.
5. Remove the screws that secures the hard-drive caddy to the computer.
4. Remove the screw that secure the hard drive to the hard drive.
6. Removing the Hard Drive
1. Follow the procedures in Before Working Inside Your Computer. 2. Remove the battery. 3. Remove the hard-drive caddy from the hard drive.
19
Owner's Manual - Page 20
... Inside Your Computer. 2.
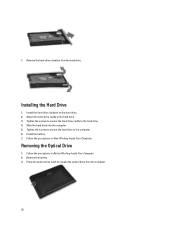
Installing the Hard Drive
1. Attach the hard-drive caddy to the hard drive. 4. Install the hard-drive isolation on the hard drive. 2. Install the battery. 7. Follow the procedures in After Working Inside Your Computer. Tighten the screws to secure the hard-drive caddy to the hard drive. 3. Press the optical-drive latch to the computer. 6. 7. Remove...
Owner's Manual - Page 26

... Card
1. Removing the Processor
1. Align the notches on the processor and the socket, and insert the processor into the socket. 2. Installing the Processor
1. Remove:
a) battery b) hard drive
26 Remove:
a) battery b) base cover c) heat sink 3. Follow the procedures in Before Working Inside Your Computer. 2.
Owner's Manual - Page 28
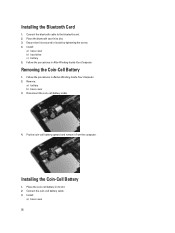
.... 2. Installing the Coin-Cell Battery
1. Place the coin-cell battery in After Working Inside Your Computer. Connect the coin-cell battery cable. 3. Install:
a) base cover b) hard drive c) battery 5. Ensure that it from the computer. Follow the procedures in its slot by tightening the screw. 4. Install:
a) base cover
28 Follow the procedures in...
Owner's Manual - Page 29
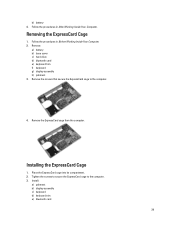
Follow the procedures in After Working Inside Your Computer. Tighten the screws to secure the ExpressCard cage to the computer.
4. Remove:
a) battery b) base cover c) hard drive d) bluetooth card e) keyboard trim f) keyboard g) display assembly h) palmrest 3. Installing the ExpressCard Cage
1. Remove the screws that secure the ExpressCard cage to the computer. 3. b) battery 4. Follow ...
Owner's Manual - Page 30
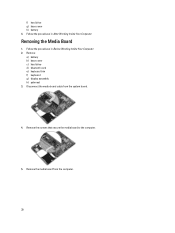
Remove:
a) battery b) base cover c) hard drive d) bluetooth card e) keyboard trim f) keyboard g) display assembly h) palmrest 3. Remove the media board from the system board.
4.
Follow the procedures in Before Working...
1. Remove the screws that secure the media board to the computer.
5. Disconnect the media board cable from the computer.
30 f) hard drive g) base cover h) battery 4.
Owner's Manual - Page 31
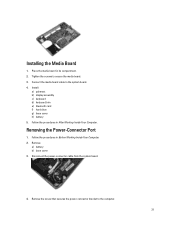
... media board cable to the computer.
31
Disconnect the power-connector cable from the system board.
4. Install:
a) palmrest b) display assembly c) keyboard d) keyboard trim e) bluetooth card f) hard drive g) base cover h) battery 5. Installing the Media Board
1. Place the media board in Before Working Inside Your Computer. 2. Follow the procedures in After Working Inside Your...
Owner's Manual - Page 33
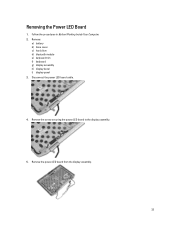
Remove the power LED board from the display assembly.
33 Disconnect the power LED board cable.
4. Remove:
a) battery b) base cover c) hard drive d) bluetooth module e) keyboard trim f) keyboard g) display assembly h) display bezel i) display panel 3. Remove the screw securing the power LED board to the display assembly.
5. Removing the ...
Owner's Manual - Page 34
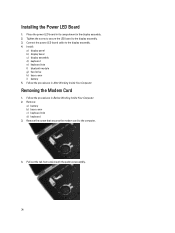
Connect the power LED board cable to the computer.
4. Install:
a) display panel b) display bezel c) display assembly d) keyboard e) keyboard trim f) bluetooth module g) hard drive h) base cover i) battery 5. Remove:
a) battery b) base cover c) keyboard trim d) keyboard 3. Removing the Modem Card
1. Remove the screw that secures the modem card to the display ...
Owner's Manual - Page 35
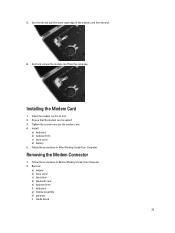
... the procedures in its slot 2. Use the tab and pull the lower right edge of the modem card from the computer. Remove:
a) battery b) base cover c) hard drive d) bluetooth card e) keyboard trim f) keyboard g) display assembly h) palmrest i) media board
35 Install:
a) keyboard b) keyboard trim c) base cover d) battery 5. Follow the procedures in After Working Inside...
Owner's Manual - Page 37
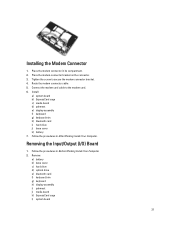
... bracket on the connector. 3. Follow the procedures in Before Working Inside Your Computer. 2. Route the modem connector cable. 5. Remove:
a) battery b) base cover c) hard drive d) optical drive e) bluetooth card f) keyboard trim g) keyboard h) display assembly i) palmrest j) media board k) ExpressCard cage l) system board
37 Install:
a) system board b) ExpressCard cage c) media board...
Owner's Manual - Page 38

... cover
38 Remove the I /O board in its compartment. 2. Install:
a) system board b) ExpressCard cage c) media board d) palmrest e) display assembly f) keyboard g) keyboard trim h) bluetooth card i) hard drive j) optical drive k) base cover l) battery 4. Place the I /O board from the computer. Remove the screw that secures the I /O board. 3. Tighten the screws to secure the I /O board...
Owner's Manual - Page 61
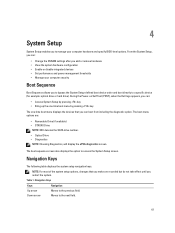
...Drive NOTE: XXX denotes the SATA drive number. • Optical Drive • Diagnostics NOTE: Choosing Diagnostics, will display the ePSA diagnostics screen. Table 1. Navigation Keys
Keys
Navigation
Up arrow
Moves to the previous field.
During the Power-on Self Test (POST), when the Dell...device order and boot directly to a specific device (for example: optical drive or hard drive).
Statement of Volatility - Page 2
...loss of main
graphics
memory. No
memory -
DVD/
DVD+RW/
Diskette
Drives
Enter S3-S5 state below.
Primary power loss (unplugging the power cord...Dell systems will write the system context to the working state where the dynamic RAM is maintained and is removed from the non-volatile storage can occur. see
uses system graphics systems. UMA uses
next column DDR3.
Hard drive...
Latitude E-Family Re-Imaging Guide - Page 34
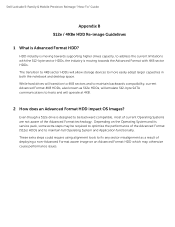
Even though a 512e drive is designed to be required to optimize the performance of the Advanced...Dell Latitude E-Family & Mobile Precision Reimage "How-To" Guide
Appendix B 512e / 4KBe HDD Re-image Guidelines
1 What is moving towards supporting higher drives capacity, to address the current limitations with the 512-byte sector HDDs, the industry is Advanced Format HDD?
While hard drives...
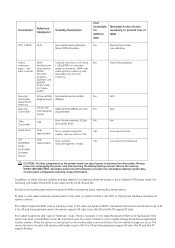
Latitude E-Family Re-Imaging Guide - Page 37
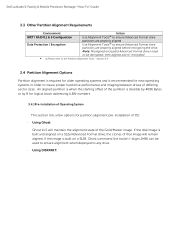
... offset of OS: - If the image is built and aligned on a 512B, Ghost command line switch {-align=1MB} can be decrypted, then aligned and re-encrypted
(1) Please refer to ensure Advanced Format drive
partitions are properly aligned before encrypting the drive. Dell Latitude E-Family & Mobile Precision Reimage "How-To" Guide
3.3 Other Partition Alignment Requirements...
Similar Questions

I Have A Msg Error Code 0141 No Hard Drive Detected Did Someone Remove It Or Do
Inspiron 1525 do I have to get a hard drive to use i
Inspiron 1525 do I have to get a hard drive to use i
(Posted by Richardwhittle8333 8 years ago)


How To Raid 0 Dell Latitude E6410 With Two Hard Drives
(Posted by malakVPaul 10 years ago)
My Laptop Lid Was Slammed Shut And Now It Can't Detect The Hard Drive. I Tried T
I have a Dell Inspiron N5030 laptop. The lid was slammed shut and now it can't detect the hard drive...
I have a Dell Inspiron N5030 laptop. The lid was slammed shut and now it can't detect the hard drive...
(Posted by ikkinrolyak 11 years ago)