Dell Latitude E6430 Support Question
Dell Latitude E6430 Support Question
Find answers below for this question about Dell Latitude E6430.Need a Dell Latitude E6430 manual? We have 5 online manuals for this item!
Question posted by reraegan on June 21st, 2014
How To Remove Hard Drive On Dell E6430
The person who posted this question about this Dell product did not include a detailed explanation. Please use the "Request More Information" button to the right if more details would help you to answer this question.
Current Answers
Related Dell Latitude E6430 Manual Pages
Owner's Manual - Page 3
... Base Cover...15 Installing the Base Cover...15 Removing the Keyboard Trim...15 Installing the Keyboard Trim...16 Removing the Keyboard...16 Installing the Keyboard...18 Removing the Hard Drive...19 Installing the Hard Drive...20 Removing the Optical Drive...20 Installing the Optical Drive...22 Removing the Memory...22 Installing the Memory...23 Removing the Wireless Local Area Network (WLAN) Card...
Owner's Manual - Page 4

... Board...37 Installing the Input Output (I/O) Board...38 Removing the Hard-Drive Support Plate...38 Installing the Hard-Drive Support Plate...39 Removing the Palmrest...40 Installing the Palmrest...41 Removing the System Board...42 Installing the System Board...45 Removing the Display Assembly...45 Installing the Display Assembly...47 Removing the Display Bezel...48 Installing the Display Bezel...
Owner's Manual - Page 19
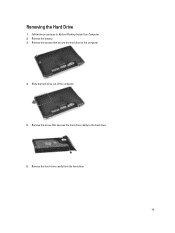
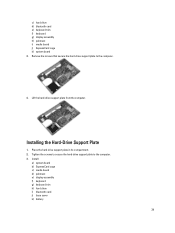
Follow the procedures in Before Working Inside Your Computer. 2. Remove the screw that secure the hard drive to the hard drive.
6. Slide the hard drive out of the computer.
5. Removing the Hard Drive
1. Remove the battery. 3. Remove the screws that secures the hard-drive caddy to the computer.
4. Remove the hard-drive caddy from the hard drive.
19
Owner's Manual - Page 20
...
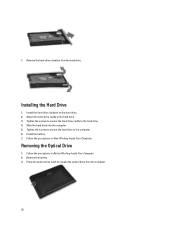
Install the hard-drive isolation on the hard drive. 2. Tighten the screws to secure the hard-drive caddy to the hard drive. 3. Removing the Optical Drive
1. Press the optical-drive latch to the computer. 6. Follow the procedures in Before Working Inside Your Computer. 2. Attach the hard-drive caddy to the hard drive. 4. Tighten the screws to secure the hard drive to release the...
Owner's Manual - Page 26

Follow the procedures in Before Working Inside Your Computer. 2. Remove the processor from the computer. Removing the Bluetooth Card
1.
Follow the procedures in Before Working Inside Your Computer. 2. Remove:
a) battery b) hard drive
26 Follow the procedures in a clockwise direction. 3.
Rotate the processor cam lock in After Working Inside Your Computer. Installing the ...
Owner's Manual - Page 28
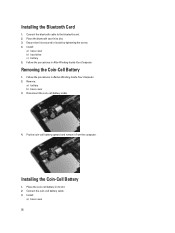
...Place the bluetooth card in its slot. 2. Install:
a) base cover b) hard drive c) battery 5.
Removing the Coin-Cell Battery
1. Remove:
a) battery b) base cover 3. Disconnect the coin-cell battery cable.
... Installing the Bluetooth Card
1. Pry the coin-cell battery upward and remove it is secured in its slot. 3.
Installing the Coin-Cell Battery
1. Ensure that it from the computer.
Owner's Manual - Page 29
... the ExpressCard Cage
1.
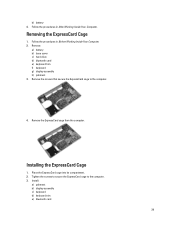
Installing the ExpressCard Cage
1. Remove:
a) battery b) base cover c) hard drive d) bluetooth card e) keyboard trim f) keyboard g) display assembly h) palmrest 3. Remove the screws that secure the ExpressCard cage to the computer. 3. Place the ExpressCard cage into its compartment. 2.
Remove the ExpressCard cage from the computer. Follow the procedures...
Owner's Manual - Page 30
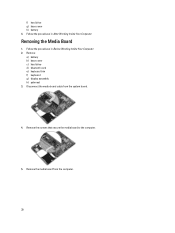
... board from the system board.
4. Follow the procedures in After Working Inside Your Computer. Disconnect the media board cable from the computer.
30 Remove:
a) battery b) base cover c) hard drive d) bluetooth card e) keyboard trim f) keyboard g) display assembly h) palmrest 3. f) hard drive g) base cover h) battery 4. Follow the procedures in Before Working Inside Your Computer. 2.
Owner's Manual - Page 31
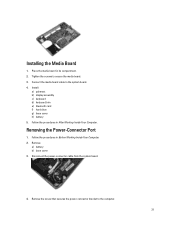
Install:
a) palmrest b) display assembly c) keyboard d) keyboard trim e) bluetooth card f) hard drive g) base cover h) battery 5. Remove:
a) battery b) base cover 3. Connect the media board cable to the computer.
31 Remove the screw that secures the power-connector bracket to the system board. 4. Place the media board in After Working Inside Your Computer. Follow the procedures ...
Owner's Manual - Page 33
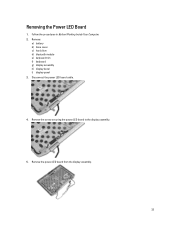
Disconnect the power LED board cable.
4. Remove:
a) battery b) base cover c) hard drive d) bluetooth module e) keyboard trim f) keyboard g) display assembly h) display bezel i) display panel 3. Remove the screw securing the power LED board to the display assembly.
5. Follow the procedures in Before Working Inside Your Computer. 2. Remove the power LED board from the display assembly.
33 ...
Owner's Manual - Page 34
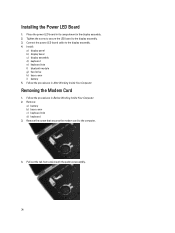
... display assembly. 4. Remove:
a) battery b) base cover c) keyboard trim d) keyboard 3. Installing the Power LED Board
1. Pull out the tab from underneath the palmrest assembly.
34 Follow the procedures in After Working Inside Your Computer.
Install:
a) display panel b) display bezel c) display assembly d) keyboard e) keyboard trim f) bluetooth module g) hard drive h) base cover i) battery...
Owner's Manual - Page 35
Install:
a) keyboard b) keyboard trim c) base cover d) battery 5. Remove:
a) battery b) base cover c) hard drive d) bluetooth card e) keyboard trim f) keyboard g) display assembly h) palmrest i) media board
35 Installing the Modem Card
1. Follow the procedures in Before Working Inside Your Computer. 2. Follow ...
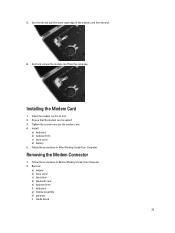
Owner's Manual - Page 37
... Route the modem connector cable. 5. Follow the procedures in After Working Inside Your Computer. Installing the Modem Connector
1. Removing the Input/Output (I/O) Board
1. Remove:
a) battery b) base cover c) hard drive d) optical drive e) bluetooth card f) keyboard trim g) keyboard h) display assembly i) palmrest j) media board k) ExpressCard cage l) system board
37 Connect the modem...
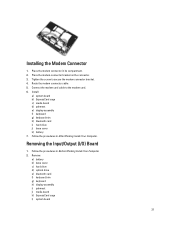
Owner's Manual - Page 38

... Computer. Follow the procedures in Before Working Inside Your Computer. 2.
Install:
a) system board b) ExpressCard cage c) media board d) palmrest e) display assembly f) keyboard g) keyboard trim h) bluetooth card i) hard drive j) optical drive k) base cover l) battery 4. 3. Remove the I /O board in its compartment. 2. Installing the Input Output (I /O board...
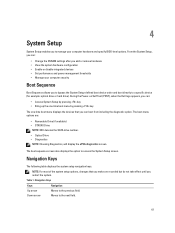
Owner's Manual - Page 39
... k) battery
39 Place the hard-drive support plate in its compartment. 2. Installing the Hard-Drive Support Plate
1. Lift the hard-drive support plate from the computer.
c) hard drive d) bluetooth card e) keyboard trim f) keyboard g) display assembly h) palmrest i) media board j) ExpressCard cage k) system board 3. Remove the screws that secure the hard-drive support plate to the computer...
Owner's Manual - Page 61
... specific device (for example: optical drive or hard drive). From the System Setup, you can:
• Change the NVRAM settings after you add or remove hardware • View the system ...Drive NOTE: XXX denotes the SATA drive number. • Optical Drive • Diagnostics NOTE: Choosing Diagnostics, will display the ePSA diagnostics screen. During the Power-on Self Test (POST), when the Dell...
Statement of Volatility - Page 2
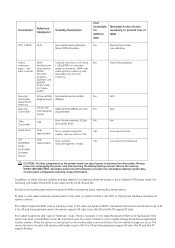
...is removed from the non-volatile storage can occur. Hard drive
User
Non-volatile magnetic
Yes
replaceable media, various sizes in off state.
In addition, to prevent loss of data)
No
Remove the...GB gDDR5 for frame
buffer. see
uses system graphics systems. UMA uses
next column DDR3. Dell systems will be valid. There is read/write by mode. Video
UMA
Volatile memory in ...
Statement of Volatility - Page 3
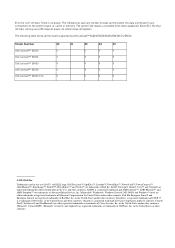
... Systems, Inc. The OS does not save any component on which clears all the states supported by Dell Latitude™ E6230/E6330/E6430/E6430ATG/E6530
Model Number Dell Latitude™ E6230 Dell Latitude™ E6330 Dell Latitude™ E6430 Dell Latitude™ E6530 Dell Latitude™ E6430 ATG
S0
S1
S3
S4
S5
X
X
X
X
X
X
X
X
X
X
X
X
X
X
X
X
X
X
X
X
© 2012...
Latitude E-Family Re-Imaging Guide - Page 34
... at 4KB.
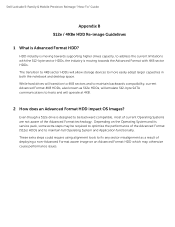
2 How does an Advanced Format HDD impact OS Images? While hard drives will transition to 4KB sectors and to maintain backwards compatibility, current Advanced Format 4KB...issues.
HDD industry is moving towards supporting higher drives capacity, to be required to optimize the performance of the Advanced Format technology. Dell Latitude E-Family & Mobile Precision Reimage "How-To" ...
Latitude E-Family Re-Imaging Guide - Page 37
.... - Dell Latitude E-Family & Mobile Precision Reimage "How-To" Guide
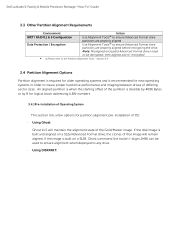
3.3 Other Partition Alignment Requirements
Environment
Action
IRRT / RAID 0,1 & 5 Configuration
Use Alignment Tools(1) to ensure Advanced Format drive
partitions are properly aligned
Data Protection / Encryption
Use Alignment Tools(1) to insure proper hard drive performance and imaging between drives of differing sector...
Similar Questions


How To Remove Memory From Dell Laptop Latitude E6430
(Posted by kjcGBor 10 years ago)


Remove Hard Drive Dell Vostro 1440 Laptop
how i remove hard drive dell vostro 1440 laptop step by step.
how i remove hard drive dell vostro 1440 laptop step by step.
(Posted by hiteshsethi73 12 years ago)