Dell Latitude E6320 Support Question
Dell Latitude E6320 Support Question
Find answers below for this question about Dell Latitude E6320.Need a Dell Latitude E6320 manual? We have 2 online manuals for this item!
Question posted by ciaratho on March 10th, 2014
How To Work With Sim In Dell Latitude E6320
The person who posted this question about this Dell product did not include a detailed explanation. Please use the "Request More Information" button to the right if more details would help you to answer this question.
Current Answers
Related Dell Latitude E6320 Manual Pages
User Manual - Page 1
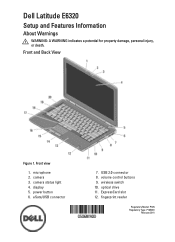
... view
1. camera status light 4. volume control buttons 9. fingerprint reader
Regulatory Model: P12S Regulatory Type: P12S001
February 2011 power button 6. wireless switch 10.
display 5. Dell Latitude E6320
Setup and Features Information
About Warnings
WARNING: A WARNING indicates a potential for property damage, personal injury, or death. microphone 2. optical drive 11.
User Manual - Page 2
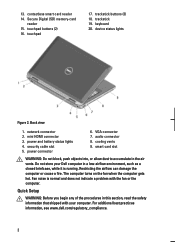
... in this section, read the safety information that shipped with the fan or the computer.
For additional best practices information, see www.dell.com/regulatory_compliance.
2 VGA connector 7. touchpad
17. trackstick buttons (3) 18. Back view
1. security cable slot 5. Restricting the airflow can damage the computer or cause a fire. trackstick ...
User Manual - Page 3
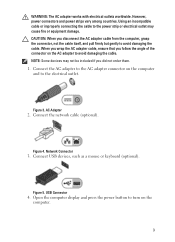
Using an incompatible cable or improperly connecting the cable to turn on the computer.
3
Figure 5. WARNING: The AC adapter works with electrical outlets worldwide. NOTE: Some devices may cause fire or equipment damage. Figure 3. When you wrap the AC adapter cable, ensure that you follow ...
User Manual - Page 7
...in the United States and/or other countries. is a registered trademark and owned by Dell Inc. Intel®, Pentium®, Xeon®, Core™, Atom™, Centrino&#... materials in any proprietary interest in this text: Dell™, the DELL logo, Dell Precision™, Precision ON™, ExpressCharge™, Latitude™, Latitude ON™, OptiPlex™, Vostro™, and ...
Owners Manual - Page 2
... trade names may be used in this publication to refer to change without the written permission of Dell Inc. Trademarks used in this text: Dell™, the DELL logo, Dell Precision™, Precision ON™,ExpressCharge™, Latitude™, Latitude ON™, OptiPlex™, Vostro™, and Wi-Fi Catcher™ are either the entities claiming...
Owners Manual - Page 3
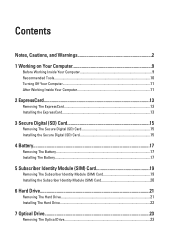
... Computer 9 Recommended Tools...10 Turning Off Your Computer 11 After Working Inside Your Computer 11
2 ExpressCard 13
Removing The ExpressCard 13 ... The Battery...17 Installing The Battery...17
5 Subscriber Identity Module (SIM) Card 19
Removing The Subscriber Identity Module (SIM) Card 19 Installing the Subscriber Identity Module (SIM) Card 20
6 Hard Drive 21
Removing The Hard Drive 21 ...
Owners Manual - Page 9
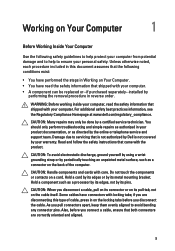
.... For additional safety best practices information, see the Regulatory Compliance Homepage at www.dell.com/regulatory_compliance. Hold a card by its edges or by a certified service technician.
Unless otherwise noted, each procedure included in reverse order. WARNING: Before working inside your product documentation, or as directed by periodically touching an unpainted metal surface...
Owners Manual - Page 10
... surface, such as the
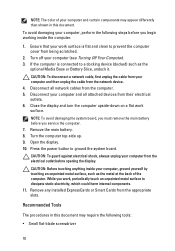
optional Media Base or Battery Slice, undock it. While you work surface. To avoid damaging your computer, perform the following tools:
• Small flat-... cable from your computer and certain components may require the following steps before you begin working inside your computer from the appropriate slots. Disconnect your computer (see Turning Off Your Computer...
Owners Manual - Page 11
The computer turns off your computer. After Working Inside Your Computer After you complete any replacement procedure, ensure you ...power button for about 4 seconds to the computer, use batteries designed for this particular Dell computer.
Do not use only the battery designed for other Dell computers. 1. CAUTION: To avoid damage to turn off after the operating system shutdown ...
Owners Manual - Page 19
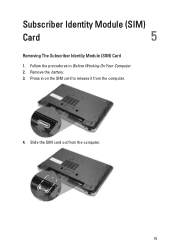
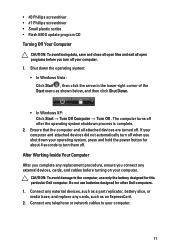
Slide the SIM card out from the computer.
4. Remove the battery. 3. Follow the procedures in on the SIM card to release it from the computer.
19 Press in Before Working On Your Computer. 2. Subscriber Identity Module (SIM)
Card
5
Removing The Subscriber Identity Module (SIM) Card
1.
Owners Manual - Page 20

Slide the SIM card into its compartment. 2. Install the battery. 3. Follow the procedures in After Working Inside Your Computer.
20 Installing the Subscriber Identity Module (SIM) Card 1.
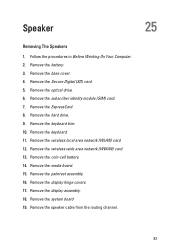
Owners Manual - Page 69
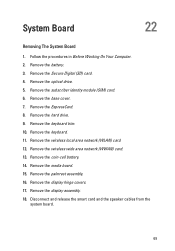
... the speaker cables from the
system board.
69 System Board
22
Removing The System Board
1. Remove the palmrest assembly. 16. Follow the procedures in Before Working On Your Computer. 2. Remove the keyboard. 11. Remove the subscriber identity module...
Owners Manual - Page 75
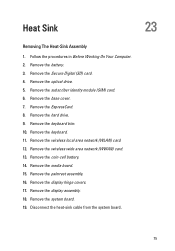
Remove the Secure Digital (SD) card. 4. Remove the subscriber identity module (SIM) card. 6. Remove the keyboard trim. 10. Remove the media board. 15. Remove the system board. 19. Remove the base cover. 7. Remove ... display hinge covers. 17. Remove the optical drive. 5. Remove the display assembly. 18. Remove the battery. 3. Follow the procedures in Before Working On Your Computer. 2.
Owners Manual - Page 79
... the computer.
79 Remove the base cover. 7. Remove the keyboard trim. 10. Follow the procedures in Before Working On Your Computer. 2. Remove the hard drive. 9. Remove the palmrest assembly. 16. Remove the subscriber identity module (SIM) card. 6. Remove the wireless local area network (WLAN) card. 12. Remove the media board. 15. Remove...
Owners Manual - Page 83
Follow the procedures in Before Working On Your Computer. 2. Remove the ExpressCard. 8. Remove the palmrest assembly. 16. Remove the system board 19. Remove the base cover. 4. Remove the keyboard. 11. Remove the coin-cell battery. 14. Remove the display hinge covers. 17. Remove the subscriber identity module (SIM) card. 7. Remove the display assembly...
Owners Manual - Page 85
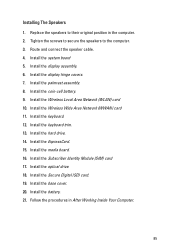
.... 19. Tighten the screws to secure the speakers to their original position in After Working Inside Your Computer.
85 Install the Wireless Local Area Network (WLAN) card 10. Install... speakers to the computer. 3. Install the keyboard trim. 13. Install the Subscriber Identity Module (SIM) card 17. Install the display hinge covers. 7. Install the keyboard. 12. Install the ExpressCard...
Owners Manual - Page 87
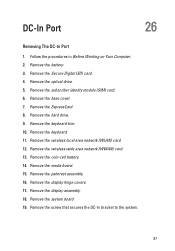
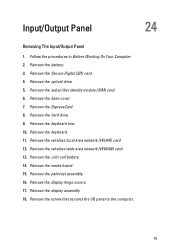
.... Remove the display hinge covers. 17. Remove the display assembly. 18. Remove the system board 19. Remove the subscriber identity module (SIM) card. 6. Remove the wireless local area network (WLAN) card. 12. Remove the palmrest assembly. 16. Remove the ExpressCard. 8.... drive. 9. DC-In Port
26
Removing The DC-In Port
1. Follow the procedures in Before Working on Your Computer. 2.
Owners Manual - Page 89
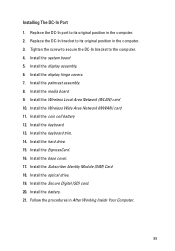
... the coin cell battery 12. Install the display hinge covers. 7. Install the Subscriber Identity Module (SIM) Card 18. Install the system board 5. Install the Secure Digital (SD) card. 20. Install... Install the keyboard trim. 14. Replace the DC-In bracket to its original position in After Working Inside Your Computer.
89 Install the hard drive. 15. Replace the DC-In port to the...
Owners Manual - Page 103
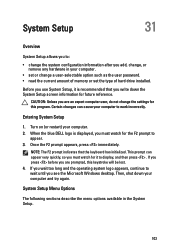
..., so you use System Setup, it to display, and then press . When the blue DELL logo is recommended that the keyboard has initialized. Before you must watch for it is displayed...System Setup Menu Options
The following sections describe the menu options available in your computer to work incorrectly.
Entering System Setup
1.
System Setup
31
Overview
System Setup allows you to:
&#...
Owners Manual - Page 115

...Codes
The following table shows the possible LED codes that may display when your laptop.
• Alternately blinking amber light with AC adapter present. • ...
Next Step
Blinki Solid Solid Processor error Replace the system board.
An unauthenticated or unsupported non-Dell AC adapter is attached to indicate battery charge status.
Turns on steadily or blinks to your computer...
Similar Questions


Wireless Adapter Does Not Work Dell Latitude 6420
(Posted by paskjra18 10 years ago)


Dell Latitude E6320 Does Built In Microphone Work With Laptop Closed?
(Posted by goCHA 10 years ago)