Dell 926 Support Question
Dell 926 Support Question
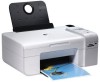
Find answers below for this question about Dell 926 - 926 Photo All-In-One Printer Scanner.Need a Dell 926 manual? We have 1 online manual for this item!
Question posted by greenwell04 on September 14th, 2014
My Printer Does Not Want To Pick Up Paper. I Think It Is Dusty But I Do Not Kno
I do not know how to clean the printer. If I help get the paper started it will print a regular piece of paper but if I am trying to print a photo it will stop somewhere along the way and will not print the whole picture. Anywhere from 5% to 90%. Please help.
Current Answers
Answer #1: Posted by TechSupport101 on September 14th, 2014 8:55 PM
TechSupport101

Member since:
May 24th, 2013 Points: 12,171,305

Member since:
May 24th, 2013 Points: 12,171,305
Hi. The User's Guide here
http://www.helpowl.com/manuals/Dell/926/41919
should also offer troubleshooting tips for issues such as these.
Related Dell 926 Manual Pages
User's Guide - Page 5
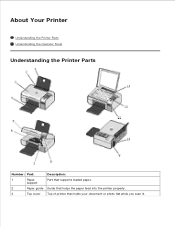
About Your Printer
Understanding the Printer Parts Understanding the Operator Panel
Understanding the Printer Parts
Number: Part:
Description:
1
Paper
Part that holds your document or photo flat while you scan it. support
2
Paper guide Guide that helps the paper feed into the printer properly.
3
Top cover Top of printer that supports loaded paper.
User's Guide - Page 6
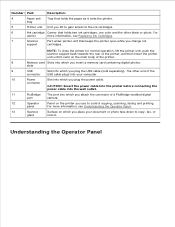
... Cartridges.
7
Scanner
Part under printer unit that keeps the printer open while you plug the power cable. Number: Part:
Description:
4
Paper exit Tray that holds the paper as it rests on the main body of the
connector USB cable plugs into your document or photo face down to control copying, scanning, faxing and printing. tray
5
Printer unit Unit...
User's Guide - Page 7

... or paper eject by holding the button for three seconds. Initiate a copy, scan, or fax.
Scroll through photos and Microsoft Office files on or off. Access the currently displayed menu. Return to check:
The ink levels in progress. NOTE: Pressing the power button does not turn off your printer on a memory card or...
User's Guide - Page 13
...
to print.
Bluetooth Mode
Setup
Settings
menu item
Enable
Off
On Press the Select button to access the contents of the
folders or to choose the file that you want to scroll through the folders and MicrosoftTM Office files stored
on USB keys or memory cards. PictBridge menu item
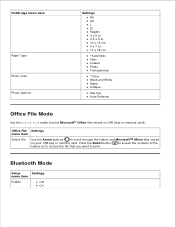
Paper Type Photo Color Photo Options...
User's Guide - Page 15

... edges should be flush against the edges of the paper. Center the paper on the Scanner Glass
Loading Paper into the Paper Support
1. NOTE: Do not force paper into the printer. Loading Paper and Originals
Loading Paper into the Paper Support Understanding the Automatic Paper Type Sensor Loading Original Documents on the paper support. 3. Adjust the paper guides so they rest against both...
User's Guide - Page 17
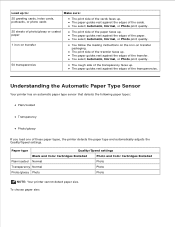
... and Color Cartridges Installed
Plain/coated Normal
Photo
Transparency Normal
Photo
Photo/glossy Photo
Photo
NOTE: Your printer cannot detect paper size. To choose paper size:
1. The paper guides rest against the edges of the paper.
Load up to:
Make sure:
25 greeting cards, index cards, postcards, or photo cards
The print side of the cards faces up . You select Automatic, Normal...
User's Guide - Page 18
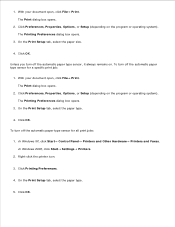
...type.
4. In Windows XP, click Start Control Panel Printers and Other Hardware Printers and Faxes. With your document open , click File Print. Click OK. To turn off the automatic paper type sensor for all print jobs:
1. The Print dialog box opens.
2. The Print dialog box opens.
2. On the Print Setup tab, select the paper type.
5. The Printing Preferences dialog box opens...
User's Guide - Page 21

....
5. NOTE: If you are using photo/glossy paper.
The printout on non-photo paper contains a 2mm margin on your computer and printer, and make any necessary changes for the photo from sticking together or smudging. Borderless printing is recommended for printing photos.
1. The Printing Preferences dialog box closes.
8. Printing Photos
NOTE: Dell recommends you finish...
User's Guide - Page 25
...
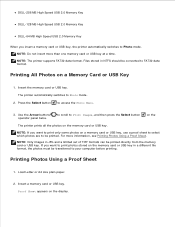
1. to scroll to FAT32 data format. NOTE: The printer supports FAT32 data format. NOTE: Only images in NTFS should be printed directly from the memory card or USB key.
Printing Photos Using a Proof Sheet
1. Printing All Photos on the memory card or USB key.
If you want to print only some photos on a memory card or USB key, use...
User's Guide - Page 26

... to reduce the red-eye effect on the Scanner Glass.
9.
to specify which photos to print, and to choose a layout and paper type to Your Computer.
3. Press the Start button . NOTE: Only images in a certain date range. Print the 25 most recent photos on the scanner glass. The proof sheet prints.
7. 2.
Load the proof sheet facedown on the proof...
User's Guide - Page 27
... into the printer memory card slots.
1. Insert the memory card. Press the Start button . Use the Arrow buttons
to scroll to Save to Your Computer
1. Load photo or glossy paper with the photos that you specified in the photo proof sheet have been printed. NOTE: Do not insert more than the size you want to store print setting information...
User's Guide - Page 34
... Copy Mode.
6. Load the paper. Load your original document.
4. Use the Arrow buttons
to scroll to scroll through the copy submenus and change the copy settings. Turn on the printer. 2. Use the Arrow buttons
to the COPY mode, and then press the Select button .
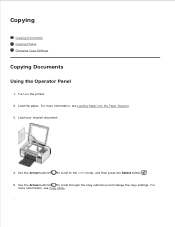
5. Copying
Copying Documents Copying Photos Changing Copy Settings
Copying...
User's Guide - Page 36
Load your original document.
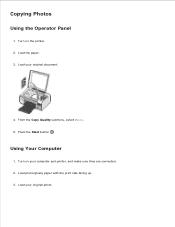
4. Load your original photo. From the Copy Quality submenu, select Photo. 5. Using Your Computer
1. Turn on the printer. 2. Copying Photos
Using the Operator Panel
1. Turn on your computer and printer, and make sure they are connected. 2. Press the Start button . Load the paper. 3. Load photo/glossy paper with the print side facing up. 3.
User's Guide - Page 54
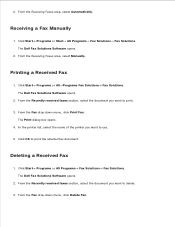
... opens.
2. From the Recently received faxes section, select the document you want to print the selected fax document. From the Fax drop-down menu, click Print Fax.
In the printer list, select the name of the printer you want to delete. 3.
Click Start Programs or Start All Programs Fax Solutions Fax Solutions.
From the Receiving Faxes area, select...
User's Guide - Page 61

...want to set the paper type manually, or have selected Use Color Cartridge for printing. Advanced 2-sided printing - You can print using portrait or landscape orientation.
Envelope - Customize how the printer prints... Allows you have the printer detect the paper type automatically. Maintenance Install Ink Cartridges
Clean Ink Cartridges
Align Ink Cartridges
Print a Test Page
Network ...
User's Guide - Page 62

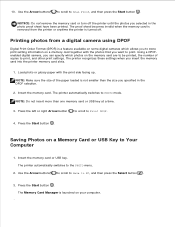
... slot or a USB memory key into the PictBridge port on the front of the printer.
2. Click Start Programs or All Programs Dell Printers Dell Photo AIO Printer 926.
3. Select Memory Card Manager.
4. Memory Card Manager allows you to display, manage, edit, print, and save photos from your memory card or USB key to your computer. Insert a memory card...
User's Guide - Page 70
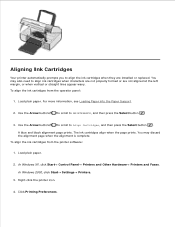
..., or when vertical or straight lines appear wavy. Load plain paper.
2. In Windows 2000, click Start Settings Printers.
3. For more information, see Loading Paper into the Paper Support.
2. A blue and black alignment page prints. The ink cartridges align when the page prints. Aligning Ink Cartridges
Your printer automatically prompts you to align ink cartridges when characters are not...
User's Guide - Page 72
... the nozzles with a clean, dry cloth, and then print your document again to verify the improved print quality. In Windows XP, click Start Control Panel Printers and Other Hardware Printers and Faxes. 1.
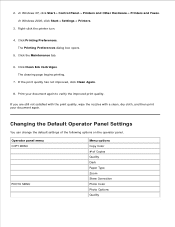
2. Changing the Default Operator Panel Settings
You can change the default settings of Copies Quality Dark Paper Type Zoom Skew Correction Photo Color Photo Options Quality The...
User's Guide - Page 87

... Scan or Fax mode, but the printer is not supported by the printer.
For more information, see Check for a paper jam..
Remove tape from the ink cartridges. Press
to FAT32. Remove the tape from cartridges or check troubleshooting. The device formatting is connected to continue printing.
Install a black or photo print cartridge on the right side. Install...
User's Guide - Page 88
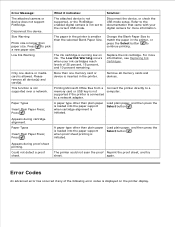
... printing is initiated.
Appears during cartridge alignment. The printer could not scan the proof Reprint the proof sheet, and try
sheet.
Refer to pick a new paper size.
Remove all device(s) and card(s). Paper Types
Insert Plain Paper Press;
A paper type other than plain paper is loaded into the paper support when cartridge alignment is initiated.
Size Warning
Photo...
Similar Questions

Printer Will Not Start Back Printing
Printing a 112 page document, needed to change out a cartridge, replaced with a new color cartridge,...
Printing a 112 page document, needed to change out a cartridge, replaced with a new color cartridge,...
(Posted by memegrand 8 years ago)

Dell 2145cn Printer Prints Pictures With Lines And Poor Color.
dell 2145cn printer prints pictures with lines and poor color. Can this be remedied by cleaning a ce...
dell 2145cn printer prints pictures with lines and poor color. Can this be remedied by cleaning a ce...
(Posted by rebecca86779 11 years ago)

Can I Buy Parts For A 926 Printer
Like The Paper Feeder Roller Assy
(Posted by Anonymous-59011 11 years ago)
I Cannot Find The Port On The Printer To Plug In A Power Cord...dumb As It Sound
(Posted by DVTOOLEY 12 years ago)

I Have A Broken Paper Feeder Bracket For The 926 Photo Printer.
(Posted by sukie13 12 years ago)