Craftsman 22124 Support Question
Craftsman 22124 Support Question
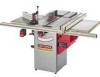
Find answers below for this question about Craftsman 22124 - Professional 10 in. Table Saw.Need a Craftsman 22124 manual? We have 1 online manual for this item!
Question posted by pgovert on January 26th, 2014
How Do I Adjust The Tracking For The Power Belt? It Keeps Coming Off.
The person who posted this question about this Craftsman product did not include a detailed explanation. Please use the "Request More Information" button to the right if more details would help you to answer this question.
Current Answers
Related Craftsman 22124 Manual Pages
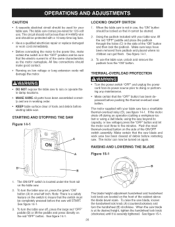
Owners Manual - Page 2
...Cords ...Grounding Instructions ...Specific Safety Instructions for Table Saw ...Accessories and Attachments ...Carton Contents ...Know Your Table Saw ...Assembly Instructions ...Operations and Adjustment to the nearest Sears Service Center for 120V,...
3-3/8-in , Cast Iron 330 Ibs. 70 Ibs. Table in front of blade at max depth-of teeth
Poly-V Belt 10-in. 5/8-in . Sears, Roebuck and Co., Dept...
Owners Manual - Page 4
... and permanent eye damage. MAiNTAiN YOUR BALANCE. Keep all of the Safety and Operating Instructions before plugging in the presence of this Table Saw if you accidentally contact the tool.
17. DO NOT work in doubt, check the instruction manual that comes with ANSi standard Z87.1) when operating power tools. If in an environment with floor surfaces...
Owners Manual - Page 7
...Table Saw plugged into your Table Saw. DO NOT unplug the Table Saw by the power cord.
Some examples of these chemicals: work in debris being thrown into the electrical outlet. To reduce your thumbs and fingers away from the blade while it is properly grounded. Keep...turn the power switch "OFF" before unplugging the Table Saw.
6. NEVER allow the power cord to come in damp...
Owners Manual - Page 8

... the power source.
27. Clean off the table/work area before table saw blade....saw . Refer to the power source.
33. 14. TheTableSawis designedforhomeuseor light commerciadlutyONLY.
15. Neversawinga largeworkpiecethatcannotbe controlled. REMOVEcut-offpiecesanddebrisfromthetable beforestartingthesaw. KEEP arms, hands and fingers away from power source. NEVER have any part of this tool...
Owners Manual - Page 9
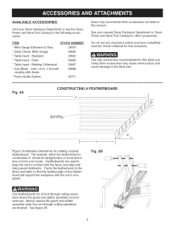
... of, should be removed. Clamp the featherboard to
keep the work in this table saw .
Do not use any accessory unless you have ...table saw . Fig. 2B
Use featherboards for all non-through cutting operations are used to the fence and table so that accessory. Molding Cutterhead * Saw Blade - AVAILABLE ACCESSORIES
Visit your nearest Sears Hardware Department or Sears Power and Hand Tool...
Owners Manual - Page 11

... and motor cover closed and fastened before assembly.
8, Compare the items to any protective coatings on a clean work surface.
2.
Table saw is shipped in the power cord and turn "ON" the table saw can be turned "ON" after all of assembly. Handwheel (2) 4. Splitter mounting rod 6. Splitter bracket assembly 7. Fence hook (2)
10. Polly-V belt 11. Dust Port 13.
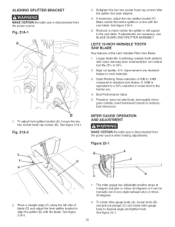
Owners Manual - Page 17
... material has been removed from inside the cabinet.
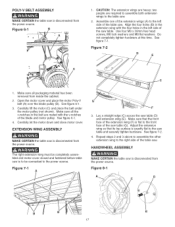
2. HANDWHEEL ASSEMBLY
MAKE CERTAIN the table saw is disconnected from the power source. POLY=V BELT ASSEMBLY
MAKE CERTAIN the table saw is disconnected from the power source. Adjust the extension wing so that the front face of the saw table (G).
c
1, CAUTION: The extension wings are heavy;
The right extension wing must be...
Owners Manual - Page 18

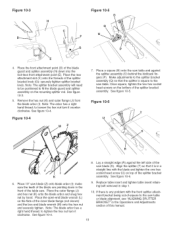
... 9-1.
2. See figure 8-1. See figure 8-2.
3. WRENCH AND FENCE HOOK ASSEMBLY
MAKE CERTAIN the table saw is disconnected from the power source. Place the splitter bracket assembly (C) onto the mounting splitter rod. Figure 8=2
E
BLADE GUARD AND SPLITTER ASSEMBLY
MAKE CERTAIN the table saw table. Figure 10=1 B
F
2. Repeat the steps above the fence hooks using four M4 x 8mm sheet metal...
Owners Manual - Page 19
... assembly (H) down in the
front of the table saw table or blade alignment, see "AMGNING SPMTTER BRACKET" in the Operations and Adjustments section of the splitter bracket assembly. Note: ... blade are pointing down into the tool-less front attachment point (E). Place a square (N) onto the saw blade (Z) onto blade arbor (I ). See figure 10-5. Place 10" saw table and against the left side of ...
Owners Manual - Page 20

...adjust front rail parallel to the table surface on the rear rail (J) with the two holes in the saw table and fasten the rail to the table surface, securely tighten front rail mounting hardware. Finish fastening the front rail to the extension wings with the two holes in the saw table...top edge (C) of the front rail is disconnected from the power source. I
I ) on the front rail (B) with ...
Owners Manual - Page 25
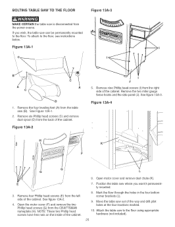
...nameplate (H). Move the table saw to the floor, see instructions below. See Figure 13A-1.
2. Remove the two miter gauge fence hooks and the side panel (J). Remove the four leveling feet (A) from the power source. Open the ...motor cover (F) and remove the two Phillip head screws (G) from the left side of the way and drill pilot holes at the four locations marked.
10...
Owners Manual - Page 26
...; KEEP table surface clear of the same characteristics as the motor nameplate. Push the reset thermal-overload button on the front of the ON/OFF switch assembly. To turn the handwhee[ (B) clockwise. The blade height adjustment handwheel and handwheel lock knob are in one-half inch.
See figure 14-1.
3, To turn the table saw off...
Owners Manual - Page 28

... square.
Fig. 17A-2
2. CHECKING BLADE ALIGNMENT
Blade heel is not touching any adjustments. It is recommended to its highest point.
2. ADJUSTING BLADE ALIGNMENT
Blade alignment is necessary, see checking blade alignment). MAKE CERTAIN the table saw is disconnected from the power source. Raise the saw blades have to the miter slots, it becomes necessary (see...
Owners Manual - Page 29

...
MAKE CERTAIN the table saw . See figure 17B-2.
3. Fig. 17B=1
®
[ BIESEMEYER
BIESEMEYER ® T=SQUARE ® COMMERCIAL RiP FENCE SYSTEM ASSEMBLY OPERATIONS AND ADJUSTMENTS
A B
To align... screws.
3. Repeat steps in position. Adjust the cursor until the blade is positioned away from the power source when making adjustments. The saw blade by loosening the two screws (E). ...
Owners Manual - Page 30

...4, Replace rip fence onto the guide tube and lock.
TABLE INSERT ADJUSTMENT
MAKE CERTAIN the table saw table (B).
ADJUSTING CLAMPING ACTION OF FENCE LOCKING HANDLE
1. The table insert (A) must be level with the miter gauge groove.... see if the rip fence is disconnected from the power source when making adjustments.
See figure 18-1.
2. See figure 18-1.
2. LUBRICATION
1, Apply paste wax weekly...
Owners Manual - Page 31

....
• USE ONLY 10-in . CHANGING MOTOR VOLTAGE
• MAKE CERTAIN the table saw table and assemble the blade flange and arbor nut.
Replace junction box cover and close motor cover. 6. diameter blades with the following instructions. Place the closedend wrench (B) on motor (C). Remove arbor nut, blade flange (D) and saw blade to keep it . Thetableinsertis equippedwitha...
Owners Manual - Page 32
...%.
2. Figure 22=1
A B
2.
Recheck to make certain the splitter is disconnected from the power source when making adjustments. To rotate miter gauge body (A), loosen knob (B) and pull out plunger (C) and rotate miter gauge body to the saw table. ALiGNiNG SPLITTER BRACKET MAKE CERTAIN the table saw is still square to desired angle and tighten knob.
Fig. 21A-2
D
3.
Owners Manual - Page 33
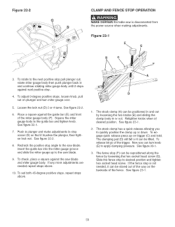
... FENCE STOP OPERATION
MAKE CERTAIN the table saw blade.
9. Square the miter gauge body to the next positive stop pull plunger out, rotate miter gauge body then push plunger back in or out.
See figure 23-1.
3, The fence stop is disconnected from the power source when making adjustments. To adjust O-degree positive stops, loosen knob...
Owners Manual - Page 38

... to turn the power "OFF" and unplug the power cord from its power source when making the cuts in the blade raising/lowering or blade tilting assemblies, the following adjustments should be slowed up at the end of the cut to prevent splintering
In all play is removed in a "front-to keep your table saw has been...
Owners Manual - Page 40

.... 2. Blade is not mounted securely.
40
1. Saw is warped. 2. See "Fence Alignment" in motor; Replace drive belt. 3. TOPREVENTINJURYTOYOURSELF or damage to the table saw on a flat surface.
Defective capacitor. 4. Have capacitor...fails to come to blade.
1. Adjust set properly.
1. Sharpen or replace blade. 2. Rails are not set -screws in miter gauge bar are out of cabinet.
1. If saw . 4....
Similar Questions

Arbor Nut For A Craftsman Professional Table Saw
(Posted by jimszawara 7 months ago)

Or91721 Replacement Belt
What is a replacement belt that can purchased with out a month relay from order from Sears Parts?
What is a replacement belt that can purchased with out a month relay from order from Sears Parts?
(Posted by Spauldid51 11 years ago)
Where Can I Get A Belt For A 9' Craftsman Band Saw Model 351.214190?
I located one at sears parts direct, but it is running $26.00 and that seems a little high for the b...
I located one at sears parts direct, but it is running $26.00 and that seems a little high for the b...
(Posted by manny22002 11 years ago)

What Is A Sears Electronic 10'table Saw Worth
what is a sears electronic 10" table saw w/ext,& base model 113.290650 worth?, it works great
what is a sears electronic 10" table saw w/ext,& base model 113.290650 worth?, it works great
(Posted by mastercook76 11 years ago)

Blade Adjustment
How can I adjust blade to correct heal vs. toe misalignment?
How can I adjust blade to correct heal vs. toe misalignment?
(Posted by Dale54131 12 years ago)