Canon iP3600 Support Question
Canon iP3600 Support Question
Find answers below for this question about Canon iP3600 - PIXMA Color Inkjet Printer.Need a Canon iP3600 manual? We have 1 online manual for this item!
Question posted by chief2christine on January 3rd, 2015
Copy Paper Not Feeding Through Printer.
Copy paper does not feed straight when printing, paper goes sideways.
Current Answers
Answer #1: Posted by Odin on January 3rd, 2015 12:20 PM
Odin

Member since:
April 10th, 2010 Points: 41,236,660

Member since:
April 10th, 2010 Points: 41,236,660
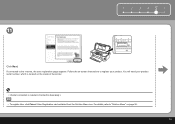
As of this writing Help Owl has not identified the printer in question—so I'll have to walk you through the process I'd follow if I knew the model of the printer:
Go to http://www.usa.canon.com/cusa/support/consumer, and enter the model name or number in the search box. On the resulting page click "Service & Support," and then in the search box type your question or kewwords. You might try "copy feed sideways." Finally, on the page that comes up, link to the article that best pertains to your issue.
Hope this is useful. Please don't forget to click the Accept This Answer button if you do accept it. My aim is to provide reliable helpful answers, not just a lot of them. See https://www.helpowl.com/profile/Odin.
Related Canon iP3600 Manual Pages
Getting Started - Page 1
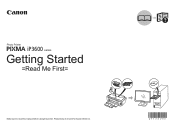
Please keep it in hand for future reference. Photo Printer
iP3600 series
Getting Started
=Read Me First=
Make sure to read this manual before using the printer.
Getting Started - Page 3
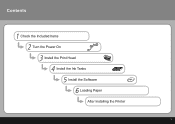
Contents
1 Check the Included Items 2 Turn the Power On 3 Install the Print Head 4 Install the Ink Tanks 5 Install the Software 6 Loading Paper
After Installing the Printer
Getting Started - Page 4
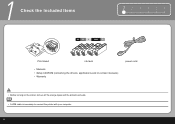
1
Check the Included Items
123456
Print Head
ink tank
• Manuals • Setup CD-ROM (containing the drivers, applications and on-screen manuals) • Warranty
power cord
• Before turning on the printer, remove all the orange tapes and the protective sheets. • A USB cable is necessary to connect the printer with your computer.
2
Getting Started - Page 5

... On
1
2
(2) (1)
1234 5 6
(A)
3
(B)
Plug in the power cord on the printer.
This is normal operation.
3
Press the ON button (A) to the wall outlet. Confirm that the POWER lamp (B) lights green.
• Do NOT connect the USB cable at the back of the printer and connect the other end to turn on the left...
Getting Started - Page 6
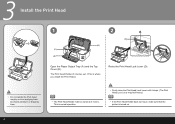
... move, make sure that the printer is where you install the Print Head.)
Raise the Print Head Lock Lever (D).
• Do not handle the Print Head roughly such as applying them excessive pressure or dropping them.
• The Print Head Holder makes a noise as it moves. 3
Install the Print Head
1
(C) (A)
2
(D) (B)
Open the Paper Output Tray (A) and the...
Getting Started - Page 10
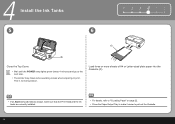
... Paper Output Tray to make some operating noises when preparing to pull out the Cassette.
8 This is normal operation. 4
Install the Ink Tanks
5
6
1 2 34 5 6
(C)
(B)
Close the Top Cover.
• Wait until the POWER lamp lights green (about 4 minutes) and go to the next step.
• The printer may make it easier to print...
Getting Started - Page 11
...to the computer's hard disk. The installation resumes from where it to a computer, software including the drivers needs to be copied (installed) to restart your computer has been restarted.
• Mac OS 9, Mac OS X Classic environments, or Mac ...CD-ROM during restarting. 5
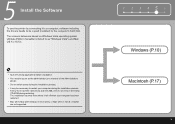
Install the Software
To use the printer by connecting it left off when your computer during the installation process.
Getting Started - Page 12

... to quit the screen.
3 Proceed from . When the CD-ROM contents appear, double-click MSETUP4.EXE.
10 Press the ON button (A) to TURN OFF THE PRINTER and turn on the computer.
In this case, proceed from .
2 Click Cancel to Step .
• Operating noise continues for about 30 seconds until the...
Getting Started - Page 15
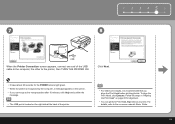
For details, refer to the printer, then TURN THE PRINTER ON. 1 2 3 456
7
8
USB
When the Printer Connection screen appears, connect one end of the printer.
• For better print results, it is located on page 29 for alignment.
• You can perform Print Head Alignment at the back of the USB cable to the computer, the other...
Getting Started - Page 17
...
Click Next. User Registration can be started from the Solution Menu icon. Follow the on-screen instructions to "Solution Menu" on the inside of the printer.
• Internet connection is required. (Connection fees apply.) • To register later, click Cancel. For details, refer to register your product serial number, which is...
Getting Started - Page 18

... 22!
16 If Restart is displayed, make sure that the Restart the system now (recommended) check box is selected, then click Restart. Next, read "6 Loading Paper" on the printer's functionality.)
Click Exit. 5
Windows
12
13
When the Extended Survey Program screen appears, confirm the message.
Getting Started - Page 19
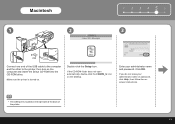
...password, click Help, then follow the onscreen instructions.
• The USB port is turned on the desktop.
Make sure the printer is located on the computer and insert the Setup CD-ROM into the CD-ROM drive. If the CD-ROM folder does not...
1
2
1 2 3 456
3
USB
Connect one end of the USB cable to the computer and the other to the printer, then turn on the right side at the back of the...
Getting Started - Page 23
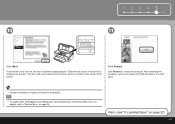
Click Restart to register your product serial number, which is required. (Connection fees apply.)
• To register later, click Cancel. Next, read "6 Loading Paper" on the inside of the printer.
After restarting the computer, remove the Setup CD-ROM and keep it in a safe place.
• Internet connection is located on page 22...
Getting Started - Page 25

... Rear Tray.
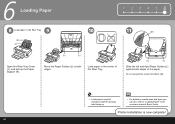
23 Attach the Cover (E) and insert the Cassette into the printer until it clicks into place.
• Load paper with the printing side facing down.
• There may be a little space between the Paper Guide and the paper stack.
• To print on speciality paper, be sure to align with the corresponding mark of the...
Getting Started - Page 26
... (M).
• Load paper in portrait orientation with the printing side facing up the Paper Support (K).
(L)
(L)
Move the Paper Guides (L) to "Loading Paper" in the on media sizes and types you can use, refer to both edges of the Rear Tray.
(L)
(L)
Slide the left and right Paper Guides (L) against both edges.
6
Loading Paper
1 23456
8 9 Load paper in the Rear...
Getting Started - Page 28
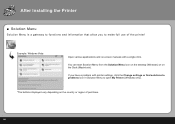
... Solution Menu icon on the desktop (Windows) or on -screen manuals with printer settings, click the Change settings or find solutions to problems icon in Solution Menu... the Dock (Macintosh).
If you to open My Printer (Windows only).
*The buttons displayed vary depending on the country or region of the printer!
After Installing the Printer
■ Solution Menu
Solution Menu is a gateway ...
Getting Started - Page 29
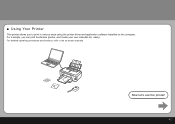
Now let's use the printer!
27 For detailed operating procedures and functions, refer to print in various ways using the printer driver and application software installed on -screen manuals. ■ Using Your Printer
This printer allows you can print borderless photos, and create your own calendar etc. easily. For example, you to the on the computer.
Getting Started - Page 30

... orientation.
Easy-PhotoPrint EX starts.
This section explains how to print photos easily.
Click Print.
The screens are based on page 22.
• On Macintosh, if the Print screen is set to start printing. Load a sheet of copies is displayed, click Print to "1." Select the image you to print borderless photos using 4" x 6" size Photo Paper Plus Glossy II.
Getting Started - Page 31

... A4 or Letter-sized plain paper into the Cassette (A).
The screens are based on page 22.
1 Click Control Panel, then Printer under Hardware and Sound.
2 Right-click the Canon iP3600 series icon and select Properties.
1 Select System Preferences from the Apple menu and click Print & Fax.
2 Double-click your printer's icon and click Utility.
3 Select...
Getting Started - Page 36
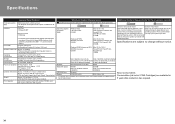
...Printing: 8.5 inches / 216 mm)
Acoustic noise level Approx. 41.0 dB(A) * When printing in the standard print quality mode on your operating system or you keep your system up to date with the Canon inkjet printer...(D) x 153 (H) mm * With the Paper Support and Paper Output Tray retracted. or Mac OS Extended.
USB Port: Hi-Speed USB*
Direct Print Port: PictBridge
* A computer that you keep...
Similar Questions

Printer Paper Feed Button
The button or sensor is messed up. How do i gix it?
The button or sensor is messed up. How do i gix it?
(Posted by virgojayne 2 years ago)

Canon Mg5200 Support Code C000
I just got my printer and set it up and it wont print, it keeps popping up with this code. I did wha...
I just got my printer and set it up and it wont print, it keeps popping up with this code. I did wha...
(Posted by nonelikejesus 9 years ago)

Error E161-403e Call For Service Canon Ipf710 - Imageprograf Color Inkjet
(Posted by josesuarez88 10 years ago)

Pixma Mg3240 Paper Feed
Just cleared a jam. why won't paper now feed? Keep getting the paper empty light.
Just cleared a jam. why won't paper now feed? Keep getting the paper empty light.
(Posted by kstringerjr 10 years ago)

A Printer Error Has Occurred. Turn Off Printer From Power Supply
I've done all above but the 2 lights at the right hand side keep flashing. It was working perfect be...
I've done all above but the 2 lights at the right hand side keep flashing. It was working perfect be...
(Posted by ejalford1950 10 years ago)