
Canon PIXMA MX360 Support Question
Canon PIXMA MX360 Support Question
Find answers below for this question about Canon PIXMA MX360.Need a Canon PIXMA MX360 manual? We have 5 online manuals for this item!
Question posted by dlkibbles on November 28th, 2012
How Do I Print From Memory On A Mx-360??
How do I print from memory on a MX-360?? Please help
Current Answers
Answer #1: Posted by bengirlxD on November 28th, 2012 1:33 PM
bengirlxD

Member since:
November 5th, 2012 Points: 6,395,085

Member since:
November 5th, 2012 Points: 6,395,085
Feel free to resubmit the question if you didn't find it useful.
Related Canon PIXMA MX360 Manual Pages
MX360 series Getting Started - Page 31
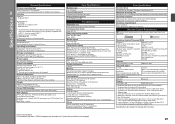
...24 bit (RGB each 8 bit)
Density adjustment
3 levels
Memory
Transmission/reception: approx. 50 pages (Based on a PC ...; Windows: Uninstall software bundled with the Canon inkjet printer before upgrading from Windows Vista to Windows 7, then,... % RH (no condensation)
Power supply AC 100-240 V, 50/60 Hz
Power consumption Printing (Copy): Approx. 11 W Standby (minimum): Approx. 2.0 W *1*2 OFF: Approx....
Selecting Best Receive Mode - Page 1
Selecting The Best Receive Mode &
Phone Line Configuration
MX360
Click Here to Begin
Selecting Best Receive Mode - Page 5
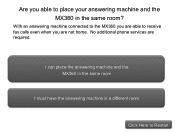
No additional phone services are required.
I can place the answering machine and the MX360 in the same room
I must have the answering machine in the same room? With an answering machine connected to the MX360 you able to place your answering machine and the MX360 in a different room
Click Here to receive fax calls even when you are not home. Are you are able to Restart
Selecting Best Receive Mode - Page 6

... is the Default Mode ("Tel Priority Mode")
To receive a fax when you are heard by the MX360 it will receive the fax document.
IMPORTANT: In order to Restart Click here for fax tones. •...; When the tones stop hang up the handset on the phone connected to the MX360. • Listen for "Tel Priority Mode" Setup Directions
Click Here to receive a fax, you must either ...
Selecting Best Receive Mode - Page 7
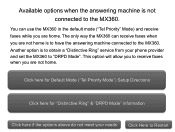
...
Click here if the options above do not meet your phone provider and set the MX360 to the MX360. Available options when the answering machine is not connected to Restart The only way the MX360 can use the MX360 in the default mode ("Tel Priority" Mode) and receive faxes while you are not home...
Selecting Best Receive Mode - Page 8
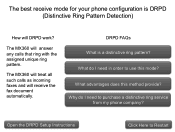
...this method provide? What do I need to purchase a distinctive ring service
from my phone company? The MX360 will DRPD work? DRPD FAQs What is DRPD (Distinctive Ring Pattern Detection)
How will answer any calls ...assigned unique ring pattern. Why do I need in order to Restart The MX360 will treat all such calls as incoming faxes and will receive the fax document automatically. What advantages does...
Selecting Best Receive Mode - Page 9
... Mode". Click here for Default Mode ("Tel Priority Mode") Setup Directions
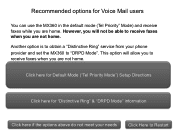
Click here for Voice Mail users
You can use the MX360 in the default mode (Tel Priority" Mode) and receive faxes while you are home. However, you will allow you to ...& "DRPD Mode" information
Click here if the options above do not meet your phone provider and set the MX360 to receive faxes when you are not home.
Selecting Best Receive Mode - Page 10
...needs
Click Here to Restart
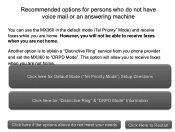
Another option is to obtain a "Distinctive Ring" service from you phone provider and set the MX360 to receive faxes when you are not home. This option will not be able to "DRPD Mode". Recommended options for... above do not have voice mail or an answering machine
You can use the MX360 in the default mode (Tel Priority" Mode) and receive faxes while you are home.
Setting Default Mode - Page 1
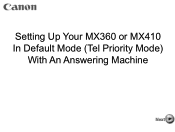
Setting Up Your MX360 or MX410 In Default Mode (Tel Priority Mode)
With An Answering Machine
Next
Setting Default Mode - Page 4
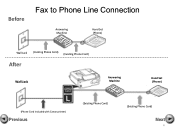
Before
Fax to Phone Line Connection
Answering Machine
Hand Set (Phone)
Wall Jack (Existing Phone Cord) (Existing Phone Cord)
After
Wall Jack
Answering Machine
Hand Set (Phone)
(Phone Cord included with Canon printer)
Previous
(Existing Phone Cord)
(Existing Phone Cord)
Next
4
Setting Default Mode - Page 5

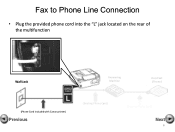
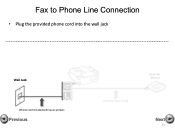
Fax to Phone Line Connection
• Plug the provided phone cord into the wall jack
Wall Jack
Answering Machine
Hand Set (Phone)
(Phone Cord included with Canon printer)
Previous
(Existing Phone Cord)
(Existing Phone Cord)
Next
5
Setting Default Mode - Page 6
Fax to Phone Line Connection
• Plug the provided phone cord into the "L" jack located on the rear of the multifunction
Wall Jack
Answering Machine
Hand Set (Phone)
(Phone Cord included with Canon printer)
Previous
(Existing Phone Cord)
(Existing Phone Cord)
Next
6
Setting Default Mode - Page 7
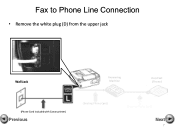
Fax to Phone Line Connection
• Remove the white plug (D) from the upper jack
Wall Jack
Answering Machine
Hand Set (Phone)
(Phone Cord included with Canon printer)
Previous
(Existing Phone Cord)
(Existing Phone Cord)
Next
7
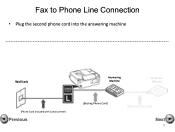
Setting Default Mode - Page 8
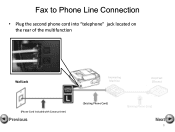
Fax to Phone Line Connection
• Plug the second phone cord into "telephone" jack located on the rear of the multifunction
Wall Jack
Answering Machine
Hand Set (Phone)
(Phone Cord included with Canon printer)
Previous
(Existing Phone Cord)
(Existing Phone Cord)
Next
8
Setting Default Mode - Page 9
Fax to Phone Line Connection
• Plug the second phone cord into the answering machine
Wall Jack
Answering Machine
Hand Set (Phone)
(Phone Cord included with Canon printer)
Previous
(Existing Phone Cord)
(Existing Phone Cord)
Next
9
Setting Default Mode - Page 10
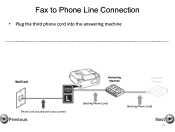
Fax to Phone Line Connection
• Plug the third phone cord into the answering machine
Wall Jack
Answering Machine
Hand Set (Phone)
(Phone Cord included with Canon printer)
Previous
(Existing Phone Cord)
(Existing Phone Cord)
Next
10
Setting Default Mode - Page 11
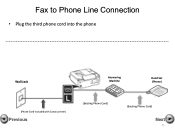
Fax to Phone Line Connection
• Plug the third phone cord into the phone
Wall Jack
Answering Machine
Hand Set (Phone)
(Phone Cord included with Canon printer)
Previous
(Existing Phone Cord)
(Existing Phone Cord)
Next
11
Setting Default Mode - Page 12
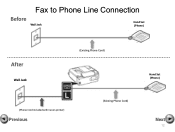
Fax to Phone Line Connection
Before
Wall Jack
Hand Set (Phone)
After
Wall Jack
(Existing Phone Cord)
(Phone Cord included with Canon printer)
Previous
(Existing Phone Cord)
Hand Set (Phone)
Next
12
Setting Default Mode - Page 13
Fax to Phone Line Connection
• Plug the provided phone cord into the wall jack
Wall Jack
(Phone Cord included with Canon printer)
Previous
(Existing Phone Cord)
Hand Set (Phone)
Next
13
Fax Setup Guide - Page 7
Wall Jack
Previous
(Phone Cord included with Canon printer)
Next
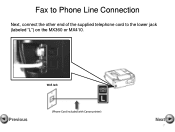
7 Fax to Phone Line Connection
Next, connect the other end of the supplied telephone cord to the lower jack (labeled "L") on the MX360 or MX410.
Similar Questions


Where Do I Find My Model Serial Number On Canon Printer Pixma Mx360
(Posted by brainsteven 9 years ago)


How Can I Print A Color Photo From My Ipad Sideshow To Canon Printer Pixma Mx89
(Posted by Maryfromzim 11 years ago)

Canon Printer Pixma 2120 Series - Told Cd Not Necessary For Install?
purchased canon printer pixma 2120 last night at walmarts. i toldkid working there my laptop didn't ...
purchased canon printer pixma 2120 last night at walmarts. i toldkid working there my laptop didn't ...
(Posted by safrn5 11 years ago)