
Canon PIXMA MX330 Support Question
Canon PIXMA MX330 Support Question
Find answers below for this question about Canon PIXMA MX330.Need a Canon PIXMA MX330 manual? We have 2 online manuals for this item!
Question posted by gbUc on September 15th, 2014
How Do I Remove A Paper Jam From My Cannon Mx330
The person who posted this question about this Canon product did not include a detailed explanation. Please use the "Request More Information" button to the right if more details would help you to answer this question.
Current Answers
Related Canon PIXMA MX330 Manual Pages
Guía de inicio [Spanish Version] - Page 10

... lado derecho.
H
Pull the orange protective tape (H) in the direction of the arrow and remove it gently. Remove the Black FINE Cartridge from its box. Tire de la cinta naranja protectora (H) en la ... and pull up the cover. 5
2
3
4
G
Open the Ink Cartridge Locking Cover on the removed protective tape.
• Tenga cuidado de no mancharse las manos ni el área de trabajo circundante...
Guía de inicio [Spanish Version] - Page 41
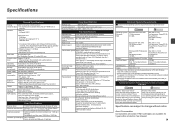
... at 33.6 Kbps, ECM-MMR, transmitting from Windows XP to date with the Canon inkjet printer. • Macintosh: Hard Disk must be formatted as Mac OS Extended (Journaled) or
Mac....2 (D) x 7.8 (H) inches Approx. 458 (W) x 410 (D) x 198 (H) mm * With the Paper Support and Paper Output Tray retracted. system or Internet Explorer version. We
recommend that you keep your system up to Windows...
Getting Started - Page 2
...in the U.S. Model Number: K10332 (MX330) Additional explanations.
Caution Instructions that take some time to mark important instructions. Contents
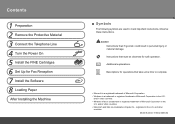
1 Preparation 2 Remove the Protective Material 3 Connect the Telephone... Line 4 Turn the Power On 5 Install the FINE Cartridges 6 Set Up for Fax Reception 7 Install the Software 8 Loading Paper...
Getting Started - Page 3

... to connect the machine with your computer. It may fall on the Document Cover. 1 Preparation
■ Check the Included Items
Before turning on the machine, remove all the orange tapes and the protective sheets.
12 3 4 5 6 7 8
□ Choosing a Location
Color
Black
FINE cartridges
power cord
telephone line cable
• Manuals • Setup...
Getting Started - Page 4
D
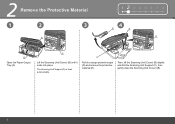
Pull the orange protective tape (D) and remove the protective material (E).
2 Remove the Protective Material
1
2
3
B
123 4 5 6 7 8
4
E
B
C
A
Open the Paper Output Tray (A). C
Lift the Scanning Unit (Cover) (B) until it locks into place. Then, lift the Scanning Unit (Cover) (B) slightly and fold the Scanning Unit Support (C), ...
Getting Started - Page 5

... connection. only
A
Connect the machine with the telephone line cable.
• If you cannot send faxes after installing the machine, check the telephone line type.
Remove the telephone connector cap (B), then connect a telephone with a telephone line using a distribution adapter. 3 Connect the Telephone Line
To use the machine as a fax only: Go...
Getting Started - Page 8

H
Pull the orange protective tape (H) in the direction of the arrow and remove it gently.
• Be careful not to stain your hands or surrounding work area with ink on the right side. Remove the Black FINE Cartridge from its box. 5
2
3
4
G
Open the Ink Cartridge Locking Cover Pinch (G) firmly and pull up the cover.
on the removed protective tape.
Getting Started - Page 10
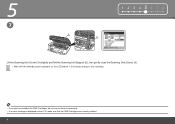
... the standby screen appears on the LCD (about 1-2 minutes) and go to the next step.
• Once you have installed the FINE Cartridges, do not remove them unnecessarily. • If an error message is displayed on the LCD, make sure that the FINE Cartridges are correctly installed.
Getting Started - Page 13
Follow
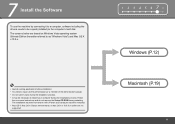
the on-screen instructions and do not remove the Setup CD-ROM during the installation process. • It may be copied (installed) to the computer's hard disk. 7 Install the Software
To use the ...
Getting Started - Page 14
...
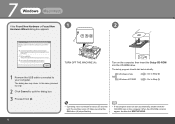
TURN OFF THE MACHINE (A). Windows Vista
Go to your computer. 7
Windows
Macintosh
If the Found New Hardware or Found New
1
2
Hardware Wizard dialog box appears:
A
1 Remove the USB cable connected to Step . The dialog box may close.
Getting Started - Page 18
7
Windows
Macintosh
9
10
11
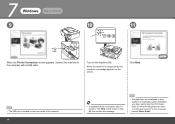
A
When the Printer Connection screen appears, connect the machine to "When Printing Becomes Faint or Colors Are Incorrect" in step , then confirm the message.
• If straight lines ...
Getting Started - Page 20
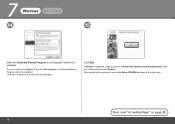
If you can agree, click Agree. After restarting the computer, remove the Setup CD-ROM and keep it in a safe place. 7
Windows
Macintosh
14
15
When the Extended Survey Program screen appears, confirm... is displayed, make sure that the Restart the system now (recommended) check box is selected, then click Restart. Next, read "8 Loading Paper" on the machine's functionality.)
Click Exit.
Getting Started - Page 25
If you can agree, click Agree. After restarting the computer, remove the Setup CD-ROM and keep it in a safe place.
• The screen does not ... computer, it is necessary to "Saving Scanned Data" in the on Image Capture under Applications. Next, read "8 Loading Paper" on the machine's functionality.)
Click Restart. If you click Do not agree, the Extended Survey Program will not be...
Getting Started - Page 26
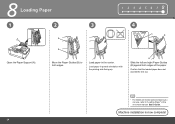
...; For details on -screen manual: Basic Guide. Machine installation is now complete!
24 Load paper in the center.
B
Slide the left and right Paper Guides (B) against both edges.
8 Loading Paper
1
2
A
B
1 2 3 4 5 6 78
3
4
C
B
Open the Paper Support (A). B
Move the Paper Guides (B) to "Loading Paper" in the on media sizes and types you can use, refer to both edges...
Getting Started - Page 28
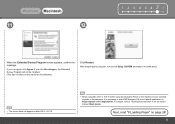
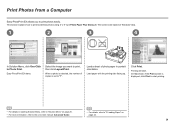
... Solution Menu to open the on-screen manual, click the button shown to make full use of purchase.
26 Example: Windows Vista
To open My Printer (Windows only).
*The buttons displayed vary depending on the Dock (Macintosh). If you to the left in Solution Menu.
Getting Started - Page 30
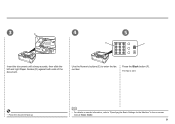
... the Start button. This is complete. Doing so may make operating noise when feeding paper.
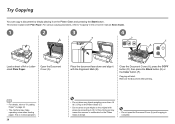
This section explains with the Alignment Mark (B). For various copying procedures, refer to ... (D), then press the Black button (E) or the Color button (F). Remove the document after printing.
• For details, refer to "8 Loading Paper" on page 24.
• The machine may cause the scanner ...
Getting Started - Page 31
..., refer to "Solution Menu" on page 26. • For more information, refer to the on-screen manual: Advanced Guide.
• For details, refer to "8 Loading Paper" on Windows Vista.
1
2
3
4
In Solution Menu, click One-Click to "1". Easy-PhotoPrint EX starts. Select the image you to print, then click Layout/Print. Click...
Getting Started - Page 32
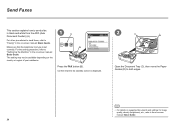
... faxes, refer to the on-screen manual: Basic Guide.
30 Confirm that the telephone line type is displayed.
2
D
C
Open the Document Tray (C), then move the Paper Guides (D) to both edges.
• For details on supported documents and settings for image quality, density (brightness), etc., refer to "Faxing" in the on-screen...
Getting Started - Page 33
...-up.
• For details on sender information, refer to enter the fax number.
3
D
4
5
E
F
Insert the document until a beep sounds, then slide the left and right Paper Guides (D) against both ends of the document. Press the Black button (F). Use the Numeric buttons (E) to "Specifying the Basic Settings for the Machine" in the...
Getting Started - Page 35
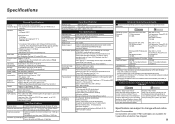
....2 (D) x 7.8 (H) inches Approx. 458 (W) x 410 (D) x 198 (H) mm * With the Paper Support and Paper Output Tray retracted. Additional System Requirements for 5 years after every 20 transactions) Sequential broadcasting (max. 21 ... Windows XP to Windows Vista, first uninstall software bundled
with the Canon inkjet printer. • Macintosh: Hard Disk must be installed.
The on -screen manual...
Similar Questions

How Do I Open Pixma892 To Remove Paper Jam
said paper jam even after removing paper and the rolls will go but then it says if it persists to ge...
said paper jam even after removing paper and the rolls will go but then it says if it persists to ge...
(Posted by bkovalpbusiness 10 years ago)


I'm Have This Message In My Cannon Mx330 'document In Adf. Redo Opperation Afte
I'm have this message in my cannon mx330 "Document in ADF. Redo opperation after checking documentin...
I'm have this message in my cannon mx330 "Document in ADF. Redo opperation after checking documentin...
(Posted by hectograph2002 12 years ago)

Pixma Mx330 Paper Output Slot Error Saying To Clear Paper Jam Will Not Clear
pixma mx330 paper output slot error saying to clear paper jam will not clear even thogh theres's no ...
pixma mx330 paper output slot error saying to clear paper jam will not clear even thogh theres's no ...
(Posted by romasoogrim 12 years ago)