
Brother International SE-400 Support Question
Brother International SE-400 Support Question
Find answers below for this question about Brother International SE-400.Need a Brother International SE-400 manual? We have 4 online manuals for this item!
Question posted by Donaalvar on December 6th, 2013
Can I Use Brother Embroidery Foot For Free Form Quilting Se400
The person who posted this question about this Brother International product did not include a detailed explanation. Please use the "Request More Information" button to the right if more details would help you to answer this question.
Current Answers
Related Brother International SE-400 Manual Pages
Users Manual - English - Page 3
... for examination, repair, electrical or mechanical adjustment. • While the machine is intended for future reference. Before using the machine immediately and unplug the power cord. • When transporting the sewing machine, be accessed for household use if you have finished reading this embroidery and sewing machine. To reduce the risk of electric shock
1 Always unplug the...
Users Manual - English - Page 7
... an even seam allowance ...67
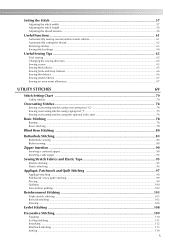
UTILITY STITCHES
69
Stitch Setting Chart ...70
Utility stitches ...70
Overcasting Stitches...74
Sewing overcasting stitches using overcasting foot "G 74 Sewing overcasting stitches using zigzag foot "J 75 Sewing overcasting stitches using the optional side cutter 76
Basic Stitching ...78
Basting ...78 Basic stitching ...78
Blind Hem Stitching ...80
Buttonhole...
Users Manual - English - Page 8

...Embroidery step by step ...119
Attaching the Embroidery Foot 120
Attaching the embroidery foot ...120 Removing the embroidery foot ...122
Attaching the Embroidery Unit 123
Embroidery unit precautions ...123 Attaching the embroidery unit ...123 Removing the embroidery... embroidery pattern ...137 Selecting a frame pattern...137 Using an embroidery ... the machine surface ...152 Cleaning the race ...152...
Users Manual - English - Page 11

...
21 Foot controller
5 Zigzag foot "J" (on machine) 6 Blind stitch foot "R" 7 Button fitting foot "M"
8 Seam ripper
9 Bobbin (4) Bobbin clip (3)
10 Needle set 11 Twin needle 12 Cleaning brush
XC3021-031 XC4051-031 XE2137-001
X54243-051
SA156
SFB: XA5539-151
XE3060-001
XE58358-021
X59296-121
X59476-021
22 Scissors
23 Disc-shaped screwdriver
24 Embroidery foot "Q"
Embroidery set...
Users Manual - English - Page 12
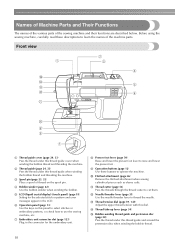
... thread and threading the machine. Before using the sewing machine, carefully read these buttons to use the sewing machine, etc. b Thread guide (page 24, 33) Pass the thread under this panel to select stitches or embroidery patterns, or check how to operate the machine.
f Operation panel (page 13) Use the keys on the spool pin. h Presser foot lever (page 50) Raise...
Users Manual - English - Page 13
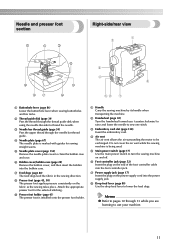
...to lower the feed dogs. a Handle Carry the sewing machine by its handle when transporting the machine.
c Embroidery card slot (page 138) Insert the embroidery card. f Foot controller jack (page 52) Insert the plug on ... the sewing machine on the fabric as the sewing takes place. g Feed dogs (page 88) The feed dogs feed the fabric in the sewing direction. e Main power switch (page 17) Use the ...
Users Manual - English - Page 15

... replacement / embroidery unit attachment / embroidery frame attachment / embroidery foot attachment / presser foot replacement.
13 e Memory key Press to the previous screen.
into the sewing machine memory.
f...sound, and more.
g Embroidery key Press this key to "LCD (Liquid Crystal Display) Operation" (page 18). Touch the keys displayed on using the sewing machine. a LCD (liquid ...
Users Manual - English - Page 20

... stitch b Presser foot to be used c Stitches d Stitch settings and twin needle sewing e Stitch width ...embroidery pattern" (page 137). Change the screen on the LCD using the keys on the front of the LCD, and make operations by directly touching the icons with your finger or a touch pen. The details are displayed on the LCD (liquid crystal display) on the right side of the sewing machine...
Users Manual - English - Page 30
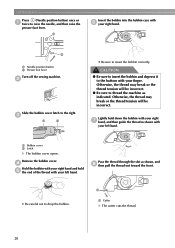
... bobbin with your right g hand, and then guide the thread as indicated. a
a Cutter
X The cutter cuts the thread.
28 b
a Needle position button b Presser foot lever
Turn off the sewing machine. b
Slide the bobbin cover latch to insert the bobbin correctly. c
a
b
• Be sure to the right. CAUTION
● Be sure to insert the...
Users Manual - English - Page 34
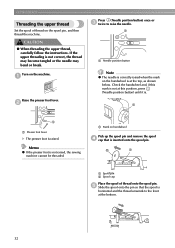
... spool onto the pin so that is correctly raised when the mark on the spool pin, and then thread the machine. If the upper threading is not raised, the sewing machine cannot be threaded. Raise the presser foot lever.
a
CAUTION
● When threading the upper thread, carefully follow the instructions. Memo
z If the presser...
Users Manual - English - Page 42

... on thick fabrics such as 65/9 to 100/16 needle, regardless of the fabric or thread.
■ Embroidery needles Use a 75/11 home sewing machine needle. In addition, the stitching may be skipped stitches. Do not use ball point needles with a bent needle is extremely dangerous since the needle may be uneven or puckered or...
Users Manual - English - Page 45
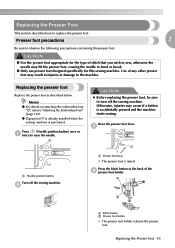
...the back of any other presser foot may hit the presser foot, causing the needle to "Attaching the Embroidery Foot" (page 120). Presser foot precautions
1
Be sure to turn off the sewing machine.
CAUTION
● Use the presser foot appropriate for this sewing machine. Replacing the Presser Foot 43
Memo
z For details on attaching the embroidery foot "Q", refer to bend or break.
●...
Users Manual - English - Page 47
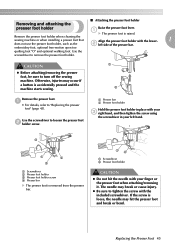
embroidery foot, optional free-motion open toe
quilting foot "O" and optional walking foot. Otherwise, injuries may hit the presser foot and break or bend.
z Be sure to remove the presser foot holder. Use the
screwdriver to tighten the screw with your c right hand, and then tighten the screw using
the screwdriver in place with the included screwdriver.
Remove the presser foot...
Users Manual - English - Page 99
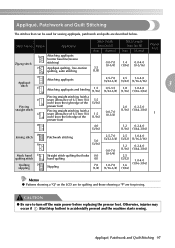
...quilting, free-motion quilting, satin stitching
Stitch Width [mm (inch)]
Auto Manual
0.0-7.0
3.5
(0-1/4)
(1/8)
Stitch Length [mm (inch)] Auto Manual
1.4 0.0-4.0 (1/16) (0-3/16)
Presser Foot...for quilting and those showing a "P" are for sewing appliqués, patchwork and quilts are described below.
CAUTION
● Be sure to turn off the main power before replacing the pressor foot. ...
Users Manual - English - Page 104

... used, the needle threader may touch the presser foot, causing it to sew uniform stitches roughly 2.02.5mm (approx. 1/16 - 3/32 inch) in your left hand.
Attach free-motion quilting foot "O" by b positioning the pin of the quilting foot above
the needle clamp screw and aligning the lower-left as seen from the rear of d the machine on the sewing machine...
Users Manual - English - Page 122

... to attach the embroidery foot "Q". b
a
b
a Embroidery foot bar b Caught by the presser foot holder screw
CAUTION
● Always use the embroidery foot "Q" when embroidering. Press and hold the black button on the handwheel is raised. If the wrong presser foot is accidentally pressed and the machine starts sewing. a
CAUTION
z Before attaching the embroidery foot, be sure to detach...
Users Manual - English - Page 125

... to the left.
Note
z Do not touch the connector in place. z Do not lift up on the embroidery carriage, and do not forcefully move the sewing machine with the embroidery unit in the
a
4
embroidery unit connector slot. Embroidery unit precautions
Attaching the embroidery unit
CAUTION
● Do not move it may result.
Otherwise injury may
cause malfunctions.
Users Manual - English - Page 127

... be saved.
c
a Release button
X The embroidery unit separates from the
sewing machine.
4
CAUTION
CAUTION
● Do not carry the embroidery unit by holding the carriage.
Turn off the sewing machine before removing the embroidery unit. Removing the embroidery unit
Make sure that the sewing machine is turned on.
Remove the embroidery frame. Press , and then press
. b
Hold...
Users Manual - English - Page 151

... before restarting embroidering. Press
. e
Press
(Forward one stitch) to
embroider.
Press
(Forward one color) to move the sewing machine. g
Restart the embroidery. Turn off , and it moves
forward 1 -> 9 ->30 stitches.
4
Turn on the sewing machine, and then select
f the pattern. Move forward to
i the beginning of stitches confirmed in b.
For details, refer to...
Users Manual - English - Page 167
...C
care 152
feed dogs 11 flat bed attachment 10
foot controller 9, 52
changing sewing direction 65
foot controller jack 11
checking needle 40
frame pattern selection 137
cleaning bobbin case 152
fraying, preventing 74
cleaning brush 9
free-arm sewing 46
cleaning machine surface 152
free-motion quilting 102
concealed seams 90
front view 10
connecting character patterns...
Similar Questions

Need An Instruction Manual For A Brother Embroifery &sewing Machine Se-350 Enthu
(Posted by Anonymous-147250 9 years ago)

Where Is The Shaft On A Brother Se400 Sewing Machine
(Posted by kpomkkahn 10 years ago)

What If Screw Falls Into A Se400 Sewing Machine
(Posted by bldauphi 10 years ago)

Brother Emboridery & Sewing Machine Se 400
Please help me... i only received this machine a week now, first it work well then it start making a...
Please help me... i only received this machine a week now, first it work well then it start making a...
(Posted by natashap4 11 years ago)