
Brother International SE 350 Support Question
Brother International SE 350 Support Question
Find answers below for this question about Brother International SE 350 - Compact Sewing & Embroidery Combo Machine.Need a Brother International SE 350 manual? We have 2 online manuals for this item!
Current Answers
Related Brother International SE 350 Manual Pages
Users Manual - English - Page 1

Computerized Embroidery and Sewing Machine
Operation Manual
Product Code 885-V31/V33
GETTING READY SEWING BASICS UTILITY STITCHES EMBROIDERY APPENDIX
Users Manual - English - Page 3

... authorized dealer or service center for purchasing this embroidery and sewing machine. Introduction
Thank you for examination, repair, electrical or mechanical adjustment. • While the machine is stored or in use if you notice anything unusual, such as an odor, heat, discoloration or deformation, stop using the machine immediately and unplug the power cord. •...
Users Manual - English - Page 9
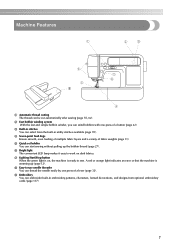
... winder, you can thread the needle easily by one press of a button (page 22). i Embroidery You can start sewing without pulling up (page 12). f Bright light The convenient LED lamp makes it easy to work on , the machine is warming up the bobbin thread (page 27). e Quick-set bobbin You can embroider built...
Users Manual - English - Page 12

...the selected stitch or pattern and error messages appear in the connector for the embroidery unit. g Embroidery unit connector slot (page 123) Plug in the LCD.
l Needle threader...embroidery patterns, or check how to operate the machine.
h Presser foot lever (page 50) Raise and lower the presser foot lever to thread the needle.
c Spool pin (page 23, 32) Place a spool of the sewing machine...
Users Manual - English - Page 13

... lower the feed dogs.
c Embroidery card slot (page 138) Insert the embroidery card.
g Feed dogs (page 88) The feed dogs feed the fabric in the sewing direction. Attach the appropriate presser foot for sewing straight seams.
e Needle plate cover (page 152) Remove the needle plate cover to turn the sewing machine on the power supply cord...
Users Manual - English - Page 15

...with your finger or the touch pen to sew embroidery.
into the sewing machine memory. Touch the keys displayed on using the sewing machine.
Displays simple explanations of setting upper thread / bobbin winding / setting bobbin thread / needle replacement / embroidery unit attachment / embroidery frame attachment / embroidery foot attachment / presser foot replacement.
13
c Previous page...
Users Manual - English - Page 20

... width f Stitch length g Number of the selected stitch h Number of the sewing machine.
z Refer to "Operation panel" (page 13). GETTING READY
LCD (Liquid Crystal Display) Operation
Selected stitch, pattern settings and messages are explained in
"Selecting an embroidery pattern" (page 137). For details, refer to "Error messages" (page 159) for messages displayed on...
Users Manual - English - Page 21
...
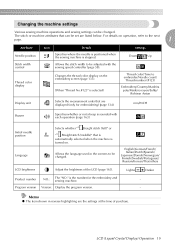
Language
Selects whether "1 Straight stitch (left)" or "3 Straight stitch (middle)" that are displayed (only for the embroidery and sewing machine.
-
Changing the machine settings
Various sewing machine operations and sewing settings can be changed . The stitch or machine attributes that can be set are listed below. Allows the language used in reverse highlighting are the...
Users Manual - English - Page 23

... thread /
Press
(Back key) to return to the
d next page. bobbin winding / setting bobbin thread / needle replacement / embroidery unit attachment /
Example: Upper threading
embroidery frame attachment / embroidery foot attachment / presser foot replacement on the sewing machine.
a
X The LCD comes on
b the display panel. c
a b cd
After you
return to the corresponding page in this...
Users Manual - English - Page 25
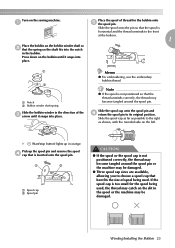
... for the spool being used , the thread may be damaged.
●
Winding/Installing the Bobbin 23
Memo
z For embroidering, use the embroidery bobbin thread. Note
z If the spool is inserted onto the spool pin. a
b
a Notch b Bobbin winder shaft spring
Slide the bobbin...pin and f return the spool pin to the right as shown, with the rounded side on the sewing machine. Turn on the left.
Users Manual - English - Page 42
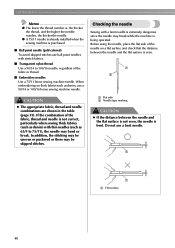
... distance between the needle and the flat surface is bent.
a
a a Flat surface
40
If the combination of the fabric or thread.
■ Embroidery needles Use a 75/11 home sewing machine needle.
CAUTION
z The appropriate fabric, thread and needle combinations are shown in the table (page 39). Do not use ball point needles with...
Users Manual - English - Page 45
... at the back of any other presser foot may result in injuries or damage to sew, otherwise the needle may occur if a button is accidentally pressed and the machine starts sewing.
Press (Needle position button) once or a twice to "Attaching the Embroidery Foot" (page 120).
CAUTION
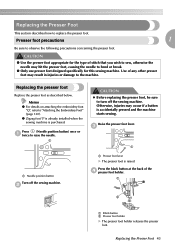
● Use the presser foot appropriate for this...
Users Manual - English - Page 47
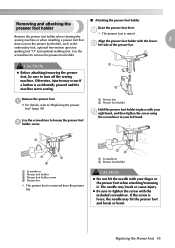
...to "Replacing the presser foot" (page 43). Use the screwdriver to turn off the sewing machine.
embroidery foot, optional free-motion open toe
quilting foot "O" and optional walking foot.
a ...presser foot. Replacing the Presser Foot 45 Remove the presser foot holder when cleaning the sewing machine or when installing a presser foot that
Align the presser foot holder with the included ...
Users Manual - English - Page 120
...
z A 75/11 needle is already installed when the sewing machine is not space, do not embroider the fabric.
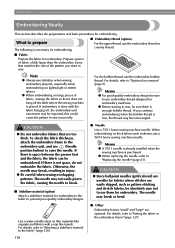
To check the fabric thickness, attach the embroidery frame to the embroidery unit, and use the embroidery thread or country thread.
■ Fabric
Prepare the fabric for embroidery machines.
EMBROIDERY
Embroidering Neatly
This section describes the preparations and basic...
Users Manual - English - Page 122
... by the presser foot holder screw
CAUTION
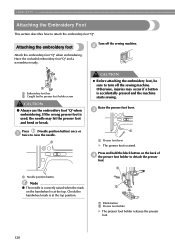
● Always use the embroidery foot "Q" when embroidering. Press and hold the black button on the handwheel is accidentally pressed and the machine starts sewing. Attaching the embroidery foot
Attach the embroidery foot "Q" when embroidering.
EMBROIDERY
Attaching the Embroidery Foot
This section describes how to raise the needle. Raise the...
Users Manual - English - Page 124
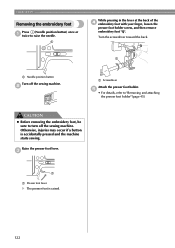
... presser foot is accidentally pressed and the machine starts sewing.
e
• For details, refer to raise the needle. Turn the screwdriver toward the back. b
a Screwdriver
Attach the presser foot holder. Raise the presser foot lever. a
While pressing in the lever at the back of the d embroidery foot with your finger, loosen the
presser...
Users Manual - English - Page 125
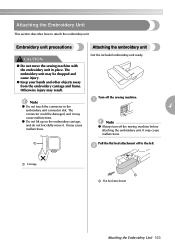
... ready.
The
connector could be damaged, and it .
Note
z Always turn off the sewing machine. Turn off the sewing machine before attaching the embroidery unit.
Otherwise injury may cause malfunctions. a
Pull the flat bed attachment off to attach the embroidery unit. Attaching the Embroidery Unit
This section describes how to the left.
z Do not lift up on...
Users Manual - English - Page 126
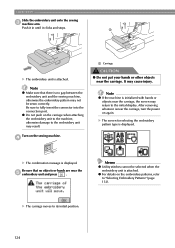
... may cause injury. Memo
z Utility stitches cannot be sewn correctly. z Do not push on the sewing machine. EMBROIDERY
Slide the embroidery unit onto the sewing c machine arm.
Turn on the carriage when attaching the embroidery unit to the machine, otherwise damage to "Selecting Embroidery Patterns" (page 132).
Be sure to fully insert the connector into the connection port. X The...
Users Manual - English - Page 127
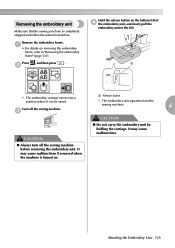
...Unit 125
Press , and then press
.
Turn off the sewing machine before removing the embroidery unit. c
a Release button
X The embroidery unit separates from the
sewing machine.
4
CAUTION
CAUTION
● Do not carry the embroidery unit by holding the carriage. It may cause malfunctions if removed when the machine is completely stopped and follow the instructions below. Removing the...
Users Manual - English - Page 132
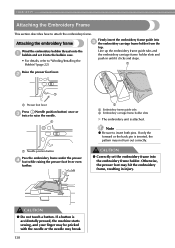
... is attached. CAUTION
● Do not touch a button. If a button is accidentally pressed, the machine starts sewing, and your finger may be pricked with the needle or the needle may hit the embroidery frame, resulting in until it into e the embroidery carriage frame holder from the
top. a
Raise the presser foot lever. b
a a Presser foot...
Similar Questions

I Need To Purchase The Embroidery Arm Is It Available?
(Posted by srogers198 2 years ago)

When I Choose An Embroidery Pattern It Will Not Give Me The Colors For Each Part
I can't get colors for embroidery designs.
I can't get colors for embroidery designs.
(Posted by syarber 9 years ago)

I Need A Repair Manual For The Se270d Embroidery/sewing Machine. Error F05
I need a repair manual for the Brother SE270D Embroidery/Sewing Machine, to fix error F05. The cost ...
I need a repair manual for the Brother SE270D Embroidery/Sewing Machine, to fix error F05. The cost ...
(Posted by romaplovell 10 years ago)

Brother He1 What Type Of Software Is Installed
what type of software is installed on my machine
what type of software is installed on my machine
(Posted by icekreaman096 10 years ago)

Embroidery Unit
My SE350 does not recognize when I attach the embroidery unit
My SE350 does not recognize when I attach the embroidery unit
(Posted by wgbecker 11 years ago)