
Brother International PE770 Support Question
Brother International PE770 Support Question
Find answers below for this question about Brother International PE770 - Computerized Embroidery Machine.Need a Brother International PE770 manual? We have 3 online manuals for this item!
Question posted by elsad33 on September 2nd, 2014
How To Remove Needle Plate From Pe770
The person who posted this question about this Brother International product did not include a detailed explanation. Please use the "Request More Information" button to the right if more details would help you to answer this question.
Current Answers
Related Brother International PE770 Manual Pages
Users Manual - English - Page 1
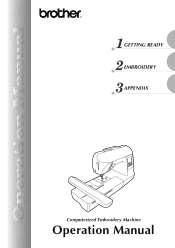
GETTING READY EMBROIDERY APPENDIX
Computerized Embroidery Machine
Operation Manual
Users Manual - English - Page 2
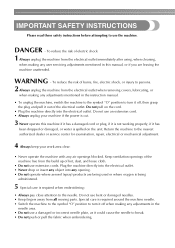
..., dust, and loose cloth.
• Do not use a damaged or incorrect needle plate, as it out of the electrical outlet. Return the machine to the nearest authorized dealer or service center for examination, repair, electrical or mechanical adjustment.
4 Always keep your machine if the power is required when embroidering:
• Always pay close attention...
Users Manual - English - Page 5

... Parts and Their Functions 8
Front view ...8
Needle and embroidery foot section ...9 Right-side/rear view ...9 Operation buttons ...10
Operation panel ...11
GETTING READY
13
Embroidery Step by Step 14 Attaching the Embroidery Unit 15
Embroidery unit precautions ...15 Attaching the embroidery unit ...15 Removing the embroidery unit ...16
Turning the Machine On/Off 18
Power supply precautions...
Users Manual - English - Page 7

... be cut automatically after you for the correct operation of the various functions.
c Automatic thread cutting The thread can quickly be accessed for future reference.
d Embroidery You can start embroiderying without pulling up the bobbin thread (page 28). In addition, after embroidering (page 51).
Introduction
Thank you have finished reading this embroidery machine.
Users Manual - English - Page 11

... to pages 8 through the needle bar thread guide. c Needle plate When the needle is being used for embroidering.
d Needle plate cover Remove the needle plate cover to thread the needle.
a Handle Carry the machine by its handle when transporting the machine. Do not cover the air vent while the machine is lowered, it enters the hole in the needle plate. f Main power switch Use...
Users Manual - English - Page 34
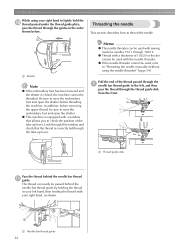
... the thread guide plate,
pass the thread through 100/16. The thread can be sure to raise the embroidery foot and open the shutter before removing the upper thread, be used , refer to "Threading the needle manually (without using your right hand to the left hand, then feeding the thread with sewing machine needles 75/11 through...
Users Manual - English - Page 37
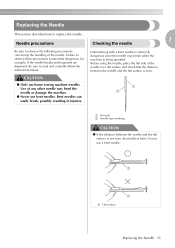
..., possibly resulting in injuries. Use of any other needle may break while the machine is bent. Do not use bent needles. CAUTION
● Only use home sewing machine needles. Before using the needle, place the flat side of the needle on a flat surface and check that the distance between the needle and the flat surface is even.
1 2
a Flat side...
Users Manual - English - Page 38
... button) is accidentally pressed and the machine starts embroidering. GETTING READY
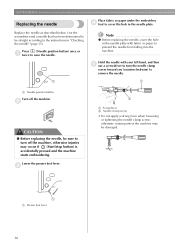
Replacing the needle
Place fabric or paper under the embroidery d foot to prevent the needle from falling into the machine. Press (Needle position button) once or a twice to raise the needle.
1
Note
z Before replacing the needle, cover the hole in the needle plate.
Lower the presser foot lever. Hold...
Users Manual - English - Page 42

... for embroidery machines.
Note
z Always use the embroidery thread or country thread. z Before starting to "Optional accessories" (page 7).
■ Embroidery thread For the upper thread, use stabilizer for embroidery.
For details, refer to embroider, be embroidered. To check the fabric thickness, attach the embroidery frame to the embroidery unit, and use (Needle position...
Users Manual - English - Page 43
...is purchased. For details, refer to
"Replacing the needle" (page 36).
2
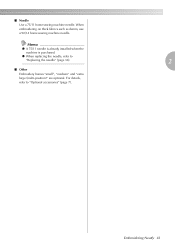
■ Other Embroidery frames "small", "medium" and "extra large (multi-position)" are optional. When embroidering on thick fabrics such as denim, use a 90/14 home sewing machine needle. ■ Needle Use a 75/11 home sewing machine needle.
z When replacing the needle, refer to "Optional accessories" (page 7).
Users Manual - English - Page 61
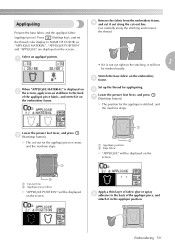
... the appliqué is sewn, and the machine stops.
1
1
2
a Appliqué position b Base fabric
X "APPLIQUE" will be displayed on the screen.
2
a Cut-out line b Appliqué piece fabric
X "APPLIQUE POSITION" will not be displayed on the screen. X The cut -out line. Remove the fabric from the embroidery frame, d and cut right on the...
Users Manual - English - Page 72
... sides of the machine is removed.
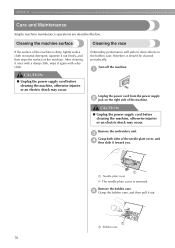
Embroidery performance will suffer if dust collects in neutral detergent, squeeze it out firmly, and then wipe the surface of the machine. Remove the bobbin case. APPENDIX
Care and Maintenance
Simple machine maintenance operations are described below. Cleaning the machine surface
Cleaning the race
If the surface of the needle plate cover, and...
Users Manual - English - Page 73
... case
Care and Maintenance 71
Insert the tabs on the needle plate cover into h the needle plate, and then slide the cover back
on the bobbin case aligns with the spring.
a
c b
a Needle plate cover
a
CAUTION
a Cleaning brush b Race c Bobbin thread sensor
• Do not apply oil to f remove any lint and dust from the race and
bobbin...
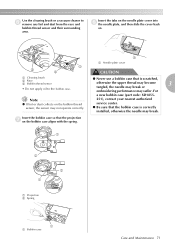
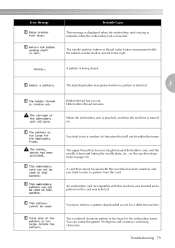
Users Manual - English - Page 75
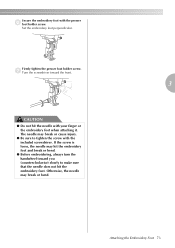
... bend.
● Before embroidering, always turn the handwheel toward the front.
3
CAUTION
● Do not hit the needle with the presser
f foot holder screw. Secure the embroidery foot with your finger or the embroidery foot when attaching it. Otherwise, the needle may break or cause injury.
● Be sure to make sure that the...
Users Manual - English - Page 76
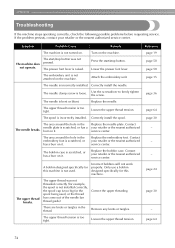
... install the spool.
Replace the bobbin case. Only use a bobbin designed specifically for this machine.
Remove any knots or tangles.
Correctly install the needle. Loosen the upper thread tension.
needle plate is scratched, or has a burr on it . Replace the embroidery foot. Contact your retailer or the nearest authorized service center.
page 24
page 30
- Turn...
Users Manual - English - Page 77
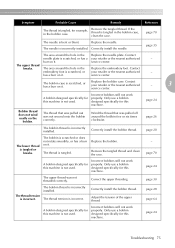
.... The thread is incorrect.
Remove the tangled thread and clean the race.
- page 28 page 64
A bobbin designed specifically for this machine is not used.
Contact
needle plate is scratched, or has ...thread is tangled, for this machine is not used.
Replace the bobbin.
service center. The area around the hole in the Replace the embroidery foot.
Incorrect bobbins will ...
Users Manual - English - Page 78
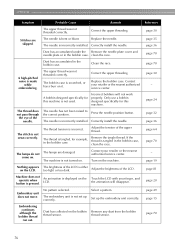
...
although the bobbin thread
ran out.
Replace the bobbin case. Press the needle position button.
Embroidery unit does not move. Set up correctly. page 19 page 81 page ...Machine does not operate when
button is incorrectly installed.
page 24
page 32 page 36 page 64 page 70
-
Dust has accumulated under the Remove the needle plate cover and needle plate or in the bobbin case. Remove...
Users Manual - English - Page 81
The start/stop button was selected. When the embroidery unit is attached, and then the machine is turned on the card was pressed when no pattern is too large for a different machine.
A pattern is bent and hitting the needle plate, etc., so the machine stops (refer to page 74). Little bobbin thread remains. A card that will not...
Users Manual - English - Page 85
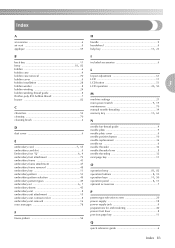
...embroidery frame removal 48 embroidery key 11 embroidery pattern 53 embroidery pattern selection 49 embroidery pattern types 49
, embroidery set 6 7
embroidery sheets 45 embroidery unit 8 embroidery unit attachment 15 embroidery unit connector slot 8 embroidery unit removal 16 error messages 78
F
frame pattern 54
needle bar thread guide 9 needle plate 9 needle plate cover 9 needle...
USB GUIDE - Multi - Page 3
...design field size. CAUTION
● When using embroidery data other than our original patterns, the thread or needle may take about 5 to 6 seconds before ...embroidery machine to malfunction.
■ Types of USB Media That Can Be Used Embroidery data can be recalled from USB media to edit the embroidery data.
■ Types of Embroidery Data That Can Be Used • Only .pes and .dst embroidery...
Similar Questions

How Do You Replace The Needle Plate On The Pe770?
Specifically, how do you remove the screws from the brackets on the back of the needle plate.
Specifically, how do you remove the screws from the brackets on the back of the needle plate.
(Posted by amcnutt1219 7 years ago)

How To Remove Needle Plate From Brother Lx2500
(Posted by alybefno 10 years ago)

Where To Buy Replacement Needle Plate For Brother Pe770
(Posted by mistnschu 10 years ago)
Replacing The Needle Plate.
I have a Brother PC420PRW sewing machine and I need to replace the needle plate. Do you know the par...
I have a Brother PC420PRW sewing machine and I need to replace the needle plate. Do you know the par...
(Posted by debbieshy4 12 years ago)

How To Remove The Needle Plate
(Posted by Anonymous-36958 12 years ago)