
Brother International PE770 Support Question
Brother International PE770 Support Question
Find answers below for this question about Brother International PE770 - Computerized Embroidery Machine.Need a Brother International PE770 manual? We have 3 online manuals for this item!
Question posted by srPedro on August 27th, 2014
How Do I Add A Line With My Brother Pe 770 Embroidery Machine
The person who posted this question about this Brother International product did not include a detailed explanation. Please use the "Request More Information" button to the right if more details would help you to answer this question.
Current Answers
Related Brother International PE770 Manual Pages
Users Manual - English - Page 1
GETTING READY EMBROIDERY APPENDIX
Computerized Embroidery Machine
Operation Manual
Users Manual - English - Page 3
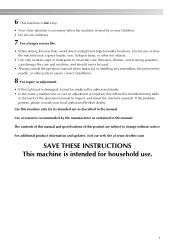
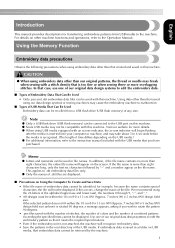
If the problem persists, please consult your local authorized Brother dealer. For additional product information and updates, visit our web site at www.brother.com
SAVE THESE INSTRUCTIONS This machine is required, first follow the troubleshooting table
in the back of this machine, avoid direct sunlight and high humidity locations. Use this manual. Benzene, thinner...
Users Manual - English - Page 5

... buttons ...10
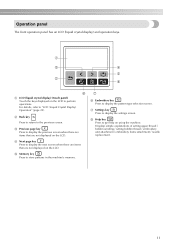
Operation panel ...11
GETTING READY
13
Embroidery Step by Step 14 Attaching the Embroidery Unit 15
Embroidery unit precautions ...15 Attaching the embroidery unit ...15 Removing the embroidery unit ...16
Turning the Machine On/Off 18
Power supply precautions ...18
Turning on the machine ...19 Turning off the machine ...19
LCD (Liquid Crystal Display) Operation 20...
Users Manual - English - Page 6

Using an embroidery card (sold separately) ...55
Embroidering ...56
Embroidering attractive finishes...56
Embroidering a pattern... Bobbin thread is tight ...68
APPENDIX
69
Care and Maintenance ...70
Cleaning the machine surface ...70 Cleaning the race ...70
Attaching the Embroidery Foot 72
Attaching the embroidery Foot "Q" ...72
Troubleshooting ...74
Error messages ...78
Adjusting the LCD ...81 ...
Users Manual - English - Page 7

... functions.
Introduction
Thank you have finished reading this manual, store it where it can quickly be accessed for future reference. Machine Features
1
23
4
a Simple bobbin-winding The bobbin can quickly and easily be cut automatically after you for purchasing this embroidery machine.
d Embroidery You can start embroiderying without pulling up the bobbin thread (page 28).
Users Manual - English - Page 8
...
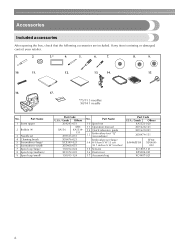
After opening the box, check that the following accessories are included. Part Name
10 Spool net
11 Operation manual
12 Quick reference guide
13
Embroidery foot "Q" (on machine)
Embroidery set
4 Cleaning brush 5 Screwdriver (large) 6 Screwdriver (small) 7 Spool cap (large) 8 Spool cap (medium) 9 Spool cap (small)
Part Code
U.S.A. / Canada Others
X54243-051
SA156
SFB...
Users Manual - English - Page 9
...
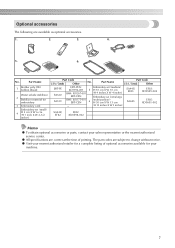
Embroidery set (extra large
BM3: X81175-001 EBT-CEN
6
(multi-position)) H 30 cm X W 13 cm
-
(H 12 inches X W 5 inches)
SA443/ EF83
SA445
EF83: XD0599-002
EF85: XD0601-002
SA442/ EF82
EF82: XD0598-002
Memo
z To obtain optional accessories or parts, contact your
machine.
7
Part Name
1
Brother poly #90 bobbin thread
Water solude stabilizer
2 Stabilizer...
Users Manual - English - Page 10

... foot
j Operation buttons Use these descriptions to operate the machine. m Needle threader lever Use the needle threader lever to the machine, and then attach the embroidery frame. Before using the machine can be displayed (page 11).
8
h Embroidery unit connector slot Plug in the connector for the embroidery unit. e Top cover Open the top cover to check...
Users Manual - English - Page 11

... upper thread through 11 while you (counterclockwise) to thread the needle. f Embroidery foot "Q" This presser foot is being used for embroidering. c Embroidery card slot Insert the embroidery card. e Power supply jack Insert the plug on and off. Memo
z Refer to turn the machine on the power supply cord into the bobbin case. Needle and...
Users Manual - English - Page 13
... upper thread / bobbin winding / setting bobbin thread / embroidery unit attachment / embroidery frame attachment / needle replacement.
11
g Settings key Press... to display the pattern type selection screen.
e Memory key Press to the previous screen. b Back key
Press to return to store patterns in the machine...
Users Manual - English - Page 15

... to start embroidering are described in this chapter. Embroidery Step by Step 14 Attaching the Embroidery Unit 15
Embroidery unit precautions 15 Attaching the embroidery unit 15 Removing the embroidery unit 16 Turning the Machine On/Off 18 Power supply precautions 18 Turning on the machine 19 Turning off the machine 19 LCD (Liquid Crystal Display) Operation 20...
Users Manual - English - Page 16

... fabric
Attach a stabilizer material to the fabric. GETTING READY
Embroidery Step by Step
The basic steps for embroidery are as follows.
1
Attaching the embroidery unit
Attach the embroidery unit. (If the embroidery unit is not attached, the machine does not operate.) For details, refer to "Attaching the embroidery unit" (page 15).
↓
2 Checking the needle
Use a needle...
Users Manual - English - Page 17
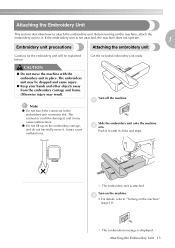
... the embroidery unit onto the machine b arm.
Turn on the machine" (page 19). Before turning on the embroidery carriage, and do not forcefully move the machine with the embroidery unit in the embroidery unit connector slot.
If the embroidery unit is not attached, the machine does not operate.
1
Embroidery unit precautions
Attaching the embroidery unit
Cautions for the embroidery unit...
Users Manual - English - Page 18
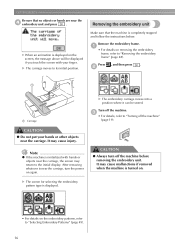
...; For details, refer to its initial position. Make sure that no objects or hands are near the carriage, turn off the machine before removing the embroidery unit.
Note
z If the machine is initialized with your hands or other objects near the carriage, the screen may cause injury. X The carriage moves to "Turning off...
Users Manual - English - Page 42

... foot and the fabric, the fabric can be sure to prevent poor quality embroidery designs.
■ Fabric Prepare the fabric for embroidery machines. EMBROIDERY
Embroidering Neatly
This section describes the preparations and basic procedures for embroidery. Otherwise, the needle may not easily pierce the fabric, causing the needle to "Optional accessories" (page 7).
z Before starting...
Users Manual - English - Page 53
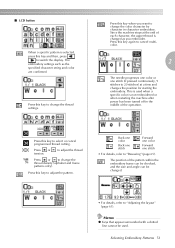
... the upper thread is not embroidered or when restarting the machine after power has been turned off in character embroidery. This is used . Press this key again to cancel... multicolor.
2
The needle progresses one color or one stitch
• For details, refer to adjust the pattern. Memo
z Keys that appear surrounded with a dotted line...
Users Manual - English - Page 61
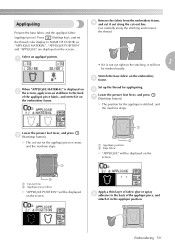
... cut -out for the appliqué piece is not cut right on the embroidery frame. a
2
• If it will be finished neatly.
When "APPLIQUE MATERIAL" is stitched, and the machine stops.
X The position for appliquéing. X The cut -out line.
Set up the thread for the appliqué is displayed on b the...
Users Manual - English - Page 85
...Brother poly #90 bobbin thread 7
buzzer 82
machine settings 21
, main power switch 9 19
C
characters 52
maintenance 70
manual needle threading 34
, memory key 11 63
cleaning 70
cleaning brush 6
N
D
dust cover 6
E
, embroidery card 7 55
embroidery card slot 9
, Embroidery foot "Q 6 9
embroidery foot attachment 72 embroidery frame 43 embroidery frame attachment 47 embroidery...
USB GUIDE - Multi - Page 3
... using embroidery data other machine functions and operations, refer to rotate the pattern 90 degrees. • .pes files saved with this machine. Using data other than that embroidery data ...machine, and may cause the embroidery machine to 6 seconds before the media is rotated 90 degrees, a message appears, asking if you have purchased. If the file name is too fine or when sewing...
USB GUIDE - Multi - Page 7
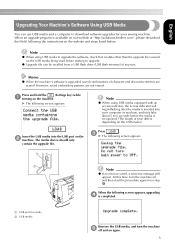
...Machine... at "http://solutions.brother.com", please download the file...machine's software is inserted into the USB port on the b machine.
c X The following screen appears.
Remove the USB media, and turn the machine...machine, and may take about 5 to 6 seconds before starting to upgrade. At this time, turn the machine... the USB media into your sewing machine. Press
. When the following...
Similar Questions

Brother Pe 770 Embroidery Machine
Can you provide the touch screen panel part number for the brother pe770 embroidery machine?
Can you provide the touch screen panel part number for the brother pe770 embroidery machine?
(Posted by sandymichelle144 2 years ago)

How To Download A Graphic For Brother Pe-770 Embroidery Machine
(Posted by souAPOST 10 years ago)

How To Fix Brother Pe 770 Embroidery Machine
(Posted by noondwlu 10 years ago)

What Designs Come Built In On A Brother Pe 150 Embroidery Machine?
(Posted by modigeomario 10 years ago)
