
Brother International PE770 Support Question
Brother International PE770 Support Question
Find answers below for this question about Brother International PE770 - Computerized Embroidery Machine.Need a Brother International PE770 manual? We have 3 online manuals for this item!
Question posted by noondwlu on February 12th, 2014
How To Fix Brother Pe 770 Embroidery Machine
The person who posted this question about this Brother International product did not include a detailed explanation. Please use the "Request More Information" button to the right if more details would help you to answer this question.
Current Answers
Related Brother International PE770 Manual Pages
Users Manual - English - Page 1
GETTING READY EMBROIDERY APPENDIX
Computerized Embroidery Machine
Operation Manual
Users Manual - English - Page 3
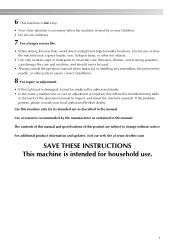
... contents of this manual and specifications of the operation manual to inspect and adjust the machine yourself. Do not use .
1 For additional product information and updates, visit our web site at www.brother.com
SAVE THESE INSTRUCTIONS This machine is intended for its intended use outdoors.
7 For a longer service life:
• When storing...
Users Manual - English - Page 5

... buttons ...10
Operation panel ...11
GETTING READY
13
Embroidery Step by Step 14 Attaching the Embroidery Unit 15
Embroidery unit precautions ...15 Attaching the embroidery unit ...15 Removing the embroidery unit ...16
Turning the Machine On/Off 18
Power supply precautions ...18
Turning on the machine ...19 Turning off the machine ...19
LCD (Liquid Crystal Display) Operation 20...
Users Manual - English - Page 6

Using an embroidery card (sold separately) ...55
Embroidering ...56
Embroidering attractive finishes...56
Embroidering a pattern... Bobbin thread is tight ...68
APPENDIX
69
Care and Maintenance ...70
Cleaning the machine surface ...70 Cleaning the race ...70
Attaching the Embroidery Foot 72
Attaching the embroidery Foot "Q" ...72
Troubleshooting ...74
Error messages ...78
Adjusting the LCD ...81 ...
Users Manual - English - Page 7

...thread (page 24). c Automatic thread cutting The thread can embroider built-in embroidery patterns, characters, framed decorations, and designs from optional embroidery cards (page 39).
5 Before using the machine, carefully read the "IMPORTANT SAFETY INSTRUCTIONS", and then study this embroidery machine.
d Embroidery You can be accessed for the correct operation of the various functions. In...
Users Manual - English - Page 8
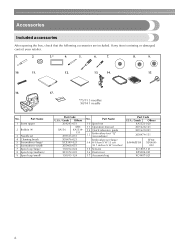
Part Name
10 Spool net
11 Operation manual
12 Quick reference guide
13
Embroidery foot "Q" (on machine)
Embroidery set
4 Cleaning brush 5 Screwdriver (large) 6 Screwdriver (small) 7 Spool cap (large) 8 Spool cap (medium) 9 Spool cap (small)
Part Code
U.S.A. / Canada Others
X54243-051
SA156
SFB: XA5539-
...
Users Manual - English - Page 9
..., contact your
machine.
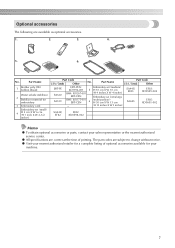
7 The part codes are available as optional accessories.
1.
2.
3.
4.
5.
6.
Optional accessories
The following are subject to change without notice. z All specifications are correct at the time of optional accessories available for a complete listing of printing. Part Name
Part Code
U.S.A. / Canada
Other
EBT-PE SA520 SA519
EBT-PEN:
Embroidery set...
Users Manual - English - Page 10

....
m Needle threader lever Use the needle threader lever to the machine, and then attach the embroidery frame.
g Operation panel From the operation panel, patterns can be displayed (page 11).
8
h Embroidery unit connector slot Plug in the connector for the embroidery unit.
Before using the machine can be selected and edited, and operations for using the...
Users Manual - English - Page 11

... Insert the plug on and off. f Embroidery foot "Q" This presser foot is being used for embroidering. a Handle Carry the machine by its handle when transporting the machine.
c Needle plate When the needle is ... upper thread through 11 while you (counterclockwise) to thread the needle. Needle and embroidery foot section
Right-side/rear view
a Thread guide disk Pass the thread through the...
Users Manual - English - Page 13
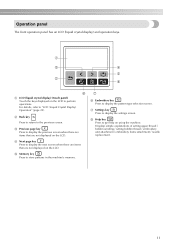
...). Displays simple explanations of setting upper thread / bobbin winding / setting bobbin thread / embroidery unit attachment / embroidery frame attachment / needle replacement.
11 For details, refer to display the settings screen....the previous screen. g
f Embroidery key Press to get help on the LCD. c Previous page key Press to store patterns in the machine's memory.
h Help key Press...
Users Manual - English - Page 15

... to start embroidering are described in this chapter. Embroidery Step by Step 14 Attaching the Embroidery Unit 15
Embroidery unit precautions 15 Attaching the embroidery unit 15 Removing the embroidery unit 16 Turning the Machine On/Off 18 Power supply precautions 18 Turning on the machine 19 Turning off the machine 19 LCD (Liquid Crystal Display) Operation 20...
Users Manual - English - Page 16

.... thread
For details, refer to the pattern. GETTING READY
Embroidery Step by Step
The basic steps for embroidery are as follows.
1
Attaching the embroidery unit
Attach the embroidery unit. (If the embroidery unit is not attached, the machine does not operate.) For details, refer to "Attaching the embroidery unit" (page 15).
↓
2 Checking the needle
Use a needle...
Users Manual - English - Page 17
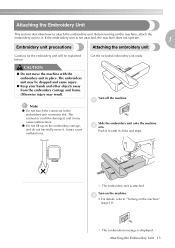
... up on the machine, attach the
embroidery unit to it . Get the included embroidery unit ready.
a
Slide the embroidery unit onto the machine b arm. c
• For details, refer to attach the embroidery unit. If the embroidery unit is not attached, the machine does not operate.
1
Embroidery unit precautions
Attaching the embroidery unit
Cautions for the embroidery unit will be damaged...
Users Manual - English - Page 18
... moves to the initial display.
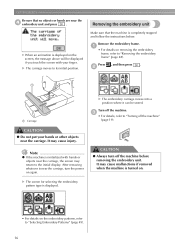
CAUTION
● Do not put your finger. GETTING READY
Be sure that the machine is turned on removing the embroidery frame, refer to "Removing the embroidery frame" (page 48). Removing the embroidery unit
• When an animation is displayed.
• For details on the screen, the message above will...
Users Manual - English - Page 19
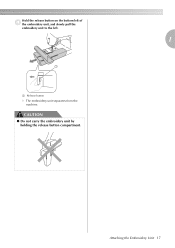
CAUTION
● Do not carry the embroidery unit by holding the release button compartment. Attaching the Embroidery Unit 17 Hold the release button on the bottom left of
d the embroidery unit, and slowly pull the embroidery unit to the left.
1
a
a Release button
X The embroidery unit separates from the machine.
Users Manual - English - Page 21
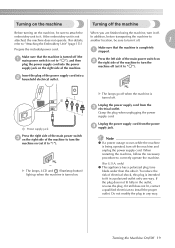
... still does not fit, contact a qualified electrician to "Attaching the Embroidery Unit" (page 15).)
Prepare the included power cord.
If it to attach the
When you are finished using the machine, turn the
machine on the right side of the machine to turn the
machine off (the a main power switch is intended to correctly operate...
Users Manual - English - Page 42

..., do not embroider the fabric. Use a water soluble sheet on lightweight or stretch fabrics. If there is enough bobbin thread.
We recommend stabilizer material for embroidery machines.
If there is low, the thread may result in injury.
● Be careful when embroidering overlapping patterns.
Otherwise, the needle may not easily pierce the...
Users Manual - English - Page 85
...Brother poly #90 bobbin thread 7
buzzer 82
machine settings 21
, main power switch 9 19
C
characters 52
maintenance 70
manual needle threading 34
, memory key 11 63
cleaning 70
cleaning brush 6
N
D
dust cover 6
E
, embroidery card 7 55
embroidery card slot 9
, Embroidery foot "Q 6 9
embroidery foot attachment 72 embroidery frame 43 embroidery frame attachment 47 embroidery...
USB GUIDE - Multi - Page 3
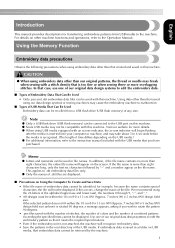
...embroidery machine to edit the embroidery data.
■ Types of Embroidery Data That Can Be Used • Only .pes and .dst embroidery data files can be connected to .dst embroidery data files only. If this machine... × 5 inches (W)) design field size. If embroidery data is too fine or when sewing three or more than eight characters long, only the first six characters followed by the...
USB GUIDE - Multi - Page 7
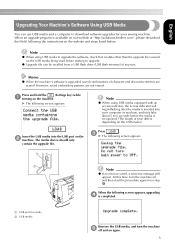
...the upgrade file.
However, saved embroidery patterns are erased.
Remove the USB media, and turn the machine off and on again.
5 Memo
z When the machine's software is saved on the website...USB media.)
Insert the USB media into your sewing machine. When an upgrade program is available on our website at "http://solutions.brother.com", please download the file(s) following screen ...
Similar Questions

Brother Pe 770 Embroidery Machine
Can you provide the touch screen panel part number for the brother pe770 embroidery machine?
Can you provide the touch screen panel part number for the brother pe770 embroidery machine?
(Posted by sandymichelle144 2 years ago)
How Do I Add A Line With My Brother Pe 770 Embroidery Machine
(Posted by srPedro 9 years ago)

How To Download A Graphic For Brother Pe-770 Embroidery Machine
(Posted by souAPOST 10 years ago)

What Can I Do To Fix Brother Innovis Ve2200 Embroidery Machine?
Innovis VE2200 gives following message: A Malfunction Occurred, turn machine off and on again I do n...
Innovis VE2200 gives following message: A Malfunction Occurred, turn machine off and on again I do n...
(Posted by marywoodstark 10 years ago)
