
Brother International CE8080PRW Support Question
Brother International CE8080PRW Support Question
Find answers below for this question about Brother International CE8080PRW.Need a Brother International CE8080PRW manual? We have 6 online manuals for this item!
Question posted by curtisbuchanan48 on June 20th, 2013
Auto Threader On Brother Sewing Machine Ce 8080prw
my new brother sewing machine auto threader does not work.have changed needle position and needles still does not work
Current Answers
Related Brother International CE8080PRW Manual Pages
Users Manual - English - Page 1
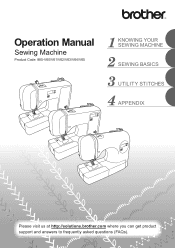
Operation Manual
Sewing Machine
Product Code: 885-V60/V61/V62/V63/V64/V65
KNOWING YOUR SEWING MACHINE
SEWING BASICS
UTILITY STITCHES
APPENDIX
Please visit us at http://solutions.brother.com where you can get product support and answers to frequently asked questions (FAQs).
Users Manual - English - Page 4
... care is required around the machine needle. • Switch the machine to the symbol "O" position to turn it off when making any adjustments in the
needle area. • Do not use a damaged or incorrect needle plate, as it could cause the needle to break. • Do not push or pull the fabric when sewing, and follow careful instruction...
Users Manual - English - Page 8
... SEWING MACHINE
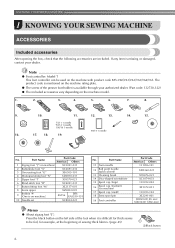
1 KNOWING YOUR SEWING MACHINE
ACCESSORIES
Included accessories
After opening the box, check that the following accessories are included. The product code is mentioned on the machine rating plate.
● The screw of the presser foot holder is on the machine with product code 885-V60/V61/V62/V63/V64/V65.
Part Name
11 Twin needle...
Users Manual - English - Page 11
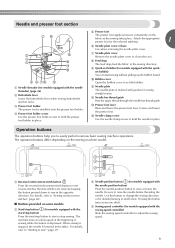
... various basic sewing machine operations.
set bobbin)
You can start or stop sewing.
c Presser foot holder The presser foot is depressed.
c Needle position button (for detailed sewing in place. Use this button to change the sewing direction or for models equipped with the needle position button) Press the needle position button to hold the needle in small areas. Needle and presser...
Users Manual - English - Page 15
... so could cause a fire or an electric shock.
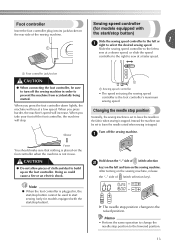
When you take your foot off the sewing machine. Memo
• Perform the same operation to change the needle stop position changes to the raised position.
Changing the needle stop . Foot controller
Insert the foot controller plug into its jack/socket on the rear side of cloth and dust to build...
Users Manual - English - Page 20
... a malfunction.
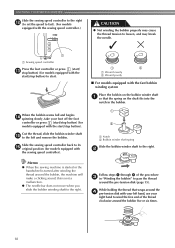
● The needle bar does not move when you slide the bobbin winding shaft to pass the thread
around the bobbin, the machine will make a clicking sound;
Slide the sewing speed controller back to the right. a Notch b Bobbin winder shaft spring
Slide the bobbin winder shaft to its p original position (for models equipped...
Users Manual - English - Page 21
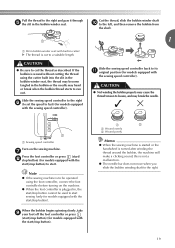
... controller back to its k original position (for models equipped
with the start /stop button cannot be operated using the cutter built into the slit in the bobbin winder seat, the thread may become tangled in the bobbin or the needle may break the needle.
Note
● If the sewing machine is to be used to...
Users Manual - English - Page 28
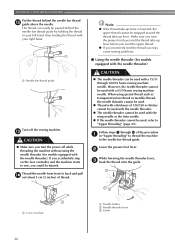
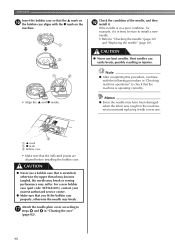
... the needle threader.
● The needle threader cannot be used with the wing needle or the twin needle.
● If the needle threader cannot be used with the needle threader)
a Needle bar thread guide
Turn off the sewing machine.
CAUTION
● The needle threader can easily be passed behind the needle bar thread l guide above the needle. b
While lowering the needle threader lever...
Users Manual - English - Page 32
... once or twice.)
or
1 2
a Mark
b Needle position button
Turn off the sewing machine, otherwise injuries may break while the machine is bent. KNOWING YOUR SEWING MACHINE
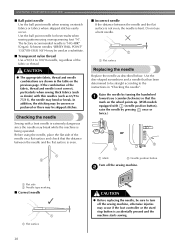
■ Ball point needle Use the ball point needle when sewing on the wheel points up. (With models equipped with (needle position button), raise the needle by turning the handwheel a toward you (counterclockwise) so...
Users Manual - English - Page 34
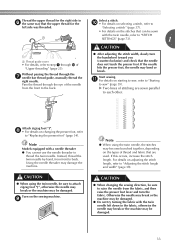
... thread spool, set it so that can use the needle threader to back. Install the twin needle.
a Bobbin winder shaft b Extra spool pin c Thread spool
Install the thread spool and thread the upper e thread. KNOWING YOUR SEWING MACHINE
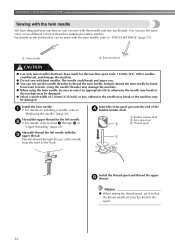
Sewing with the twin needle
We have been made for this needle and two top threads. Instead, thread the twin...
Users Manual - English - Page 35
... needle, the stitches may be sure to attach zigzag foot "J", otherwise the needle may break or the machine may become bunched together, depending on changing the presser foot, refer
to back. If this occurs, increase the stitch length. Pass the thread through the g needle bar thread guide, manually thread the
right needle.
For details on the sewing machine...
Users Manual - English - Page 38
... Never use bent needles. SEWING BASICS
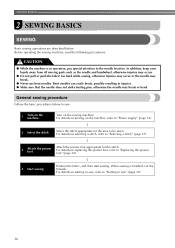
2 SEWING BASICS
SEWING
Basic sewing operations are described below to sew.
1
Turn on the sewing machine.
For details on turning on selecting a stitch, refer to the needle location.
Before operating the sewing machine, read the following precautions. Position the fabric, and then start sewing. Turn on the machine.
CAUTION
● While...
Users Manual - English - Page 55

... as g possible. a Buttonhole lever
The buttonhole lever is completed, the
3
machine automatically sews
reinforcement stitches, then stops.
Raise the needle and the presser foot lever, i remove the fabric, and cut the thread.
a Buttonhole lever b Bracket
53
Raise the buttonhole lever to its original j position. Position the fabric with the front end of the f buttonhole mark...
Users Manual - English - Page 59
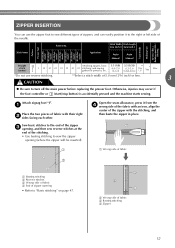
... or (start/stop button) is accidentally pressed and the machine starts sewing. Pattern No. Attach zigzag foot "J". a
Place the two pieces of the stitching. • Use basting stitching to sew the zipper
opening (where the zipper will be inserted). b Wrong side of the needle. ZIPPER INSERTION
Pattern Presser Foot 100 stitches model 90 stitches...
Users Manual - English - Page 67
... seen from the rear of the machine)
X The feed dogs are sewn at .
3
65 a Pattern
After sewing is positioned at the beginning and end of the machine) and turn the
handwheel to follow the pattern.
Slide the feed dog position lever, located at the
d rear of the machine on the sewing machine, and then select a e stitch.
Use both...
Users Manual - English - Page 69
... the fabric does not feed, for example, because it is completed, the machine automatically sews reinforcement stitches, then stops. Position the fabric so that the opening of the d pocket faces toward you, ... not reduce the gap.
Raise the needle and the presser foot lever, g remove the fabric, and cut the thread. For details, refer to its original h position.
Pull down through the hole
in ...
Users Manual - English - Page 84
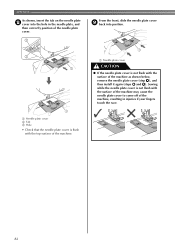
... shown, insert the tab on the needle plate h cover into position. a Needle plate cover b Tab c Hole
• Check that the needle plate cover is flush with the top surface of the needle plate cover. Sewing while the needle plate cover is not flush with the surface of the machine may cause the needle plate cover to come off of...
Users Manual - English - Page 92
... the needle may break.
Attach the needle plate cover according to "Checking the needle" (page 30)
and "Replacing the needle" (page 30).
For a new bobbin case (part code: XE7560-001), contact your nearest authorized service center.
● Make sure that the machine is scratched, otherwise the upper thread may become tangled, the needle may break or sewing performance...
Users Manual - English - Page 97
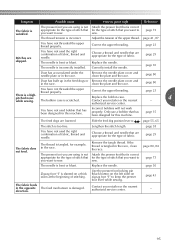
...needle.
Correctly install the needle. page 80
Dust has built up in the feed dogs or Remove the needle plate cover and
in the race.
Replace the bobbin case. Incorrect bobbins will not work... dog position lever to sew.
The thread is bent or blunt. page 80, 84 page 73
The needle is ... that has been designed for this machine. Remove the needle plate cover and clean the plate and ...
Users Manual - English - Page 10

...and sewing trial stitches to feed the needle into the punched hole again, and then lower the presser foot lever. Examples of the machine.
...change the stitch length and stitch width settings.
k
Adjust the upper thread tension.
Note
• Do not sew reinforcement/reverse stitches at the rear of the stitching area, stop the machine.
p
CAUTION
• Before sewing...
Similar Questions

How To Change Needle Brother Ce8080prw
(Posted by Dillapetit 9 years ago)

How Does The Ce8080prw Brothers Sewing Machine Rate
(Posted by leflyby 9 years ago)

How To Repair Needle Threader On A Brother Sewing Machine Ce8080prw
(Posted by eugkuibrahi 10 years ago)

How To Change Needle Brother Sewing Machine Ce 5500 Prw
i lost my manual and do not know how to change the needle for a brother sewing machine CE 5500 PRW. ...
i lost my manual and do not know how to change the needle for a brother sewing machine CE 5500 PRW. ...
(Posted by giomariagina 11 years ago)

Machine Will Not Change Needle Position
The machine is locked up and will not change needle position.
The machine is locked up and will not change needle position.
(Posted by jstorts 11 years ago)