
Brother International CE8080PRW Support Question
Brother International CE8080PRW Support Question
Find answers below for this question about Brother International CE8080PRW.Need a Brother International CE8080PRW manual? We have 6 online manuals for this item!
Question posted by bdenRM on April 24th, 2014
How To Change Thread On Brother Ce8080prw
The person who posted this question about this Brother International product did not include a detailed explanation. Please use the "Request More Information" button to the right if more details would help you to answer this question.
Current Answers
Related Brother International CE8080PRW Manual Pages
Users Manual - English - Page 1
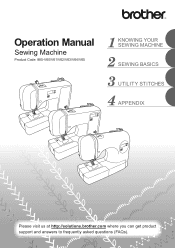
Operation Manual
Sewing Machine
Product Code: 885-V60/V61/V62/V63/V64/V65
KNOWING YOUR SEWING MACHINE
SEWING BASICS
UTILITY STITCHES
APPENDIX
Please visit us at http://solutions.brother.com where you can get product support and answers to frequently asked questions (FAQs).
Users Manual - English - Page 6
...
USING YOUR SEWING MACHINE 12
Power supply precautions ...12 Power supply ...12 Foot controller ...13 Sewing speed controller (for models equipped with the start/stop button 13 Changing the needle stop position ...13 Changing the initial needle position ...14 Cancelling the operation beep (for models equipped with the operation beep 14
THREADING THE MACHINE 15
Winding the...
Users Manual - English - Page 10
... on and off.
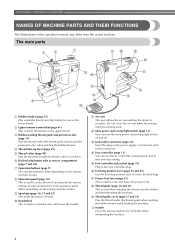
n Foot controller (page 13) You can turn the main power and sewing light switch on the sewing machine model. o Foot controller jack/socket (page 13) Plug in this thread guide when winding the bobbin thread and threading the machine. r Thread guide (page 16 and 25) This is used to manually raise and lower the needle...
Users Manual - English - Page 11
... plate is depressed. The machine sews at a slow speed at the beginning of sewing while the button is marked with the start/stop button) Press the start or stop button (for models equipped with guides for sewing straight seams.
l Needle bar thread guide Pass the upper thread through the needle bar thread guide. d Sewing speed controller (for models...
Users Manual - English - Page 15
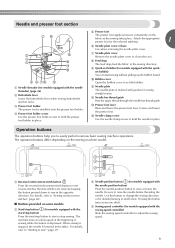
... the foot controller plug into its jack/socket on the sewing machine, release the "-" side of (stitch selection key). Changing the needle stop button). After turning on the rear side of the sewing machine. Sewing speed controller
(for models equipped with
the start /stop position
Normally, the sewing machine is stopped. Note
● When the foot controller is...
Users Manual - English - Page 16

... (stitch selection b key) on the left needle position) is automatically selected when the sewing machine is set to change the initial needle position to the center needle position. X The machine is now set so that the machine does not beep.
Turn off the sewing machine.
Memo
● Perform the same operation to beep each time a key is...
Users Manual - English - Page 17

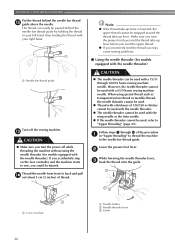
... the thread onto the bobbin. • For details on the spool pin lever a with your finger. Using other models, the machine will not work properly. Only use bobbins from other bobbins may cause damage to raise the spool pin when winding the bobbin. If you use the bobbin that comes with this sewing machine...
Users Manual - English - Page 18

... your right hand so that there is no slack in the spool or the machine may be damaged.
KNOWING YOUR SEWING MACHINE
Fully insert the spool of the spool pin.
a Thread guide
Pass the thread under the thread guide cover with your left , slide the spool cap onto the spool pin as far as possible to...
Users Manual - English - Page 19

... to pull out 7 to 10 cm (2-3/4 to
3-15/16 inches) of thread from the
hole on the sewing machine. k • Leave 1 cm (3/8 inch) of thread from the hole on the shaft b Notch c 7-10 cm (2-3/4 - ...3-15/16 inches)
Trim the excess thread above the bobbin.
Note
● If the sewing machine is to be used to start sewing (only for models equipped with the start/stop button cannot...
Users Manual - English - Page 20
... controller back to its p original position (for models equipped with the sewing speed controller.)
CAUTION
● Not winding the bobbin properly may cause the thread tension to loosen, and may break the needle.
Memo
● When the sewing machine is started or the handwheel is not a malfunction.
● The needle bar does not move...
Users Manual - English - Page 21
... then remove the bobbin from
the shaft.
1
a Slit in , the start /stop button).
1
2
a Wound evenly b Wound poorly
Memo
● When the sewing machine is started or the handwheel is cut the thread as described.
g
Press the foot controller or press (start/ h stop button) to its k original position (for models equipped with the
start...
Users Manual - English - Page 22

... or break the needle.
20
Memo
● The direction for this sewing machine. b
Slide the button and open the cover.
Turn off while threading the machine.
Raise the needle to sew, you set bobbin, see page 21. If you turn the power off the sewing machine. Use only the enclosed bobbin or bobbins of the same type...
Users Manual - English - Page 23

... the sewing machine.
case, it may cause the thread tension to be incorrect or break the needle.
21 Put the left tab in f place (see arrow a), and then press lightly on the needle plate cover.
a Cover b Slide button
Insert the bobbin with your right hand so that the d end of the thread is indicated...
Users Manual - English - Page 24

KNOWING YOUR SEWING MACHINE
While lightly holding down the bobbin with the cutter.)
Note
● If the thread is not correctly inserted through the slit (a and b). • At this time, check that the bobbin easily
rotates counterclockwise.
a Slit b Cutter (Cut the thread with e your right hand as shown, guide the thread
through the tension-adjusting spring...
Users Manual - English - Page 25
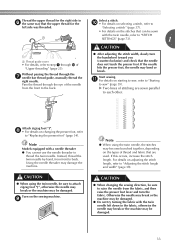
...). For details on the wheel points up before threading the sewing machine.
23 Turn on the handwheel
CAUTION
● When threading the upper thread, carefully follow the instructions. a Presser foot lever
CAUTION
● If the presser foot is not raised, the sewing machine cannot be threaded. Upper threading
Set the upper thread and thread the needle. • For details on the...
Users Manual - English - Page 26

...too small for the upper thread f onto the spool pin.
KNOWING YOUR SEWING MACHINE
As shown, press down on the slit in the wrong place, or is set incorrectly, the thread may tangle on the spool ... spool pin.
CAUTION
● If the spool or the spool cap is not positioned correctly, the thread may become tangled around the spool pin or the needle may break.
● Three spool cap sizes...
Users Manual - English - Page 28
... easily be used with a 75/11 through m of the procedure a in your right hand.
1
Note
● If the thread take-up lever. However, the needle threader cannot be used with a 65/9 home sewing machine needle.
Thread the needle from front to back and pull n out about 5 cm (2 inches) of 130/120 or thicker cannot...
Users Manual - English - Page 35
... occurs, increase the stitch length. CAUTION
● When changing the sewing direction, be damaged.
33 Otherwise the needle may break or the machine may be sewn
with the twin needle, refer to "STITCH
SETTINGS" (page 73).
1
CAUTION
a Thread guide cover
• For details, refer to sew" (page 39).
For details on the types of "Upper...
Users Manual - English - Page 44
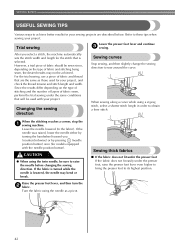
... your project, and check the thread tension and stitch length and width.
Leave the needle lowered (in order to obtain a finer stitch. Raise the presser foot lever, and then turn the b fabric. Trial sewing
Lower the presser foot lever and continue c sewing.
When the stitching reaches a corner, stop the a sewing machine. If the needle was...
Users Manual - English - Page 85

.... Turn off the sewing machine.
b
Place the bobbin in the bobbin case so that c the thread unwinds in the machine and cannot be done with an incorrect thread tension.
83 Then, with your right hand with the thread unwinding in the fabric. • The upper thread tension is tight, and the results do not change even after the...
Similar Questions

My Brother Ce8080prw Giving E8 When I Try To Change Stitches
My Brother CE8080PRW Project Runway Limited Edition is giving code E8 when I try to change stitches....
My Brother CE8080PRW Project Runway Limited Edition is giving code E8 when I try to change stitches....
(Posted by lillymae20047420 1 year ago)

Power Supply For Brother Ce8080prw
Looking for Power supply XE73160010122120424300977CTalso on the board, Nichicon, KPC 1694-0 and ZSBA...
Looking for Power supply XE73160010122120424300977CTalso on the board, Nichicon, KPC 1694-0 and ZSBA...
(Posted by RayRcn 1 year ago)

How To Change Needle Brother Ce8080prw
(Posted by Dillapetit 9 years ago)

User Manual Brother Computrized Sewing Machine Zz3 _b894
I need user manual BROTHER computerized sewing machine model no ZZ3_B894NO. 20419363 .
I need user manual BROTHER computerized sewing machine model no ZZ3_B894NO. 20419363 .
(Posted by malikmaliks 10 years ago)

Brother Lx2500 Sewing Machine
I have a Brother LX2500 sewing machine and at tops the top thread pops right off the machine. Is the...
I have a Brother LX2500 sewing machine and at tops the top thread pops right off the machine. Is the...
(Posted by Aprille2175 10 years ago)