
Brother International CE-5500PRW Support Question
Brother International CE-5500PRW Support Question
Find answers below for this question about Brother International CE-5500PRW.Need a Brother International CE-5500PRW manual? We have 3 online manuals for this item!
Question posted by redjwolde on November 25th, 2013
What Stitch Do I Use For A Zipper On The Brother Ce5500prw
The person who posted this question about this Brother International product did not include a detailed explanation. Please use the "Request More Information" button to the right if more details would help you to answer this question.
Current Answers
Related Brother International CE-5500PRW Manual Pages
Users Manual - English - Page 1
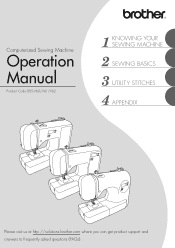
Computerized Sewing Machine
Operation Manual
Product Code:885-V60/V61/V62
KNOWING YOUR SEWING MACHINE
SEWING BASICS
UTILITY STITCHES
APPENDIX
Please visit us at http://solutions.brother.com where you can get product support and answers to frequently asked questions (FAQs).
Users Manual - English - Page 4
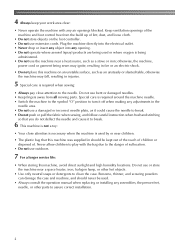
... push or pull the fabric when sewing, and follow careful instruction when freehand stitching
so that this machine was supplied in should never be kept out of the reach of children or
disposed of. Benzene, thinner, and scouring powders can damage the case and machine, and should be used or where oxygen is required when...
Users Manual - English - Page 6

... ...39 Thread tension ...41
USEFUL SEWING TIPS ...42
Trial sewing ...42 Changing the sewing direction ...42 Sewing curves ...42 Sewing thick fabrics ...42 Sewing hook-and-loop fastener ...43 Sewing thin fabrics ...44 Sewing stretch fabrics ...44 Stitching cylindrical pieces ...44
4 CONTENTS
IMPORTANT SAFETY INSTRUCTIONS 1
1. KNOWING YOUR SEWING MACHINE 6
ACCESSORIES ...6
Included accessories...
Users Manual - English - Page 7

UTILITY STITCHES 45
OVERCASTING STITCHES 45
Using zigzag foot ...45 Using overcasting foot ...46
BASIC STITCHING ...47
Basic stitching ...47
BLIND HEM STITCHING 48 BUTTONHOLE SEWING 51
Button sewing ...55
ZIPPER INSERTION ...57 SEWING STRETCH FABRICS AND ELASTIC TAPE 59
Stretch stitching ...59 Elastic attaching ...59
APPLIQUÉ, PATCHWORK AND QUILT STITCHING 61
Appliqués ...62 ...
Users Manual - English - Page 8
... YOUR SEWING MACHINE
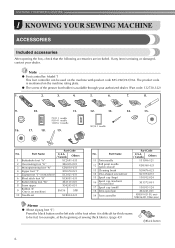
1 KNOWING YOUR SEWING MACHINE
ACCESSORIES
Included accessories
After opening the box, check that the following accessories are included. Part Name
U.S.A. / Canada
Others
1 Buttonhole foot "A"
XC2691-033
2 Overcasting foot "G"
XE6305-001
3 Monogramming foot "N"
XD0810-031
4 Zipper foot "I"
X59370-021
5 Zigzag foot "J" (on machine)
XC3021-031
6 Blind stitch foot...
Users Manual - English - Page 10
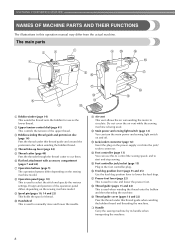
... 16 and 22) Pass the thread under this operation manual may differ from the actual machine.
h Operation panel (page 10) This is used . n Foot controller (page 13) You can turn the main power and sewing light switch on the sewing machine model.
c Bobbin-winding thread guide and pretension disc (page 14) Pass the thread under...
Users Manual - English - Page 11

... Press the reverse/reinforcement stitch button to set the bobbin. The machine sews at a slow speed at the beginning of sewing while the button is installed onto the presser foot holder. j Bobbin cover
Open the bobbin cover to sew reverse stitches.
c Needle position button (for the selected stitching.
1
f Needle plate cover release Use when removing the needle plate...
Users Manual - English - Page 12
..., position it to be sewn. KNOWING YOUR SEWING MACHINE
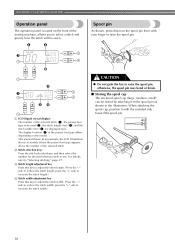
Operation panel
The operation panel, located on the front of the sewing machine, allows you wish to select a stitch and specify how the stitch will be used (2), the stitch length (mm) (3), and the stitch width (mm) (4) are displayed here. b Stitch selection keys Press the stitch selection keys, and then select the number...
Users Manual - English - Page 15

...
CAUTION
● When connecting the foot controller, be used to start sewing (only for models equipped with the start /stop position changes to the left and turn off the sewing machine. a
Faster
You should make sure that nothing is placed on the rear side of (stitch selection key). Foot controller
Insert the foot controller plug...
Users Manual - English - Page 30
...
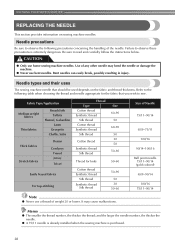
Corduroy Tweed Jersey Tricot
Easily frayed fabrics
For top-stitching
Thread Type Cotton thread Synthetic thread Silk thread Cotton thread Synthetic thread Silk thread
Cotton thread
Synthetic thread Silk thread
Thread for the fabric that should be used depends on sewing machine needles. KNOWING YOUR SEWING MACHINE
REPLACING THE NEEDLE
This section provides information on the...
Users Manual - English - Page 31
... skipped stitches easily
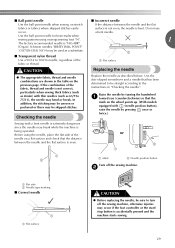
surface is not even, the needle is bent. b
a Flat side b Needle type marking
■ Correct needle
1
a Flat surface
CAUTION
● Before replacing the needle, be skipped stitches. Do not use
occur. Raise the needle by turning the handwheel a toward you (counterclockwise) so that has been determined to turn off the sewing machine.
Users Manual - English - Page 34
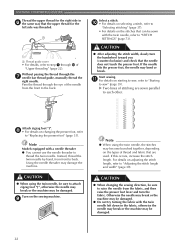
... the needle hits the presser foot, the needle may damage the machine. CAUTION
● When using the twin needle, the stitches may become bunched together, depending on the sewing machine. If this occurs, increase the stitch length. Otherwise the needle may break or the machine may be damaged.
● Do not try turning the fabric with a needle...
Users Manual - English - Page 35
... foot, be sure to be used with the
shank in the LCD.
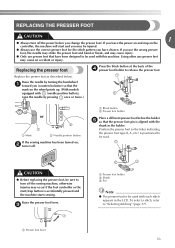
Replacing the presser foot
Press the black button at the back of the d presser foot holder to "Selecting stitching" (page 37). Raise the needle by pressing once or twice.)
or
a Mark
b Needle position button
If the sewing machine has been turned on...
Users Manual - English - Page 38
...).
36
When sewing is in injuries. ● Make sure that the needle does not strike basting pins, otherwise the needle may break.
● Never use bent needles. Bent needles can easily break, possibly resulting in operation, pay special attention to "Power supply" (page 12).
↓
2 Select the stitch.
For details on the machine, refer...
Users Manual - English - Page 39
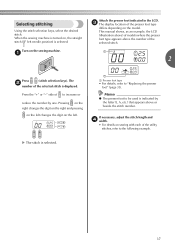
... display location of to be used is selected. The
b
number of the utility stitches, refer to "Replacing the presser foot" (page 33).
a Presser foot type
• For details, refer to the following example. If necessary, adjust the stitch length and d width.
• For details on the sewing machine. a
2
Press
(stitch selection keys).
Pressing on the right...
Users Manual - English - Page 44
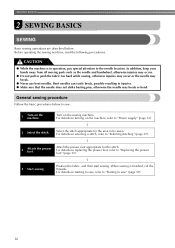
... does not fit easily under the same conditions that are described below. SEWING BASICS
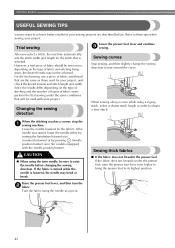
USEFUL SEWING TIPS
Various ways to raise the needle before changing the sewing direction. When the stitching reaches a corner, stop the a sewing machine.
Trial sewing
Lower the presser foot lever and continue c sewing. However, a trial piece of fabric should be sewn since, depending on the...
Users Manual - English - Page 49
... adjustment key moves the needle to "Sewing reinforcement stitches" (page 40).
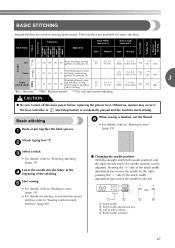
■ Changing the needle position With the straight stitch (left . Center
Triple stretch stitch
Attaching zippers, basic
J 01 01 01 01 stitching, and sewing
-
Pressing the "+" side of the stitching. BASIC STITCHING
Straight stitches are used for sewing plain seams. Three stitches are available for basic...
Users Manual - English - Page 59
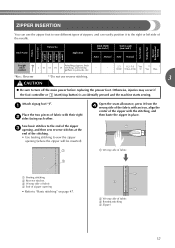
... left side of fabric with the stitching, and then baste the zipper in place. b Wrong side of the stitching. • Use basting stitching to sew the zipper
opening
• Refer to the end of the zipper c opening, and then sew reverse stitches at the
end of fabric c Basting stitching d Zipper
57
a Wrong side of fabric
a Basting stitching b Reverse stitches c Wrong side of fabric d End...
Users Manual - English - Page 67

...; Normally, the feed dog position lever is positioned at the
d rear of the machine on the sewing machine, and then select a e stitch. a Pattern
After sewing is finished, slide the feed dog
g position lever to
(to the left as seen from the front of sewing. Slide the feed dog position lever, located at .
3
65 Turn on the...
Users Manual - English - Page 98
... , presser foot lever 9 22
Q
quick-set bobbin 9, 20, 27
quilting 63 quilting foot 64
, quilting guide 63 64
R
reinforcement stitching 40
, reverse/reinforcement stitch button 9 40
S
scallop stitching 70 seam ripper 54 sewing machine needles 28
, sewing speed controller 9 13
sleeve holes 66 smocking 70
spool cap 6 10, 14, 23 spool , pin 10 14, 22 , start...
Similar Questions

How To Thread Bobbin Brother Ce5500prw Sewing Machine
(Posted by mastAES 9 years ago)

How To Make A Baste Stitch On A Brother Project Runway Sewing Machine
(Posted by citrmstr 9 years ago)
How To Tighten A Zig Zag Stitch On A Brother Lx2500 Sewing Machine
(Posted by Royxaaleckk 10 years ago)

How To Do Zigzag In Brother Ce5500prw?
I tried to do zigzag on my brother ce5500prw sewing machine, there was no error message when I start...
I tried to do zigzag on my brother ce5500prw sewing machine, there was no error message when I start...
(Posted by Prasanthikk 11 years ago)

What Model Number Bobbins Should Be Used On Brother Sc9500 Sewing Machine
Please provide me with the model/style bobbin that fits on a Brother SC9500 sewing machine. Thanks.
Please provide me with the model/style bobbin that fits on a Brother SC9500 sewing machine. Thanks.
(Posted by ezth2 11 years ago)