
Brother International CE-5000PRW Support Question
Brother International CE-5000PRW Support Question
Find answers below for this question about Brother International CE-5000PRW.Need a Brother International CE-5000PRW manual? We have 1 online manual for this item!
Question posted by brenjj24j on August 13th, 2014
The Handwheel Is Stuck Won't Turn
The person who posted this question about this Brother International product did not include a detailed explanation. Please use the "Request More Information" button to the right if more details would help you to answer this question.
Current Answers
Related Brother International CE-5000PRW Manual Pages
Users Manual - English - Page 2
.... 9. IMPORTANT SAFETY INSTRUCTIONS
When using .
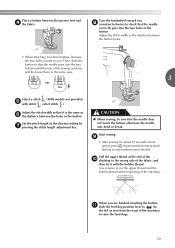
Never drop or insert any air openings blocked. To disconnect, turn the main switch to the nearest authorized dealer or service center for use the proper needle plate. The...bobbin, or changing presser foot, and the like. 15. This sewing machine is not intended for examination, repair, electrical or mechanical adjustment.
4.
Users Manual - English - Page 4
... turn off the power switch and unplug the cord when:
• Operation is completed • Replacing or removing the needle or any assemblies, the presser feet, needle, or other parts • A power failure occurs during use • Maintaining the machine • Leaving the machine unattended 3. Do not store anything on the needle while sewing...
Users Manual - English - Page 7
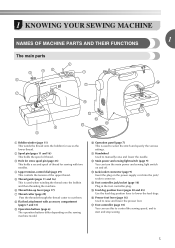
... two needles.
k Handwheel Used to cut them.
l Main power and sewing light switch (page 9) You can use as the lower thread. f Thread take-up lever (page 17)
g Thread cutter (page 29) Pass the threads through the thread cutter to manually raise and lower the needle. 1 KNOWING YOUR SEWING MACHINE
1
NAMES OF MACHINE PARTS AND THEIR...
Users Manual - English - Page 10
KNOWING YOUR SEWING MACHINE
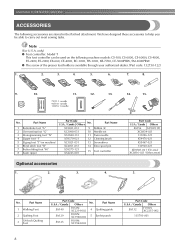
ACCESSORIES
The following machine models: CS-100, CS-6000, CS-6000i, CS-4000, ES-2400, ES-2000, EX-660, CE-4000, BC-1000, HS-1000, XR-7700, CE-5000PRW, SM-6500PRW
●... Code U.S.A. / Canada Others
No.
We have designed these accessories to help you be used on machine) 6 Blind stitch foot "R" 7 Button fitting foot "M" 8 Seam ripper
Part Code U.S.A. /...
Users Manual - English - Page 11
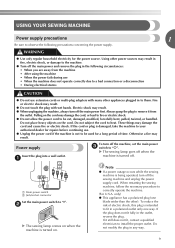
... power and remove the plug in the following precautions concerning the power supply.
Do not subject the cord to "I". X The sewing lamp goes off when the
machine is being operated, turn off the sewing machine and unplug the power supply cord. a Main power switch b Jack/socket connector
Set the main power switch to heat. If...
Users Manual - English - Page 12
... the left and turn off the sewing machine. Instead, the machine can be sure to turn on the left or a right to leave the needle in the fabric when sewing is set to select the desired sewing speed. Sewing speed controller (for models equipped with the start /stop position
Normally, the sewing machine is stopped. After turning on the sewing machine, release
the...
Users Manual - English - Page 13
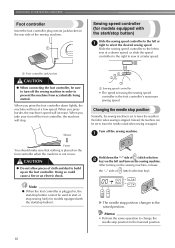
...) that comes with this machine.
e
11 b
CAUTION
● If the spool of the bobbin
Turn on c the bobbin from other bobbins may tangle on the spool pin.
Turn the bobbin clockwise, by...the thread may cause damage to the machine.
● We designed the bobbin that comes with this machine or bobbins of the thread through the hole on the sewing machine.
a Pre-tension disk b Bobbin ...
Users Manual - English - Page 14
... foot controller is turned after winding the thread around the bobbin and cause the needle to start. Slide the sewing speed controller back to its l original position (for models equipped with the
start / i stop button) (for models equipped with the sewing speed controller.)
Memo
● When the sewing machine is started or the handwheel is plugged...
Users Manual - English - Page 15
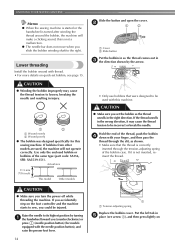
... the foot controller is cut the thread as described. Pull the thread to a suitable length.
Turn on the bobbin winder shaft b so that wraps around the pre-tension disk (page 11).
1
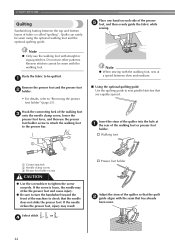
Place the bobbin on the sewing machine. CAUTION
● Be sure to cut to the right and pass it through 2 of the...
Users Manual - English - Page 16
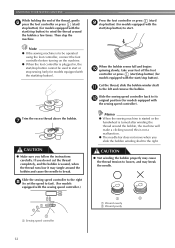
... injured. If you accidentally step on the foot controller and the machine starts to its highest position by the arrow.
Raise the needle to sew, you turn the power off while threading the machine. KNOWING YOUR SEWING MACHINE
Memo
● When the sewing machine is started or the handwheel is not inserted, reinsert the thread. b
1
2
a Cover b Slide button
Put...
Users Manual - English - Page 18
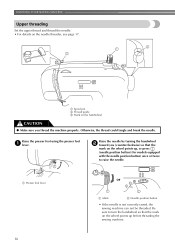
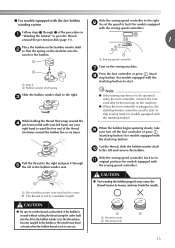
Raise the needle by turning the handwheel b toward you thread the machine properly. Raise the presser foot using the presser foot a lever. a Presser foot lever
or
a Mark
b Needle position button
• If the needle is not correctly raised, the sewing machine can not be threaded.
Be sure to raise the needle. Otherwise, the thread could tangle...
Users Manual - English - Page 23

...21 Checking the needle
Replacing the needle
Replace the needle as 65/9 to turn off the sewing machine, otherwise injuries may occur if the foot controller or the start/ stop button is even.
... and needle combinations are shown in "Checking the needle" .
1
Raise the needle by turning the handwheel a toward you (counterclockwise) so that the
mark on the wheel points up. (With models...
Users Manual - English - Page 24

... clamp screw with the screwdriver, otherwise the needle may break or damage may be removed by turning it
touches the needle stopper. CAUTION
● Be sure to insert the needle until it clockwise.
KNOWING YOUR SEWING MACHINE
Hold the needle with your left hand, and then d use the screwdriver to tighten the needle...
Users Manual - English - Page 26

... turning the handwheel a toward you (counterclockwise) so that the
mark on the wheel points up. (With models equipped with this machine. Position the presser foot so the letter indicating the presser foot type (J, A, etc.) is positioned to be read. Raise the presser foot lever. If you have been designed to turn it off the sewing machine...
Users Manual - English - Page 28

...as the needle and handwheel, otherwise injuries may occur.
● Do not pull or push the fabric too hard while sewing, otherwise injuries may occur...turning on starting to sew, refer to "Starting to "Power supply" (page 9).
↓
2 Select the stitch. Select the stitch appropriate for the stitch. For details on the machine, refer to sew" (page 28).
26 Before operating the sewing machine...
Users Manual - English - Page 29

...used is selected.
CAUTION
● After adjusting the stitch width, slowly turn the handwheel toward you (counterclockwise) and check that the needle does not touch the....
Turn on the left changes the digit on the sewing machine.
Continuing to
the right of
(stitch width
c adjustment key) to increase or reduce
the stitch length. When the sewing machine is turned on...
Users Manual - English - Page 32
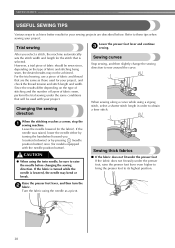
...) or by turning the handwheel toward you select a stitch, the machine automatically sets the stitch width and length for models equipped with your project. However, a trial piece of fabric should be used for your project, and check the thread tension and stitch length and width.
When the stitching reaches a corner, stop the a sewing machine. If...
Users Manual - English - Page 41
...width so that it is the same as seen from the front of the j stitching to sew reinforcement stitches. Pull the upper thread at the beginning of the button. Then, slide the button... otherwise the needle may bend or break.
Turn the handwheel toward the rear of the sewing machine, and then sew them in the button. CAUTION
● When sewing, be sure that the needle
correctly goes into...
Users Manual - English - Page 46
... fork of the presser e foot, and then evenly guide the fabric while
sewing. If the needle strikes the presser foot, injury may strike the presser foot and cause injury.
● Be sure to turn the handwheel toward the front of the machine to check that has already
been sewn.
44 Select stitch , or . d
†...
Users Manual - English - Page 53

... needle, refer to the back. wing needle, otherwise the sewing machine
may bend or break.
● After adjusting the stitch width, slowly turn the handwheel toward you (counterclockwise) and check that the right side ...stitch , or . Manually pass the thread
through the eye of joined fabrics. Heirloom stitching
When sewing with the seam.
• Use a 130/705H 100/16 wing needle. • For...
Similar Questions

How To Set Up A Ce-5000prw Sewing Machine?
(Posted by gggmrs 10 years ago)

How To Thread A Brother Ce-5000prw Sewing Machine
(Posted by nerandy0 10 years ago)
My Ce 5000prw Sewing Machine Keeps Jamming At The Bobbin Then Flashes E6 .brothe
(Posted by denisemborland 10 years ago)

Auto Threader On Brother Sewing Machine Ce 8080prw
my new brother sewing machine auto threader does not work.have changed needle position and needles s...
my new brother sewing machine auto threader does not work.have changed needle position and needles s...
(Posted by curtisbuchanan48 10 years ago)

How To Change Needle Brother Sewing Machine Ce 5500 Prw
i lost my manual and do not know how to change the needle for a brother sewing machine CE 5500 PRW. ...
i lost my manual and do not know how to change the needle for a brother sewing machine CE 5500 PRW. ...
(Posted by giomariagina 11 years ago)