
Brother International CE-5000PRW Support Question
Brother International CE-5000PRW Support Question
Find answers below for this question about Brother International CE-5000PRW.Need a Brother International CE-5000PRW manual? We have 1 online manual for this item!
Question posted by ohiocowgirl65 on July 27th, 2020
F8 Code
my machine is showing a F8 code and it was just working fine then i tried to refill a bobbin and the code popped up and now it wont work at all?
Current Answers
Answer #1: Posted by waelsaidani1 on July 27th, 2020 9:05 PM
waelsaidani1

Member since:
May 12th, 2013 Points: 19,501,797

Member since:
May 12th, 2013 Points: 19,501,797
Related Brother International CE-5000PRW Manual Pages
Users Manual - English - Page 1

KNOWING YOUR SEWING MACHINE SEWING BASICS UTILITY STITCHES APPENDIX
Computerized Sewing Machine
Operation Manual
Users Manual - English - Page 2
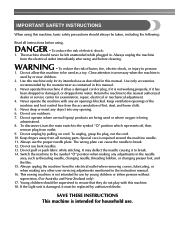
... all instructions before cleaning.
SAVE THESE INSTRUCTIONS This machine is used or where oxygen is required around the machine needle. 11. Close attention is necessary when the machine is intended for examination, repair, electrical or mechanical adjustment.
4. Do not use . This sewing machine is damaged, it to the nearest authorized dealer or service center for...
Users Manual - English - Page 4
... is required, first follow the troubleshooting table in the back of the most advanced computerized household sewing machines. up lever, needle, or other parts to assure correct installation. Do not use • Maintaining the machine • Leaving the machine unattended 3. To fully enjoy all the features, we suggest that you study the manual before...
Users Manual - English - Page 5
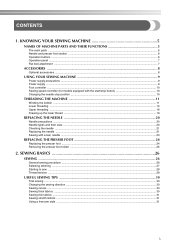
... panel ...7 Flat bed attachment ...7
ACCESSORIES ...8
Optional accessories ...8
USING YOUR SEWING MACHINE 9
Power supply precautions ...9 Power supply ...9 Foot controller ...10 Sewing speed controller (for models equipped with the start/stop button 10 Changing the needle stop position ...10
THREADING THE MACHINE 11
Winding the bobbin ...11 Lower threading ...14 Upper threading ...16 Drawing up...
Users Manual - English - Page 7
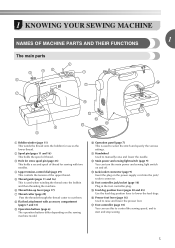
... 45) Use the feed dog position lever to raise and lower the presser foot. 1 KNOWING YOUR SEWING MACHINE
1
NAMES OF MACHINE PARTS AND THEIR FUNCTIONS
The main parts
a Bobbin winder (page 11) This winds the thread onto the bobbin for sewing with accessory compartment (pages 7 and 31)
i Operation buttons (page 6) The operation buttons differ depending on...
Users Manual - English - Page 8
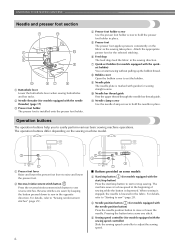
... place. For details, refer to "Starting to easily perform various basic sewing machine operations. e Presser foot The presser foot applies pressure consistently on the sewing machine model. g Quick-set the bobbin. Operation buttons
The operation buttons help you to sew" (page 28). When sewing is stopped, the needle is depressed.
d Presser foot holder screw Use the presser...
Users Manual - English - Page 9

... stored in the bag, and then store the bag inside
the flat bed attachment.
Operation panel
The operation panel, located on the front of the sewing machine, allows you wish to
1
a open it.
press the "+" side to "Selecting stitching" (page 27).
Users Manual - English - Page 10
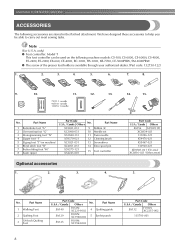
... used on machine) 6 Blind stitch foot "R" 7 Button fitting foot "M" 8 Seam ripper
Part Code U.S.A. / Canada Others
No. Note
(For U.S.A. Part Name
XC2691-031
9 Bobbin (4)
XC3098-...Code U.S.A. / Canada Others
No. KNOWING YOUR SEWING MACHINE
ACCESSORIES
The following machine models: CS-100, CS-6000, CS-6000i, CS-4000, ES-2400, ES-2000, EX-660, CE-4000, BC-1000, HS-1000, XR-7700, CE-5000PRW...
Users Manual - English - Page 11
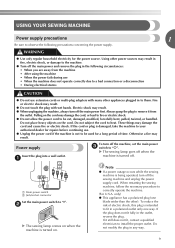
...Fire or electric shock may result in fire, electric shock, or damage to the machine.
● Turn off the sewing machine and unplug the power supply cord. Do not place heavy objects on .
a ...Main power switch b Jack/socket connector
Set the main power switch to heat. When restarting the sewing machine, follow the necessary procedure to "{". If the plug does not fit fully in any way.
9 ...
Users Manual - English - Page 12
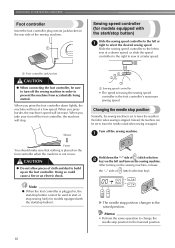
... the same operation to change the needle stop button)
Slide the sewing speed controller to the left to sew at a low speed.
X The needle stop .
Instead, the machine can be sure to turn on the sewing machine.
Turn off the foot controller, the machine will increase. Sewing speed controller (for models equipped with the start /stop position...
Users Manual - English - Page 13
... thread onto the bobbin. • For details on the sewing machine. Only use bobbins from the inside of the bobbin. THREADING THE MACHINE
Winding the bobbin
1
This section describes how to the machine.
● We designed the bobbin that comes with this machine or bobbins of the same type (part code: SA156, SFB: XA5539-151).
Put the bobbin onto the bobbin winder shaft d and...
Users Manual - English - Page 14
... models equipped with the start/stop button) to break.
If you do not cut the thread completely, and the bobbin is turned after winding the thread around the bobbin a few times. KNOWING YOUR SEWING MACHINE
While holding the end of the thread, gently f press the foot controller or press (start/
stop button) (for models...
Users Manual - English - Page 15
... equipped
with the
start/stop button) to start. Note
● If the sewing machine is wound without cutting the thread using the foot controller, connect the foot controller before turning on the sewing machine. Follow steps 1 through e the slit in
a "Winding the bobbin" to pass the thread around the pre-tension disk (page 11).
1
Place...
Users Manual - English - Page 16
... bobbin wound with your finger, and then pass the
thread through the tension-adjusting spring of the same type (part code: SA156, SFB: XA5539-151). If it may cause the thread tension to its highest position by the arrow. Slide the button and open the cover.
KNOWING YOUR SEWING MACHINE
Memo
● When the sewing machine...
Users Manual - English - Page 18
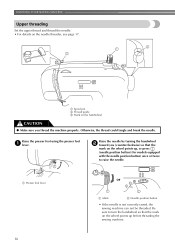
...tangle and break the needle. Be sure to raise the needle. KNOWING YOUR SEWING MACHINE
Upper threading
Set the upper thread and thread the needle. • For details... so that the mark on the wheel points up before threading the sewing machine.
16 Raise the needle by turning the handwheel b toward you thread the machine properly. Raise the presser foot using the presser foot a lever. ...
Users Manual - English - Page 19
... inch) of thread. Make sure the main power switch is set incorrectly, the thread may
cause sewing problems.
■ Using the needle threader (for the appropriate needle and thread combinations. b
While lowering... such as shown in a "Upper threading" to thread the machine to left hand, then feeding the thread with home sewing machine needles size 75/11100/16. CAUTION
● If the spool...
Users Manual - English - Page 20

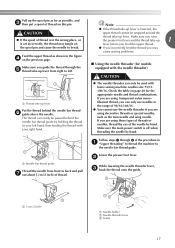
... below. e
a Hook b Thread
While lightly holding the thread, release the f needle threader lever. d
Pull out about 5 cm (2 inch) of thread through the needle. KNOWING YOUR SEWING MACHINE
Fully lower the needle threader lever. The hook will pull the
thread through g the needle toward you may cause...
Users Manual - English - Page 22
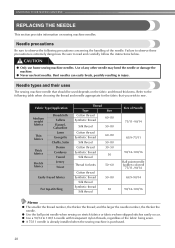
...9679; A 75/11 needle is already installed when the sewing machine is extremely dangerous.
Needle types and their uses
The sewing machine needle that you wish to read and carefully follow the ...below. Bent needles can easily break, possibly resulting in injury. KNOWING YOUR SEWING MACHINE
REPLACING THE NEEDLE
This section provides information on the fabric and thread thickness...
Users Manual - English - Page 23

... needle
Replacing the needle
Replace the needle as denim) with a bent needle is extremely dangerous
since the needle may be sure to turn off the sewing machine. Do not use a bent needle. In addition, the stitching may be uneven or puckered or there may break while the...
Users Manual - English - Page 64

... start /stop button.
Note
● If error message "F1" through "F8" appears in the table. Contact your nearest authorized service center. The motor locked up because the thread is tangled The sewing machine beeps for four seconds and the machine automatically stops. Move the bobbin winder shaft to check for example, because the thread is...
Similar Questions


How To Set Up A Ce-5000prw Sewing Machine?
(Posted by gggmrs 10 years ago)

How To Thread A Brother Ce-5000prw Sewing Machine
(Posted by nerandy0 10 years ago)
My Ce 5000prw Sewing Machine Keeps Jamming At The Bobbin Then Flashes E6 .brothe
(Posted by denisemborland 10 years ago)

Auto Threader On Brother Sewing Machine Ce 8080prw
my new brother sewing machine auto threader does not work.have changed needle position and needles s...
my new brother sewing machine auto threader does not work.have changed needle position and needles s...
(Posted by curtisbuchanan48 10 years ago)