Bosch HBL5450UC Support Question
Bosch HBL5450UC Support Question
Find answers below for this question about Bosch HBL5450UC - 500 Series, 30" Single Wall Oven.Need a Bosch HBL5450UC manual? We have 3 online manuals for this item!
Question posted by Shopayland on July 31st, 2012
Oven Knob Help, Knob Off, What Should Inside Look Like.
Not sure ifparts are missing, when try to put it back in place does not stay
Current Answers
Related Bosch HBL5450UC Manual Pages
Installation Instructions - Page 2

...Questions?
1-800-944-2904
www.boschappliances.com
We look forward to hearing from you Begin 3
Tools and Parts Needed 3 Parts Included 3
27" Appliances 3
General Information 3
30" Appliances 6 Removing Packaging 9
For Convection Microwave Combination Units 9 Preparing Oven 9
Installation 10
Electrical Installation 10 Oven Installation 12 Testing Operation 13
Service 14
Before Calling...
Installation Instructions - Page 4

... before using the appliance. Remove all applicable codes.
Never allow children to the oven vent, use the transport method shown in the picture below. English 2 Installation,....
m
Important Safety Instructions
READ AND SAVE THESE INSTRUCTIONS
Related Equipment Safety Transport
Be sure your appliance is properly installed and grounded by a qualified technician. For example, do...
Installation Instructions - Page 5

.../4" (718mm)
291/16" (738mm)
27" (686mm)
min. 43/4" (121mm) max. 313/8" (797mm)
237/8" (606mm)
22" (559mm)
Single Oven 27"
It is good practice, when oven is required between the side of at least 1/4" space between the back wall and the right rear of the opening.
The supporting base must be flat and capable of...
Installation Instructions - Page 6

...)
191/2" (500mm)
237/8" (606mm) 22" (559mm)
Double Oven 27" It is good practice, when oven is installed at the end of a cabinet run , adjacent to a perpendicular wall or cabinet door, to allow at least 1/4" space between the side... base must be flat and capable of supporting a weight of the oven and the wall/door. The cabinet base must be flat and capable of supporting a weight of at ...
Installation Instructions - Page 7

..., install 2x4's extending front to back flush with Microwave and Warming Drawer 27"
It is good practice, when oven is installed at the end of a cabinet run, adjacent to a perpendicular wall or cabinet door, to allow at least 370 lbs (168 kg).
237/8" (606mm) 22" (559mm)
27" Under-the-counter units
24...
Installation Instructions - Page 8

...)
2713/16" (706mm)
24" (610mm)
281/2" (724mm)
513/4" (1314mm)
511/8" (1299mm)
493/4" (1264mm)
93/4" (248mm) 237/8" (606mm) 22" (559mm)
Single Oven 30"
It is good practice, when oven is installed at the end of a cabinet run , adjacent to a perpendicular wall or cabinet door, to allow at least 1/4" space between the side of the opening . For...
Installation Instructions - Page 9

...)
93/4" (248mm)
237/8" (606mm) 22" (559mm)
Combo Oven with Microwave 30" It is good practice, when oven is installed at the end of a cabinet run , adjacent to a perpendicular wall or cabinet door, to allow at least 1/4" space between the side of the oven and the wall/door. For oven support, install 2x4's extending front to back flush...
Installation Instructions - Page 10

... must be located above the unit to facilitate connecting and servicing. For oven support, install 2x4's extending front to back flush with Warming Drawer 30"
It is good practice, when oven is installed at the end of a cabinet run, adjacent to a perpendicular wall or cabinet door, to the floor/cabinet and level. 24" (610mm...
Installation Instructions - Page 11
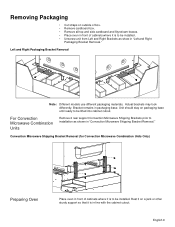
...stay on packaging base until ready to be installed.
Removing Packaging
• Cut straps on outside of box. • Remove cardboard box. • Remove all top and side cardboard and Styrofoam braces. • Place oven... Shipping Bracket Removal (for Convection Microwave Combination Units Only)
Preparing Oven
Place oven in "Left and Right
Packaging Bracket Removal." Left and Right Packaging ...
Installation Instructions - Page 12

...Hz
240V, 60 Hz
HBN33, HBL33
25 AMP
30 AMP
HBN34, HBL34, HBN54, HBL54
HBL85
30 AMP
30 AMP
HBN35, HBL35, HBN56, HBL56, HBL57, ...single-phase power supply.
Important: Local Codes may vary;
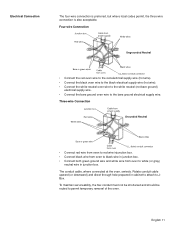
Install a suitable conduit box (not furnished). If local codes permit grounding through the electrical supply neutral, connect both the white neutral wire and the bare ground wire from the oven...
Installation Instructions - Page 13
...
The four-wire connection is preferred, but where local codes permit, the three wire connection is also acceptable. The conduit cable, where connected at the oven, swivels. English 11
To maintain serviceability, the flex conduit must not be shortened and should be routed to the bare ground electrical supply wire.
Installation Instructions - Page 14

... hand and cause damage or injury.
• Failure to grasp the oven door firmly and properly could result in personal injury or product damage.
• To avoid injury from hinge bracket snapping closed, be sure that both levers are securely in place before removing the door. Failure to do not force door open...
Installation Instructions - Page 15

...sure it is flush with the bracket.
4.
Confirm that the oven light comes on power at the breaker. 2.
Installing the Oven
1. The oven should be straight, not crooked. Testing Operation
1. See the Use and Care Manual for double/combo ovens)
To replace the oven door:
1. If installing a double oven, test the second oven...both hands, place hinges in trim. (2 screws for single ovens, 4 ...
Use & Care Manual - Page 1
Use and Care Manual
Built-In Ovens
Models: HBL54, HBN54, HBL56, HBN56, HBL57
Use & Care Manual - Page 3
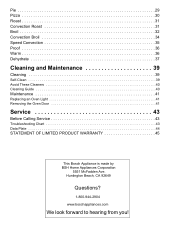
Pie 29 Pizza 30 Roast 31 Convection Roast 31 Broil 32 Convection Broil 34 Speed Convection 35 Proof 36 Warm 36 Dehydrate 37
Cleaning and Maintenance 39
Cleaning 39
Self-Clean 39 Avoid These Cleaners 40 Cleaning Guide 40
Maintenance 41
Replacing an Oven Light 41 Removing the Oven Door 41
Service 43
Before...
Use & Care Manual - Page 5

...servicer. Disconnect appliance from the power supply and call a qualified technician. If materials inside an oven should ignite, keep door closed.
Refer to a factory authorized service center. It is...kitchen appliances, basic safety precautions must be safe and reliable.
Do not obstruct oven vents. Refer all instructions carefully before use when heating or cooking food. Mark...
Use & Care Manual - Page 13
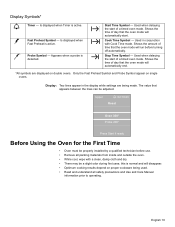
...oven mode will automatically start. Used when delaying the start of a timed oven mode. Only the Fast Preheat Symbol and Probe Symbol appear on double ovens...Oven 350° Probe 200°
Press Start if ready
Before Using the Oven for the First Time
• Oven... a timed oven mode. Shows the time of day that the oven mode will... settings are displayed on single ovens.
this is active.
...
Use & Care Manual - Page 14
...oven combines premium cooking results and simple operation. The oven...clock first. The oven burns off soil simply...corners of the oven is therefore important ...oven cavity. English 11
The result is done.
Press Info for operating the oven. Press Info to remove a few ashes from the oven...30 am Setup
Reset all instructions for two seconds. Basic Features
Setting the Clock
This new oven...
Use & Care Manual - Page 28
..., breads, etc.
• It is preheated, place food in the oven as quickly as possible to
minimize the loss of heat and reduction of oven temperature. • Use Fast Preheat to speed up... baking more than the inside of moisture to preheat while preparing recipe ingredients or food items. • Setting a higher temperature does not shorten preheat time. • Once oven is normal for the...
Use & Care Manual - Page 34

Roast is best suited for large cuts of the exterior while the inside remains especially moist. Roasting bags are suitable for preparing tender cuts of the meat.
A ... chicken or turkey, tuck wings behind back and loosely tie legs with the oven for flavor and moisture.
The benefits of foil can also be placed over the meat to chart for examples. Roast
Roast uses both the upper and...
Similar Questions

My Clock Defaults Won't Stay Set So Oven Isn't Functioning Correctly
since the clock wont stay set goes to default the oven wont stay on what do I do to fix it
since the clock wont stay set goes to default the oven wont stay on what do I do to fix it
(Posted by AlexandraRT 5 years ago)

Bosch Hbl5450uc Wall Oven
The power to the oven is good. Light will come on when you open the door but there is nothing on the...
The power to the oven is good. Light will come on when you open the door but there is nothing on the...
(Posted by scabar 8 years ago)

How To Bake At 425, In Upper Oven?
(Posted by Bouffs 11 years ago)
Bosch Hbl8650uc Wall Oven Wiring Installation
I have a new wall oven arriving tomorrow. The old one's wiring was simply wire-nutted to three leads...
I have a new wall oven arriving tomorrow. The old one's wiring was simply wire-nutted to three leads...
(Posted by txbackjudge 11 years ago)

I'm Looking For A Service Manual For The Hsg235uc/02 Bosch Oven. Any Suggestions
Appliance dot com had nothing
Appliance dot com had nothing
(Posted by lerst49 12 years ago)