Acer TravelMate 240 Support Question
Acer TravelMate 240 Support Question
Find answers below for this question about Acer TravelMate 240.Need a Acer TravelMate 240 manual? We have 4 online manuals for this item!
Question posted by davidtro on August 3rd, 2014
How To Change Cimus Battery Of Travelmate 240 Acer
The person who posted this question about this Acer product did not include a detailed explanation. Please use the "Request More Information" button to the right if more details would help you to answer this question.
Current Answers
Related Acer TravelMate 240 Manual Pages
TravelMate 240/250 Service Guide - Page 1
Acer TravelMate 240/250 Series
Service Guide
SERVICE CD PART NO.: VD.T30V1.001
PRINTED IN TAIWAN
TravelMate 240/250 Service Guide - Page 7
... 50 Removing the Battery 52 Removing the ...Battery 93
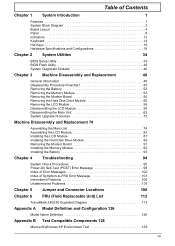
Chapter 4 Troubleshooting
94
System Check Procedures 95 Power-On Self-Test (POST) Error Message 99 Index of Error Messages 100 Index of Symptom-to-FRU Error Message 103 Intermittent Problems 106 Undetermined Problems 107
Chapter 5 Jumper and Connector Locations
108
Chapter 6
FRU (Field Replaceable Unit) List
112
TravelMate 240...
TravelMate 240/250 Service Guide - Page 13
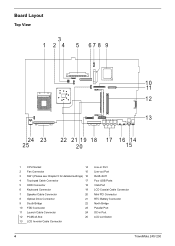
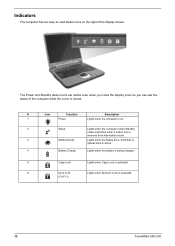
... LCD Inverter Cable Connector
Line-in Port Line-out Port RJ45+RJ11 Four USB Ports VGA Port LCD Coaxial Cable Connector Mini PCI Connector RTC Battery Connector North Bridge Parallel Port DC-in Port LCD Lid Switch
4
TravelMate 240/ 250
TravelMate 240/250 Service Guide - Page 21
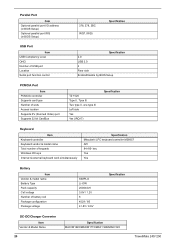
... from hibernation mode.
3
Media Activity
Lights when the floppy drive, hard disk or
optical drive is active.
4
Battery Charge
Lights when the battery is being charged.
5
Caps Lock
Lights when Caps Lock is activated.
6
Num Lock
Lights when Numeric Lock is...is closed.
#
Icon
Function
Description
1
Power
Lights when the computer is activated.
(Fn-F11)
12
TravelMate 240/ 250
TravelMate 240/250 Service Guide - Page 35
... Yes Yes (IRQ17)
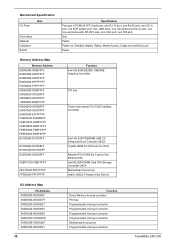
Specification
Keyboard
Item Keyboard controller Keyboard vendor & model name Total number of battery cell Package configuration Package voltage
SIMPLO Li-ION 2000mAH 3.8V / 1.2V 8 4529 / 8S 41.8V / 9.6V
Specification
DC-DC/Charger Converter
Item Vendor & Model Name
26
Specification MAX IM1645/MAXIM1715/MAX1 999/MAXI 545
TravelMate 240/ 250
TravelMate 240/250 Service Guide - Page 39
One Plastic Power-on, Standby, Battery Status, Media Access, CapsLock and NumLock Power
Memory Address Map
Memory Address 000A0000-000BFFFF E0000000-E007FFFF E0080000-E00FFFFF ...PCI bus Programmable interrupt controller Programmable interrupt controller Programmable interrupt controller Programmable interrupt controller Motherboard resources Programmable interrupt controller
TravelMate 240/ 250
TravelMate 240/250 Service Guide - Page 41
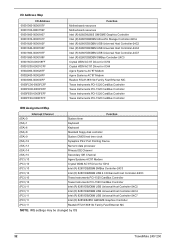
.../DBM USB Universal Host Controller-24C7 Intel (R) 82852/82855 GM/GME Graphics Controller Realtek RTL8139/810x Family Fast Ethernet NIC
NOTE: IRQ settings may be changed by OS
32
TravelMate 240/ 250
TravelMate 240/250 Service Guide - Page 55
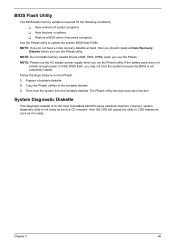
Use the Phlash utility to the bootable diskette. 3. If the battery pack does not
contain enough power to finish BIOS flash, you run the Phlash. 1. Copy the Phlash utilities to update the system BIOS flash ... the steps below to CSD website as soon as service CD released. BIOS Flash Utility
The BIOS flash memory update is required for the Acer TravelMate 240/250 series notebook machine.
TravelMate 240/250 Service Guide - Page 62
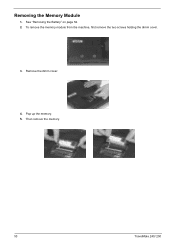
Removing the Memory Module
1. Then remove the memory.
53
TravelMate 240/ 250 Remove the dimm cover.
4. See "Removing the Battery" on page 52. 2. To remove the memory module from the machine, first remove the two screws holding the dimm cover.
3. Pop up the memory. 5.
TravelMate 240/250 Service Guide - Page 64

See "Removing the Battery" on page 55. 3. Detach the hard disk drive from the HDD holder.
55
TravelMate 240/ 250 Then take the hard disk drive out of the main unit. See "Removing the Hard Disk Drive Module" on page 52... dirve carefully.
3. Remove the two screws that fasten the HDD holder.
4. Disassembling the Hard Disk Drive Module
1.
See "Removing the Battery" on page 52. 2.
TravelMate 240/250 Service Guide - Page 66

..." on page 56. 3. See "Removing the Battery" on the bottom; Remove the four screws holding the LCD hinge; Remove the two screws on page 52. 2. Removing the LCD Module
1. Remove the two screws and then detach the launch board from the main unit. 57
TravelMate 240/ 250 Remove the screw that fastens the...
TravelMate 240/250 Service Guide - Page 68
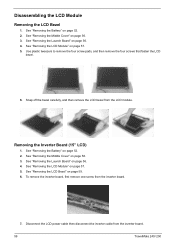
... "Removing the Battery" on page 56. 4. Snap off the bezel carefully, and then remove the LCD bezel from the inverter board.
7. See "Removing the Launch Board" on page 52. 2. See "Removing the Battery" on page 52. 2. Disconnect the LCD power cable then disconnect the inverter cable from the inverter board.
59
TravelMate 240/ 250
TravelMate 240/250 Service Guide - Page 70
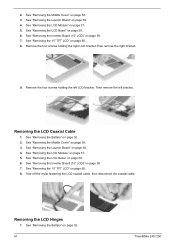
See "Removing the Battery" on page 57. 5. Tear off the mylar fastening the LCD coaxial cable, then disconnect the ...the left LCD bracket. See "Removing the Middle Cover" on page 60. 8. See "Removing the Battery" on page 56. 4. See "Removing the Launch Board" on page 52.
61
TravelMate 240/ 250 See "Removing the Middle Cover" on page 59. 6. See "Removing the LCD Bezel" ...
TravelMate 240/250 Service Guide - Page 72
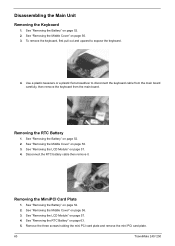
Removing the MimiPCI Card Plate
1. See "Removing the RTC Battery" on page 52. 2. See "Removing the Battery" on page 63. 5. Use a plastic tweezers or a plastic ...the mini PCI card plate.
63
TravelMate 240/ 250 See "Removing the Battery" on page 52. 2. Removing the RTC Battery
1. Disconnect the RTC battery cable then remove it. See "Removing the Battery" on page 52. 2. Disassembling ...
TravelMate 240/250 Service Guide - Page 74

.... Please remember to press the CPU
lever after you put the CPU back to the lower case. See "Removing the Battery" on page 63. 2.
See "Removing the Keyboard" on page 52. 2. Then turn over the main unit and....
3. Lift up the CPU lever, then place the CPU back to the upper case.
65
TravelMate 240/ 250 See "Removing the RTC Battery" on page 63. 5. Installing the Processor
1.
TravelMate 240/250 Service Guide - Page 78

... 67. 5. See "Removing the Floppy Disk Drive Module" on page 63. 4. See "Removing the Battery" on page 56. 3. See "Removing the Middle Cover" on page 52. 2. See "Removing the...5. See "Removing the Battery" on page 56. 3. See "Removing the Middle Cover" on page 52. 2. Remove the four screws holding the HDD bracket, then remove the HDD bracket.
69
TravelMate 240/ 250 See "Removing the...
TravelMate 240/250 Service Guide - Page 80

...page 63. 4. See "Removing the Main Board" on page 52. 2. See "Removing the Battery" on page 70. 10. See "Removing the Main Board" on page 52. 2. See "Removing the Battery" on page 70. 10. See "Removing the VGA Heatsink Plate" on page 68. 6. ...Port Bracket
1. See "Removing the Keyboard" on page 67. 5. See "Removing the Main Board" on page 70.
71
TravelMate 240/ 250
7.
TravelMate 240/250 Service Guide - Page 82

See "Removing the RTC Battery" on page 56. 2. System Upgrade Procedure
Base Unit to the wireless LAN card.
73
TravelMate 240/ 250 See "Removing the Middle Cover" on page 63. 4. Secure the wireless LAN card antanna by four screws. See "Removing the Keyboard" on page 63. 5. ...
TravelMate 240/250 Service Guide - Page 116
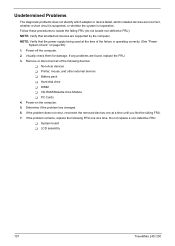
..., and other external devices T Battery pack T Hard disk drive T DIMM T CD-ROM/Diskette drive Module T PC Cards 4. Power-off the computer. 2. NOTE: Verify that all of the failure is inoperative. Do not replace a non-defective FRU: T System board T LCD assembly
107
TravelMate 240/ 250 Power-on page 96): 1. Determine if the problem has changed. 6.
TravelMate 240/250 Service Guide - Page 121
... whenever ordering for parts to repair or for repair and service of TravelMate 240/250. For whatever reasons a part number change is made, it properly, or follow the local government ordinance or
... customer machines. Chapter 6
112 You MUST use the local FRU list provided by your regional Acer office on your regional web or channel. Chapter 6
FRU (Field Replaceable Unit) List
This...
Similar Questions

Where Is And How Change Inside Battery In My 8910
where is and how change inside battery in my 8910
where is and how change inside battery in my 8910
(Posted by ppt1944 10 years ago)

How To Locate The Cmos Battery On A Acer Aspire S3
how can i locate the cmos battery on the acer aspire s3
how can i locate the cmos battery on the acer aspire s3
(Posted by hkees01 10 years ago)

How Do I Change The Battery Of Acer Aspire 4830tg?
Laptop battery error message coder changing the battery
Laptop battery error message coder changing the battery
(Posted by deksimapansakilan 11 years ago)

Li-ion Battery No Loaded
The li-ion battery of my acer travelmate 240 don't charce, I have a new battery buyd, but it didn't ...
The li-ion battery of my acer travelmate 240 don't charce, I have a new battery buyd, but it didn't ...
(Posted by wvanpoppel 11 years ago)
