
Acer S201HL Support Question
Acer S201HL Support Question
Find answers below for this question about Acer S201HL.Need a Acer S201HL manual? We have 2 online manuals for this item!
Question posted by jrocha003 on November 23rd, 2012
There Is A Line In The Middle Of The Screen Can You Help
when I turn on the computer a line appears in the middle of the screen a nd I do not know how to remove it
Current Answers
Related Acer S201HL Manual Pages
Quick Start Guide - Page 1
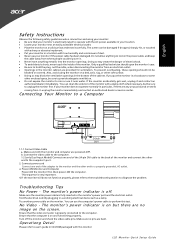
... indicator is on and functioning properly. No Video -
Power-ON Monitor and Computer Power-ON the monitor first, then power-ON the computer. Try another power cable on the monitor.
Turn off . The screen can clean the exterior of the monitor with the AC power available in a bookcase or some
other enclosed space, be
blocked or...
Quick Start Guide - Page 2
... is encouraged to try to
correct the interference by turning the device off and on a circuit different from that this LCD monitor is likely to result in a particular installa- Operation...connected.
•
Consult the dealer or an experienced radio/television technician for help. LCD Monitor Quick Setup Guide
Notice: Shielded cables
All connections to other relevant provisions of ...
Quick Start Guide - Page 3

For more information about where you purchased the product.
LCD Monitor Quick Setup Guide The separate collection and recycling of your waste equipment at the time of disposal will help to conserve natural resources and ensure that it over to dispose of your waste equipment by Users in Private Household in a manner that...
User Manual - Page 1
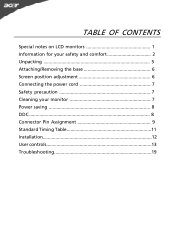
TABLE OF CONTENTS
Special notes on LCD monitors 1 Information for your safety and comfort 2 Unpacking 5 Attaching/Removing the base 6 Screen position adjustment 6 Connecting the power cord 7 Safety precaution 7 Cleaning your monitor 7 Power saving 8 DDC 8 Connector Pin Assignment 9 Standard Timing Table 11 Installation 12 User controls 13 Troubleshooting 19
User Manual - Page 2
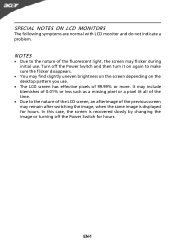
... for hours. In this case, the screen is displayed for hours. EN-1 Turn off the Power Switch and then turn it on the desktop pattern you use.
· The LCD screen has effective pixels of the fluorescent light, the screen may flicker during initial use.
SPECIAL NOTES ON LCD MONITORS
The following symptoms are normal with...
User Manual - Page 3

...provided.
•
Never push objects of time listening to music at high volume.
•
Avoid turning up the volume to prevent battery leakage, do
not place the product on a vibrating surface.
&#...•
To avoid damage of internal components and to block out noisy surroundings.
•
Turn the volume down if you can hear it clearly and comfortably and
without distortion.
•...
User Manual - Page 4
... not constitute a malfunction.
Nevertheless, some pixels may occasionally misfire or appear as opening or removing covers may lead to normal condition. Long
work periods, bad posture,...that are
also at risk of physical injury after prolonged use
Computer users may appear in front of the monitor, using a footrest,
or raising your leg muscles
EN-3
LCD Pixel Statement
The...
User Manual - Page 5
...help in such a way that the side faces the window or any light
source
• minimizing room light by looking away from the monitor... or contact lenses, glare, excessive room
lighting, poorly focused screens, very small typefaces and low-contrast displays could
stress your... awkward viewing angle.
•
Avoid looking at the middle of the display.
•
Adjust the display brightness and...
User Manual - Page 6
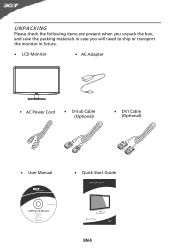
UNPACKING
Please check the following items are present when you unpack the box, and save the packing materials in case you will need to ship or transport the monitor in future.
· LCD Monitor
· AC Adapter
· AC Power Cord
· D-Sub Cable (Optional)
· DVI Cable (Optional)
· User Manual
· Quick Start Guide
S2 1HL LCD monitor
31
08/1
User Manual - Page 7
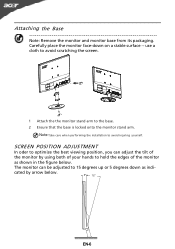
...-down as shown in the figure below .
5 15
EN-6 The monitor can adjust the tilt of your hands to 15 degrees up or 5 degrees down on a stable surface -- Attaching the Base
Note: Remove the monitor and monitor base from its packaging. Note:Take care when performing the installation to the base. 2 Ensure that the...
User Manual - Page 8
... follow the below eye level. · Handle with care when transporting the monitor. · Refrain from giving shock or scratch to the screen, as screen is adequate ventilation. · Avoid placing the monitor against a bright background or where sun- Always
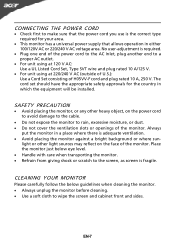
put the monitor in a place where there is fragile. CONNECTING THE POWER CORD
· Check...
User Manual - Page 9
...around 3 seconds.
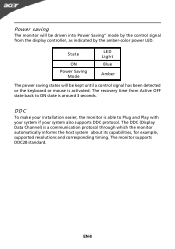
DDC
To make your installation easier, the monitor is able to ON state is a communication protocol through which the monitor automatically informs the host system about its capabilities, for example,... signal has been detected or the keyboard or mouse is activated.
Power saving
The monitor will be driven into Power Saving" mode by the control signal from Active OFF...
User Manual - Page 13
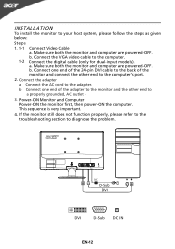
..., please follow the steps as given below:
Steps
1. 1-1 1-2
Connect Video Cable a. Mnnaekcet stuhreedbiogtithatlhceabmleo(noitnolyr afonrddcuoaml-pinupteurt amreodpeolws).ered-OFF. Cao. Connect one end of the monitor and connect the other end to the computer's port.
2. b Connect one end of the 24-pin DVI cable to the back of the adapter to...
User Manual - Page 14
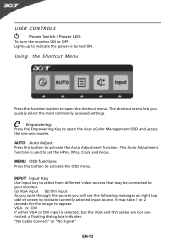
... side of screen to open the Acer eColor Management OSD and access the scenario modes. Empowering: Press the Empowering Key to appear. It may be connected to your monitor. (a) VGA... input (b) DVI input As you cycle through the sources you quickly select the most commonly accessed settings. VGA or DVI If either VGA or DVI input is turned...
User Manual - Page 16
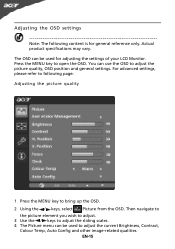
... the picture quality, OSD position and general settings. The OSD can use the OSD to following content is for adjusting the settings of your LCD Monitor. You can be used for general reference only. EN-15 Actual product specifications may vary. Then navigate to
the picture element you wish to adjust...
User Manual - Page 17

EN-16 Then navigate to the feature you wish to bring up the OSD. 2 Using the directional keys, select OSD from the on screen display. Adjusting the OSD position
1 Press the MENU key to adjust.
User Manual - Page 18
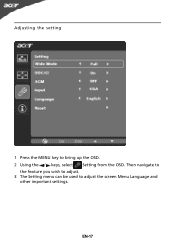
Adjusting the setting
1 Press the MENU key to adjust the screen Menu Language and
other important settings. EN-17 Then navigate to
the feature you wish to adjust. 3 The Setting menu can be used to bring up the OSD. 2 Using the / keys, select Setting from the OSD.
User Manual - Page 20
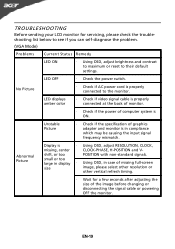
...monitor is
· Using OSD, adjust RESOLUTION, CLOCK,
missing, center
CLOCK-PHASE, H-POSITION and V- EN-19 LED OFF
· Check the power switch.
Abnormal Picture
Display is in case of missing full-screen... ON
· Using OSD, adjust brightness and contrast to maximum or reset to the monitor.
shift, or too
POSITION with non-standard signals. small or too
large in display ...
User Manual - Page 22
[email protected] And,
Acer Europe SA Via Cantonale, Centro Galleria 2 6928 Manno Switzerland
Hereby declare that: Product: Trade Name: Model Number: SKU Number:
LCD Monitor Acer S201HL S2**HL ("*" = 0~9, a ~ z, or A ~ Z)
Is compliant with the essential requirements and other relevant provisions of the following EC directives, and that all the necessary steps...
User Manual - Page 23

... must accept any interference received, including interference that may not cause harmful interference, and (2) this declaration:
Product Name: Main Model Number: Series Model Number:
LCD Monitor S201HL S2**HL
Name of Responsible Party: Acer America Corporation
Address of the FCC Rules. S.
Contact Person:
Acer Representative
Phone No.:
254-298-4000
Fax No...
Similar Questions

Acer 20 Ultra-thin Widescreen Led Monitor S201hl Does It Come With Connecting
cable?
cable?
(Posted by lafRacha 9 years ago)


