Acer Aspire 5749Z Support Question
Acer Aspire 5749Z Support Question
Find answers below for this question about Acer Aspire 5749Z.Need a Acer Aspire 5749Z manual? We have 1 online manual for this item!
Question posted by joey716 on October 30th, 2011
How Do I Install Memory? Must I Remove The Entire Back Panel?
I have a 4G memory that I want to install in my new laptop
Current Answers


Related Acer Aspire 5749Z Manual Pages
Aspire 5349, 5749, 5749Z Service Guide - Page 7
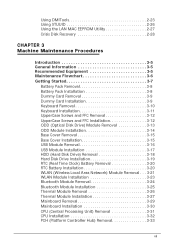
... Started 3-7
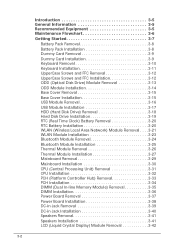
Battery Pack Removal 3-8 Battery Pack Installation 3-8 Dummy Card Removal 3-9 Dummy Card Installation 3-9 Keyboard Removal 3-10 Keyboard Installation 3-11 UpperCase Screws and FFC Removal 3-12 UpperCase Screws and FFC Installation 3-12 ODD (Optical Disk Drive) Module Removal 3-13 ODD Module Installation 3-14 Base Cover Removal 3-15 Base Cover Installation 3-15 USB Module...
Aspire 5349, 5749, 5749Z Service Guide - Page 8

... 3-37 Power Board Installation 3-38 DC-in Jack Removal 3-39 DC-in Jack Installation 3-40 Speakers Removal 3-41 Speakers Installation 3-41 LCD (Liquid Crystal Display) Module Removal 3-42 LCD Module Installation 3-43 LCD Bezel Removal 3-44 LCD Bezel Installation 3-45 Camera Module Removal 3-46 Camera Module Installation 3-47 LCD Panel Removal 3-48 LCD Panel Installation 3-49 LCD Hinge...
Aspire 5349, 5749, 5749Z Service Guide - Page 15
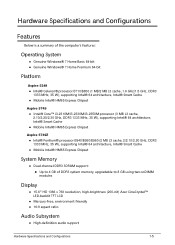
...174; 64 architecture, Intel® Smart Cache
Mobile Intel® HM65 Express Chipset
Aspire 5749Z
0
Intel® Pentium® processor B940/B950/B960 (2 MB L3 cache, ...;Mobile Intel® HM65 Express Chipset
System Memory 0
Dual-channel DDR3 SDRAM support: Up to 4 GB of DDR3 system memory, upgradable to 8 GB using two soDIMM ...
Aspire 5349, 5749, 5749Z Service Guide - Page 23
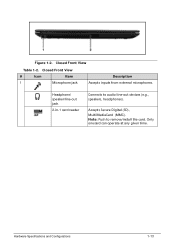
... microphones. Accepts Secure Digital (SD), MultiMediaCard (MMC). Only onecard can operate at any given time. Headphone/ speaker/line-out jack
2-in-1 card reader
Connects to remove/install the card. Closed Front View
Table 1-2.
Aspire 5349, 5749, 5749Z Service Guide - Page 72

... BIOS Flash ROM.
Prepare a bootable USB HDD. 2.
BIOS Flash Utilities 0
BIOS Flash memory updates are required for the following to bootable USB HDD. 3.
NOTE: NOTE:
If a... conditions: New versions of system programs New features or options Restore a BIOS when it becomes corrupted.
NOTE: NOTE:
Do not install memory related drivers (XMS, ...
Aspire 5349, 5749, 5749Z Service Guide - Page 86
...30 CPU (Central Processing Unit) Removal 3-31 CPU Installation 3-32 PCH (Platform Controller Hub) Removal 3-33 PCH Installation 3-34 DIMM (Dual In-line Memory Module) Removal 3-35 DIMM Installation 3-36 Power Board Removal 3-37 Power Board Installation 3-38 DC-in Jack Removal 3-39 DC-in Jack Installation 3-40 Speakers Removal 3-41 Speakers Installation 3-41 LCD (Liquid Crystal Display...
Aspire 5349, 5749, 5749Z Service Guide - Page 87
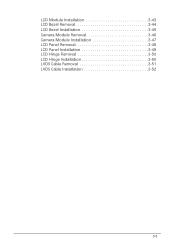
LCD Module Installation 3-43 LCD Bezel Removal 3-44 LCD Bezel Installation 3-45 Camera Module Removal 3-46 Camera Module Installation 3-47 LCD Panel Removal 3-48 LCD Panel Installation 3-49 LCD Hinge Removal 3-50 LCD Hinge Installation 3-50 LVDS Cable Removal 3-51 LVDS Cable Installation 3-52
3-3
Aspire 5349, 5749, 5749Z Service Guide - Page 89
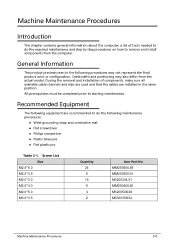
... procedures may also differ from the computer. Screw List Size
M2.5*6.0 M2.5*3.5 M2.0*3.0 M2.5*4.0 M2.0*5.0 M3.0*3.5
Quantity 24 6 18 6 4 2
Acer Part No. During the removal and installation of tools needed to do the following maintenance procedures:
Wrist grounding strap and conductive mat Flat screwdriver Philips screwdriver...
Aspire 5349, 5749, 5749Z Service Guide - Page 90

...
WLAN module
Bluetooth module
Mainboard
CPU
PCH
Lower case
DIMM module
Power board
DC-in Figure 3-1 shows a graphic representation of the module removal and installation sequences. Maintenance Flowchart 0
The flowchart in Jack
LCD module
Speaker
LCD bezel
Camera
LCD panel
LCD hinge
LVDS cable
Thermal module
Figure 3-1. Maintenance Flow
3-6
Machine Maintenance Procedures
Aspire 5349, 5749, 5749Z Service Guide - Page 91
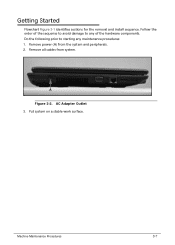
... avoid damage to any maintenance procedures: 1. AC Adapter Outlet 3.
Machine Maintenance Procedures
3-7 Follow the order of the hardware components. Remove power (A) from system.
Getting Started 0 Flowchart Figure 3-1 identifies sections for the removal and install sequence. Put system on a stable work surface. A
Figure 3-2. Remove all cables from the system and peripherals. 2.
Aspire 5349, 5749, 5749Z Service Guide - Page 92

Battery
+ IMPORTANT:
Follow local regulations for battery (C) disposal (Figure 3-3). Battery Pack Removal 0 1. Lift battery pack (C) from battery bay (Figure 3-3).
Place computer on flat surface, battery side up. 2.
Battery Pack Installation 0 1. Push and hold battery release latch (B) to unlock position (Figure 3-3). 3. C
A B
Figure 3-3. Lock battery lock/unlock latch (A) (Figure ...
Aspire 5349, 5749, 5749Z Service Guide - Page 93
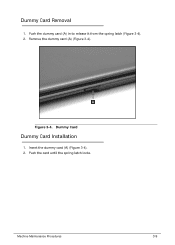
Insert the dummy card (A) (Figure 3-4). 2.
Push the card until the spring latch locks. Machine Maintenance Procedures
3-9 Dummy Card Removal 0 1. A
Figure 3-4. Remove the dummy card (A) (Figure 3-4). Dummy Card
Dummy Card Installation 0 1. Push the dummy card (A) in to release it from the spring latch (Figure 3-4). 2.
Aspire 5349, 5749, 5749Z Service Guide - Page 95

... the keyboard FPC (A) to Figure 3-5. 5. ! Turn the keyboard over and align the keyboard with the indentation in the upper
cover. 4. Refer to the mainboard connector (B). Install the battery. Refer to Figure 3-6. 3. Machine Maintenance Procedures
3-11 Put the keyboard face down to Figure 3-6. 2. CAUTION:
Keyboard FPC (Flexible Printed Circuit) can be damaged...
Aspire 5349, 5749, 5749Z Service Guide - Page 96

...Call out
Quantity 4
Screw Type
3-12
Machine Maintenance Procedures
UpperCase Screws and FFC Installation 0
3. Install the keyboard. Disconnect the touchpad cable (A), speaker cable (B) and power cable (C)
(Figure 3-7). Connect the touchpad cable, speaker cable and the power cable. 5. A
B C
Figure 3-7. Remove the four (4) screws from the upper case (Figure 3-7). Base Cover Screw...
Aspire 5349, 5749, 5749Z Service Guide - Page 101

Connect USB module FFC (A) to lower cover (Figure 3-13). 3. USB Module Installation 0
1.
USB screw 4. Remove USB module from lower cover (Figure 3-13)
D
Figure 3-13. Install and secure screw (D) to module connector (B) (Figure 3-12). 4. Install the base cover. ID
Size
D M2.5*3.5
Quantity 1
Screw Type
Machine Maintenance Procedures
3-17 Connect USB module FFC (A) to ...
Aspire 5349, 5749, 5749Z Service Guide - Page 134
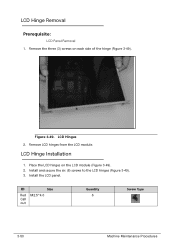
...). 2. Place the LCD hinges on each side of the hinge (Figure 3-49).
ID
Size
Red M2.5*4.0 Call out
Quantity 6
Screw Type
3-50
Machine Maintenance Procedures Remove LCD hinges from the LCD module. Install the LCD panel. LCD Hinges 2. LCD Hinge Installation 0
1. Install and secure the six (6) screws to the LCD hinges (Figure 3-49). 3.
Figure 3-49.
Aspire 5349, 5749, 5749Z Service Guide - Page 136

... (A) on the rear of the LCD panel. Install the LCD panel.
3-52
Machine Maintenance Procedures LVDS Cable Connector
LVDS Cable Installation 0 1. C
B
Figure 3-51. Remove the bottom mylar and disconnect the LVDS cable from the LCD panel connector (B) (Figure 3-51). Refer to Figure 3-50. 3. Place the LVDS cable into the LCD panel connector (B) and secure the bottom mylar...
Aspire 5349, 5749, 5749Z Service Guide - Page 142

... follow the
on battery alone as this may reduce display brightness.
2. Connect an external monitor to Online Support Information. Remove any memory cards and CD/DVD discs. 8. If the Issue is still not resolved, refer to the computer and switch between...prompts.
4-6
Troubleshooting Readjust if necessary. 4. Check the Device Manager to determine that the computer is properly installed.
Aspire 5349, 5749, 5749Z Service Guide - Page 147
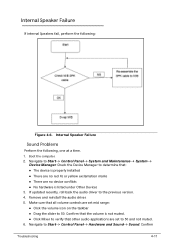
...Remove and reinstall the audio driver. 5. Navigate to 50. Confirm
Troubleshooting
4-11 Navigate to the previous version. 4. Check the Device Manager to determine that:
The device is properly installed... Start Control Panel Hardware and Sound Sound. If updated recently, roll back the audio driver to Start Control Panel System and ...
Aspire 5349, 5749, 5749Z Service Guide - Page 165
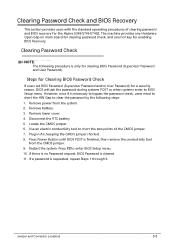
...and/or User Password) for clearing BIOS Password (Supervisor Password and User Password). Remove power from the CMOS jumper. 9. Remove battery. 3.
Use an electric conductivity tool to short the two points of ... Gap on main board for clearing password check, and one hot key for the Aspire 5349/5749/5749Z.
However, once it is necessary to bypass the password check, users need to short...
Similar Questions


How Do I Remove The Panel Between Keyboard And Screen On Acer Aspire 5750-6414
(Posted by sullbm 10 years ago)
