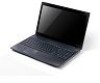
Acer Aspire 5336 Support Question
Acer Aspire 5336 Support Question
Find answers below for this question about Acer Aspire 5336.Need a Acer Aspire 5336 manual? We have 2 online manuals for this item!
Question posted by amandaledgerwood on February 7th, 2012
How Can I Reset My Laptop When Recovery Didnt Finish. I Did F2 &f10
The person who posted this question about this Acer product did not include a detailed explanation. Please use the "Request More Information" button to the right if more details would help you to answer this question.
Current Answers
Related Acer Aspire 5336 Manual Pages
Quick Start Guide - Page 5
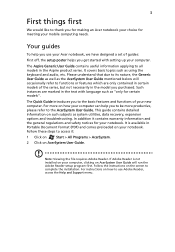
...in Portable Document Format (PDF) and comes preloaded on AcerSystem User Guide. The Aspire Generic User Guide contains useful information applying to access it contains warranty information and ...all models in the model you get started with language such as system utilities, data recovery, expansion options and troubleshooting. For instructions on the screen to the AcerSystem User Guide...
Service Guide - Page 9
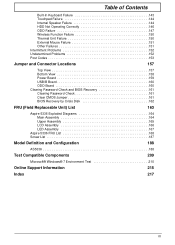
... 158 Power Board 159 USB/B Board 160 ODD Board 160 Clearing Password Check and BIOS Recovery 161 Clearing Password Check 161 Clear CMOS Jumper 161 BIOS Recovery by Crisis Disk 162
FRU (Field Replaceable Unit) List
163
Aspire 5336 Exploded Diagrams 164 Main Assembly 164 Upper Assembly 165 LCD Assembly 166 LED Assembly 167...
Service Guide - Page 37
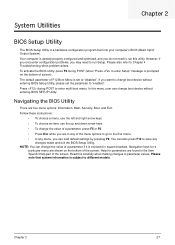
To activate the BIOS Utility, press F2 during POST to run this utility. Press during POST (when "Press to enter Setup" message is subject to different ...item, use the up and down arrow keys.
• To change boot device without entering BIOS SETUP Utility. You can also press F10 to save any menu, you can change the value of the menu options to go to the Exit menu.
• In any ...
Service Guide - Page 38

...-958C-88AE1D628162
F1 Help ESC Exit
Select Item F5/F6 Change Values
F9 Setup Default
Select Menu Enter Select SubMenu F10 Save and Exit
NOTE: The screen above is an identifier standard used in this screen. Aspire 5336 BIOS
Information
The Information screen displays a summary of the Distributed Computing Environment (DCE).
28
Chapter 2
Service Guide - Page 39
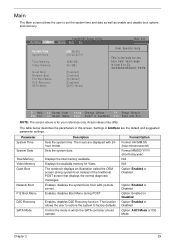
... of the traditional POST screen that displays the normal diagnostic messages. Enables, disables D2D Recovery function.
Information Main
InsydeH20 Setup Utility Security Boot Exit
System Time System Date
Total Memory...enable and disable boot options and recovery.
F1 Help ESC Exit
Select Item F5/F6 Change Values
F9 Setup Default
Select Menu Enter Select SubMenu F10 Save and Exit
NOTE: The...
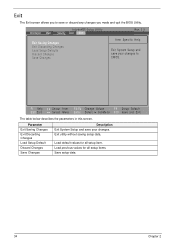
Service Guide - Page 40
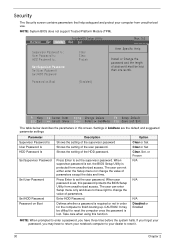
... and protect your computer from unauthorized access. Press Enter to reset the computer once the password is set the supervisor password. When... Change Values
F9 Setup Default
Select Menu Enter Select SubMenu F10 Save and Exit
The table below describes the parameters in ... If you forget your dealer to finish booting up.
Shows the setting of parameters. Enter HDD Password.
...
Service Guide - Page 41
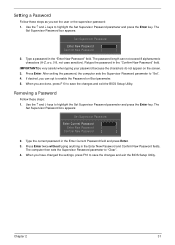
... exceed 8 alphanumeric characters (A-Z, a-z, 0-9, not case sensitive). Retype the password in the Enter New Password and Confirm New Password fields. If desired, you are done, press F10 to "Set". 4.
Press Enter twice without typing anything in the "Confirm New Password" field. Type a password in the Enter Current Password field and press Enter...
Service Guide - Page 42
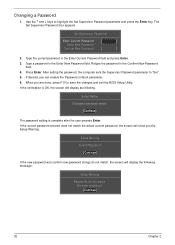
... match the actual current password, the screen will display the following . Setup Warning
Passwords do not match, the screen will show you are done, press F10 to save the changes and exit the BIOS Setup Utility. Use the ↑ and ↓ keys to "Set". 5. The Set Supervisor Password box appears. When...
Service Guide - Page 43

... of boot devices to escape the menu
F1 Help ESC Exit
Select Item F5/F6 Change Values
F9 Setup Default
Select Menu Enter Select SubMenu F10 Save and Exit
Chapter 2
33 USB HDD : 6. InsydeH20 Setup Utility Information Main Security Boot Exit
Rev. 3.5
Boot priority order:
Item Specific Help
1.
Network Boot : MBA...
Service Guide - Page 44
... 2
Load default values for all setup item.
F1 Help ESC Exit
Select Item F5/F6 Change Values
F9 Setup Default
Select Menu Enter Select SubMenu F10 Save and Exit
The table below describes the parameters in this screen.
Exit
The Exit screen allows you to CMOS.
Service Guide - Page 45
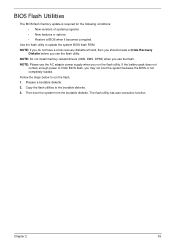
Follow the steps below to finish BIOS flash, you run the flash. 1. The flash utility has auto-execution function. NOTE:.... Then boot the system from the bootable diskette.
NOTE: If you do not have a crisis recovery diskette at hand, then you should create a Crisis Recovery
Diskette before you use the flash utility. Chapter 2
35 BIOS Flash Utilities
The BIOS flash memory update...
Service Guide - Page 46
... steps to escape the menu
F1 Help ESC Exit
Select Item F5/F6 Change Values
F9 Setup Default
Select Menu Enter Select SubMenu F10 Save and Exit
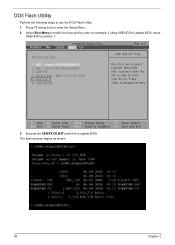
3. Press F2 during boot to update BIOS. InsydeH20 Setup Utility Information Main Security Boot Exit
Boot priority order:
Rev. 3.5 Item Specific Help
1. USB HDD : 6. USB...
Service Guide - Page 49
The command generates a password which can be used for unlocking utilities. To reset the HDD password, perform the following steps: 1. Key in the password from the previous step to create the unlock code in DOS Mode using the ...
Service Guide - Page 156
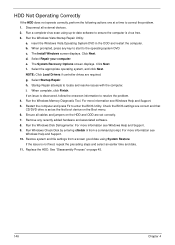
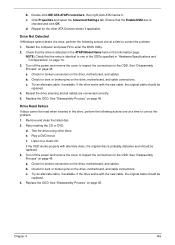
...Diagnostic Tool. For more information see Windows Help and Support. 9. Restart the computer and press F2 to the operating system DVD. For more information see Windows Help and Support. 10. Run... time to locate and resolve issues with the computer. The System Recovery Options screen displays. When complete, click Finish. g. Remove any key to start to enter the BIOS Utility. Restore...
Service Guide - Page 159
.... Drive Read Failure If discs cannot be replaced.
4. Check for bent or broken pins on the drive, motherboard, and cables.
Restart the computer and press F2 to correct the problem. 1. b. Test the drive using other ATA Devices shown if applicable. Check for broken connectors on the drive, motherboard, and cable connections...
Service Guide - Page 163

... MMIO BAR Initialization North Bridge Early Initialization South Bridge Early Initialization PCIE Training TPM Initialization SMBUS Early Initialization Clock Generator Initialization Memory Initial for Crisis Recovery Simple Memory test Start to use Memory
Chapter 4
153 Memory Initial for Normal boot. Post Codes
These tables describe the POST codes and descriptions during...
Service Guide - Page 164
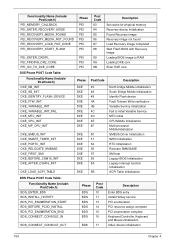
... PEI
Post Code 83 84 85 86 87 88
89 8A 8B
Description
Set cache for physical memory Recovery device Initialization Found Recovery image Recovery image not found Load Recovery Image completed Start Flash BIOS with Recovery image Loading BIOS image to RAM Loading DXE core Enter DXE core
Functionality Name (Include\ PostCode.h)
DXE_NB_INIT DXE_SB_INIT...
Service Guide - Page 165

... Start to boot UEFI OS Prepare to Boot to Legacy OS Last Chipset initial before boot to Boot Legacy OS. Ready to Legacy OS. Fast Recovery Start Flash. PostBDS POST Code Table
Functionality Name (Include\ PostCode.h)
POST_BDS_NO_BOOT_DEVICE POST_BDS_START_IMAGE POST_BDS_ENTER_INT19 POST_BDS_JUMP_BOOT_SECTOR
Phase
POST_BDS POST_BDS POST_BDS POST_BDS
Post Code F9 FB FD FE...
Service Guide - Page 171
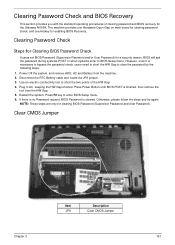
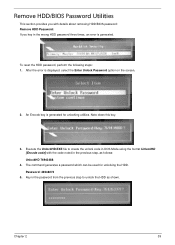
...there is no Password request, BIOS Password is finished, then remove the tool from the machine. 2. Otherwise, please follow the steps and try again.
Press F2 key to clear the password by the following ... systems POST or when systems enter to BIOS Setup menu. Clearing Password Check and BIOS Recovery
This section provides you with the standard operating procedures of the HW Gap. 4. Clearing...
Service Guide - Page 172
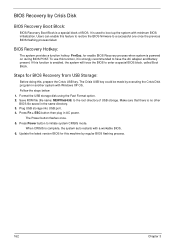
..., the system auto restarts with minimum BIOS initialization. BIOS Recovery Hotkey:
The system provides a function hotkey: Fn+Esc, for enable BIOS Recovery process when system is enabled, the system will force the.... Plug USB storage into USB port. 4.
Update the latest version BIOS for BIOS Recovery from USB Storage:
Before doing this machine by executing the Crisis Disk program in another...
Similar Questions

I Have A Acer Laptop Aspire 5336-2615 I Need The Drivers For It How Do I Get
them ?
them ?
(Posted by duggtomchu 9 years ago)

How Do I Take The Motherboard Battery Out Of An Acer Aspire 5336 Series
(Posted by marknikoli 10 years ago)

How To Reset Laptop To Factory Settings Acer Aspire 5733z-4851
(Posted by begemvalcum 10 years ago)

Where Is The Bios Battery Located On An Acer Aspire 5336 Series Model Pawf6
(Posted by moondogstyle 12 years ago)

Recovery Didnt Finish Cause My Battery Died & Now All I Get Is An Error Message.
(Posted by amandaledgerwood 12 years ago)