

User Guide
Page 8
... 4-1 Replacing the Cover 4-3 Installing an Expansion Card 4-4 Installing an Additional Hard Disk Drive 4-6 Installing the 5.25-inch Device in the Peripheral Bay 4-9 Chapter 5 Using the Restore CDs Restoring Your Original Software 5-1 Chapter 6 Using the PowerDVD About DVD ...6-1 Playing the PowerDVD 6-1 How to Run the PowerDVD 6-1 Buttons of the PowerDVD 6-2 Appendix A. Approval Statements Battery...
... 4-1 Replacing the Cover 4-3 Installing an Expansion Card 4-4 Installing an Additional Hard Disk Drive 4-6 Installing the 5.25-inch Device in the Peripheral Bay 4-9 Chapter 5 Using the Restore CDs Restoring Your Original Software 5-1 Chapter 6 Using the PowerDVD About DVD ...6-1 Playing the PowerDVD 6-1 How to Run the PowerDVD 6-1 Buttons of the PowerDVD 6-2 Appendix A. Approval Statements Battery...

User Guide
Page 14
...Off the Computer To turn on the monitor, and any other peripheral devices connected to shut down the system. 4. To start Windows, remove the Restore CD and restart the computer. In this case, the "Microsoft Windows Startup Menu" menu will load Microsoft ® Windows ® . Press the ...power button on your computer. 2. When the Turn Off Computer dialog box is booting, the computer will be booted with Restore CD. 4. Turning the Computer On and Off Follow the instructions below to turn off the monitor and any other peripheral devices. 2-4 Setting Up Your...
...Off the Computer To turn on the monitor, and any other peripheral devices connected to shut down the system. 4. To start Windows, remove the Restore CD and restart the computer. In this case, the "Microsoft Windows Startup Menu" menu will load Microsoft ® Windows ® . Press the ...power button on your computer. 2. When the Turn Off Computer dialog box is booting, the computer will be booted with Restore CD. 4. Turning the Computer On and Off Follow the instructions below to turn off the monitor and any other peripheral devices. 2-4 Setting Up Your...
User Guide
Page 37
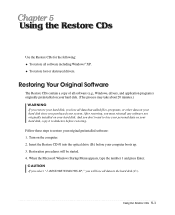
... the number 1 and press Enter. And you select "1. Using the Restore CDs 5-1 To restore lost or destroyed drivers. Turn on your hard disk, copy it to restore your computer boots up. 3. Using the Restore CDs Use the Restore CDs for the following: To restore all data in the hard disk (C:). Restoration procedures will lose all software including Windows® XP.
... the number 1 and press Enter. And you select "1. Using the Restore CDs 5-1 To restore lost or destroyed drivers. Turn on your hard disk, copy it to restore your computer boots up. 3. Using the Restore CDs Use the Restore CDs for the following: To restore all data in the hard disk (C:). Restoration procedures will lose all software including Windows® XP.
User Guide
Page 38
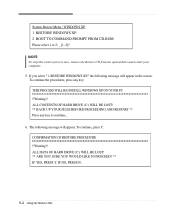
... (C:) WILL BE LOST! ** ARE YOU SURE YOU WOULD LIKE TO PROCEED? ** IF YES, PRESS Y. NOTE To stop this restore process now, remove the Restore CD from the optical drive and restart your computer. 5. THIS PROCESS WILL RE-INSTALL WINDOWS XP ON YOUR PC !!Warning!! ALL CONTENTS OF... BEFORE PROCEEDING AND RESTART ** Press any key. To continue, press Y. The following message will appear. IF NO, PRESS N. 5-2 Using the Restore CDs If you select "1. RESTORE WINDOWS XP," the following message will appear in the screen. To continue the procedures, press any key to continue... 6. System...
... (C:) WILL BE LOST! ** ARE YOU SURE YOU WOULD LIKE TO PROCEED? ** IF YES, PRESS Y. NOTE To stop this restore process now, remove the Restore CD from the optical drive and restart your computer. 5. THIS PROCESS WILL RE-INSTALL WINDOWS XP ON YOUR PC !!Warning!! ALL CONTENTS OF... BEFORE PROCEEDING AND RESTART ** Press any key. To continue, press Y. The following message will appear. IF NO, PRESS N. 5-2 Using the Restore CDs If you select "1. RESTORE WINDOWS XP," the following message will appear in the screen. To continue the procedures, press any key to continue... 6. System...

User Guide
Page 39
...menu will start. Windows XP starts and the registration program runs. 14. Enter your system has two or three Restore CDs. 11. If there is completed, remove the Restore CD from your optical drive and restart the computer. 13. If the "Insert next media and press enter to ...your optical drive. 12. After the restoration process is the executable file for installation, use it to continue. To continue the restoration, remove the Restore CD from your hard disk. 10. Using the Restore CDs 5-3 All data in the Restore CD #2 will be copied to continue..." NOTE Depending on...
...menu will start. Windows XP starts and the registration program runs. 14. Enter your system has two or three Restore CDs. 11. If there is completed, remove the Restore CD from your optical drive and restart the computer. 13. If the "Insert next media and press enter to ...your optical drive. 12. After the restoration process is the executable file for installation, use it to continue. To continue the restoration, remove the Restore CD from your hard disk. 10. Using the Restore CDs 5-3 All data in the Restore CD #2 will be copied to continue..." NOTE Depending on...

User Guide
Page 40
Blank 5-4 Using the Restore CDs
Blank 5-4 Using the Restore CDs


