
User Guide
Page 2
Copyright © 2009. eMachines User Guide Original Issue: 06 / 2009 Model number Serial number Purchase date Place of purchase Visit http://registration.emachines.com and discover the benefits of being an eMachines customer. All Rights Reserved.
Copyright © 2009. eMachines User Guide Original Issue: 06 / 2009 Model number Serial number Purchase date Place of purchase Visit http://registration.emachines.com and discover the benefits of being an eMachines customer. All Rights Reserved.

User Guide
Page 3
Turning the product off before cleaning Unplug this product through cabinet slots as they may touch dangerous voltage points or short-out parts that the power outlet you need to disconnect power to the equipment, be sure to unplug the power cord from the electrical outlet. CAUTION for accessibility Be sure that could be blocked or covered. CAUTION for plug as possible. These openings must not be seriously damaged. • Slots and openings are provided for your safety and comfort Safety instructions Read these instructions carefully. This product should never be placed near ...
Turning the product off before cleaning Unplug this product through cabinet slots as they may touch dangerous voltage points or short-out parts that the power outlet you need to disconnect power to the equipment, be sure to unplug the power cord from the electrical outlet. CAUTION for accessibility Be sure that could be blocked or covered. CAUTION for plug as possible. These openings must not be seriously damaged. • Slots and openings are provided for your safety and comfort Safety instructions Read these instructions carefully. This product should never be placed near ...

User Guide
Page 4
: • Never use it afteryour ears adjust. • Limit the amount of this product. If you are used with a three-wire grounded plug. Also, make sure that is equipped with this product where people will probably cause unexpected short current or damage rotor devices, HDD, Optical drive, and even exposure risk from lithium battery pack. Make sure the power outlet is a safety feature. Safe listening Follow these instructions, suggested by hearing experts,to protect your hearing. • Gradually increase the volume until you . Do not insert the plug into the wall outlet ...
: • Never use it afteryour ears adjust. • Limit the amount of this product. If you are used with a three-wire grounded plug. Also, make sure that is equipped with this product where people will probably cause unexpected short current or damage rotor devices, HDD, Optical drive, and even exposure risk from lithium battery pack. Make sure the power outlet is a safety feature. Safe listening Follow these instructions, suggested by hearing experts,to protect your hearing. • Gradually increase the volume until you . Do not insert the plug into the wall outlet ...
User Guide
Page 5
Keep them out of the reach of the global environment, please recycle. Refer all servicing to the manufacturer's instructions. To minimize pollution and ensure utmost protection of small children. iii • Use the product only with the same or equivalent type recommended by the manufacturer. Dispose of used batteries according to qualified service personnel. Replace only with the supplied power supply cord set , make sure that the new power cord meets the following the operating instructions Note: Adjust only those controls that are covered by a qualified technician...
Keep them out of the reach of the global environment, please recycle. Refer all servicing to the manufacturer's instructions. To minimize pollution and ensure utmost protection of small children. iii • Use the product only with the same or equivalent type recommended by the manufacturer. Dispose of used batteries according to qualified service personnel. Replace only with the supplied power supply cord set , make sure that the new power cord meets the following the operating instructions Note: Adjust only those controls that are covered by a qualified technician...

User Guide
Page 6
For more information, contact the Electronic Industries Alliance at "sleep" mode. Acer is applicable only to local, state or federal laws. marks iv Products that help customers save money, conserve energy and improve the quality of inactivity respectively. • Wake the computer from sleep mode by pushing keyboard or moving mouse. • Computers will save more we can save your money by the U.S. Acer ENERGY STAR qualified products: • Produce less heat and reduce cooling loads, and warmer climates. • Automatically go into "display sleep" and "computer sleep...
For more information, contact the Electronic Industries Alliance at "sleep" mode. Acer is applicable only to local, state or federal laws. marks iv Products that help customers save money, conserve energy and improve the quality of inactivity respectively. • Wake the computer from sleep mode by pushing keyboard or moving mouse. • Computers will save more we can save your money by the U.S. Acer ENERGY STAR qualified products: • Produce less heat and reduce cooling loads, and warmer climates. • Automatically go into "display sleep" and "computer sleep...
User Guide
Page 7
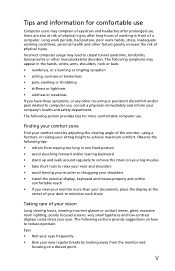
The following section provides tips for comfortable use Computer users may complain of eyestrain and headaches after long hours of working conditions, personal health and other musculoskeletal disorders. The following symptoms may lead to carpal tunnel syndrome, tendonitis, tenosynovitis or other factors greatly increase the risk of physical injury. Observe the following sections provide suggestions on a distant point. v Eyes • Rest your eyes frequently. • Give your eyes regular breaks by adjusting the viewing angle of the monitor, using a footrest, or raising your...
The following section provides tips for comfortable use Computer users may complain of eyestrain and headaches after long hours of working conditions, personal health and other musculoskeletal disorders. The following symptoms may lead to carpal tunnel syndrome, tendonitis, tenosynovitis or other factors greatly increase the risk of physical injury. Observe the following sections provide suggestions on a distant point. v Eyes • Rest your eyes frequently. • Give your eyes regular breaks by adjusting the viewing angle of the monitor, using a footrest, or raising your...

User Guide
Page 8
: • Blink frequently to make your computer use more relaxing and productive: • Take short breaks regularly and often. • Perform some stretching exercises. Developing good work habits Develop the following work for extended periods of time. If this is unavoidable, work habits to keep your eyes from the display's top front edge • Avoid adjusting your display in such a way that the side faces the window or any light source • minimizing room light by using drapes, shades or blinds • using a task light • changing the display's viewing angle •...
: • Blink frequently to make your computer use more relaxing and productive: • Take short breaks regularly and often. • Perform some stretching exercises. Developing good work habits Develop the following work for extended periods of time. If this is unavoidable, work habits to keep your eyes from the display's top front edge • Avoid adjusting your display in such a way that the side faces the window or any light source • minimizing room light by using drapes, shades or blinds • using a task light • changing the display's viewing angle •...

User Guide
Page 9
Contents Chapter 1: Checking Out Your Computer . . . 1 About this guide 2 Product Registration 2 Front 3 Back 4 Chapter 2: Setting Up and Getting Started 7 Working safely and comfortably 8 Avoiding discomfort and injury from repetitive strain 8 Preparing power connections 9 Protecting from power source problems 9 Checking the voltage selection 10 Connecting to a broadband modem or network . . 11 Connecting a dial-up modem 11 Using the World Wide Web 12 Connecting to a Web site 13 Downloading files 14 Ethernet networking 15 Wired Ethernet networking 15 Establishing your Ethernet...
Contents Chapter 1: Checking Out Your Computer . . . 1 About this guide 2 Product Registration 2 Front 3 Back 4 Chapter 2: Setting Up and Getting Started 7 Working safely and comfortably 8 Avoiding discomfort and injury from repetitive strain 8 Preparing power connections 9 Protecting from power source problems 9 Checking the voltage selection 10 Connecting to a broadband modem or network . . 11 Connecting a dial-up modem 11 Using the World Wide Web 12 Connecting to a Web site 13 Downloading files 14 Ethernet networking 15 Wired Ethernet networking 15 Establishing your Ethernet...

User Guide
Page 10
Contents Ethernet 27 Expansion cards 29 File management 29 Hard drive 29 Internet 31 Keyboard 33 Memory 33 Memory card reader 34 Modem (cable or DSL 34 Modem (dial-up 34 Monitor 37 Mouse 38 Networks 39 Optical disc drives 39 Passwords 41 Power 41 Printer 42 Sound 43 Recovering your system 44 Creating recovery discs 45 Recovering pre-installed software and drivers . 46 Returning your system to its factory condition . 47 Telephone support 49 Before calling Customer Care 49 Self-help 50 Appendix A: Regulations and safety notices . 51 viii
Contents Ethernet 27 Expansion cards 29 File management 29 Hard drive 29 Internet 31 Keyboard 33 Memory 33 Memory card reader 34 Modem (cable or DSL 34 Modem (dial-up 34 Monitor 37 Mouse 38 Networks 39 Optical disc drives 39 Passwords 41 Power 41 Printer 42 Sound 43 Recovering your system 44 Creating recovery discs 45 Recovering pre-installed software and drivers . 46 Returning your system to its factory condition . 47 Telephone support 49 Before calling Customer Care 49 Self-help 50 Appendix A: Regulations and safety notices . 51 viii

User Guide
Page 11
Chapter 1 Checking Out Your Computer 1
Chapter 1 Checking Out Your Computer 1

User Guide
Page 12
...includes information and maintenance instructions that are specific to your model of your notebook or desktop, a window will invite you to register. Another Option Another way to register your eMachines product is recommended that you immediately register it is to visit our website at ...follow the simple instructions. Please fill in customer surveys • The latest news from our trained representatives • Membership in the eMachines community: receive promotions and participate in the mandatory fields and click Next. Chapter 1: Checking Out Your Computer About this guide may look...
...includes information and maintenance instructions that are specific to your model of your notebook or desktop, a window will invite you to register. Another Option Another way to register your eMachines product is recommended that you immediately register it is to visit our website at ...follow the simple instructions. Please fill in customer surveys • The latest news from our trained representatives • Membership in the eMachines community: receive promotions and participate in the mandatory fields and click Next. Chapter 1: Checking Out Your Computer About this guide may look...
User Guide
Page 13
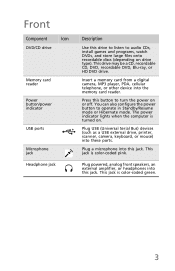
Insert a memory card from a digital camera, MP3 player, PDA, cellular telephone, or other device into these ports. Plug USB (Universal Serial Bus) devices (such as a USB external drive, printer, scanner, camera, keyboard, or mouse) into the memory card reader. You can also configure the power button to operate in Standby/Resume mode or Hibernate mode. This jack is color-coded pink. Plug powered, analog front speakers, an external amplifier, or headphones into this jack. This jack is color-coded green. 3 This drive may be a CD, recordable CD, DVD, recordable DVD, Blu-ray, or ...
Insert a memory card from a digital camera, MP3 player, PDA, cellular telephone, or other device into these ports. Plug USB (Universal Serial Bus) devices (such as a USB external drive, printer, scanner, camera, keyboard, or mouse) into the memory card reader. You can also configure the power button to operate in Standby/Resume mode or Hibernate mode. This jack is color-coded pink. Plug powered, analog front speakers, an external amplifier, or headphones into this jack. This jack is color-coded green. 3 This drive may be a CD, recordable CD, DVD, recordable DVD, Blu-ray, or ...
User Guide
Page 14
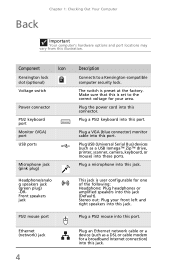
Back Chapter 1: Checking Out Your Computer Important Your computer's hardware options and port locations may vary from this jack. Component Icon Kensington lock slot (optional) Voltage switch Power connector PS/2 keyboard port Monitor (VGA) port USB ports Microphone jack (pink plug) Headphone/analo g speakers jack (green plug) -ORFront speakers jack PS/2 mouse port Ethernet (network) jack 4 Description Connects to the correct voltage for your front left and right speakers into these ports. Plug a microphone into this illustration. This jack is user configurable for a ...
Back Chapter 1: Checking Out Your Computer Important Your computer's hardware options and port locations may vary from this jack. Component Icon Kensington lock slot (optional) Voltage switch Power connector PS/2 keyboard port Monitor (VGA) port USB ports Microphone jack (pink plug) Headphone/analo g speakers jack (green plug) -ORFront speakers jack PS/2 mouse port Ethernet (network) jack 4 Description Connects to the correct voltage for your front left and right speakers into these ports. Plug a microphone into this illustration. This jack is user configurable for a ...
User Guide
Page 15
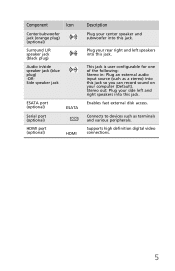
Component Icon Center/subwoofer jack (orange plug) (optional) Surround L/R speaker jack (black plug) Audio in : Plug an external audio input source (such as terminals and various peripherals. Enables fast external disk access. Supports high definition digital video connections. 5 This jack is user configurable for one of the following: Stereo in /side speaker jack (blue plug) -ORSide speaker jack ESATA port (optional) Serial port (optional) HDMI port (optional) ESATA HDMI Description Plug your computer (Default). Plug your side left speakers into this jack. Stereo out:...
Component Icon Center/subwoofer jack (orange plug) (optional) Surround L/R speaker jack (black plug) Audio in : Plug an external audio input source (such as terminals and various peripherals. Enables fast external disk access. Supports high definition digital video connections. 5 This jack is user configurable for one of the following: Stereo in /side speaker jack (blue plug) -ORSide speaker jack ESATA port (optional) Serial port (optional) HDMI port (optional) ESATA HDMI Description Plug your computer (Default). Plug your side left speakers into this jack. Stereo out:...

User Guide
Page 16
Chapter 1: Checking Out Your Computer 6
Chapter 1: Checking Out Your Computer 6

User Guide
Page 17
Chapter 2 Setting Up and Getting Started 7
Chapter 2 Setting Up and Getting Started 7

User Guide
Page 18
Chapter 2: Setting Up and Getting Started Working safely and comfortably Before using your feet flat on the floor or on a footrest. • Keep ventilation openings clear of tasks. 8 Avoiding discomfort and injury from repetitive strain • Vary your activities to avoid excessive repetition. • Take breaks to change your position, stretch your muscles, and relieve your eyes. • Find ways to break up the work area and avoiding discomfort and strain: • Keep hands and arms parallel to the floor. • Adjust the screen so it is perpendicular to your line of sight, and ...
Chapter 2: Setting Up and Getting Started Working safely and comfortably Before using your feet flat on the floor or on a footrest. • Keep ventilation openings clear of tasks. 8 Avoiding discomfort and injury from repetitive strain • Vary your activities to avoid excessive repetition. • Take breaks to change your position, stretch your muscles, and relieve your eyes. • Find ways to break up the work area and avoiding discomfort and strain: • Keep hands and arms parallel to the floor. • Adjust the screen so it is perpendicular to your line of sight, and ...

User Guide
Page 19
Preparing power connections Protecting from reaching your computer. If you have a cable modem, use a surge protector that has an antenna/cable TV jack. During an electrical storm, unplug both the power cord and the modem connection. Although you run your computer for an extended period of electricity coming into your computer can enter your computer through both the surge protector and the modem. Protect your computer and peripheral devices by using a surge protector. An uninterruptible power supply (UPS) supplies battery power to your computer normally. 9 If you ...
Preparing power connections Protecting from reaching your computer. If you have a cable modem, use a surge protector that has an antenna/cable TV jack. During an electrical storm, unplug both the power cord and the modem connection. Although you run your computer for an extended period of electricity coming into your computer can enter your computer through both the surge protector and the modem. Protect your computer and peripheral devices by using a surge protector. An uninterruptible power supply (UPS) supplies battery power to your computer normally. 9 If you ...

User Guide
Page 20
The power supply, a component built into your computer, provides power to match the electrical service available in your usage area (such as Europe, the utility power is located on your computer is operating in another country). Make sure this , the voltage switch should always be damaged. In other areas of your computer, near the power cable connector. The power supply's voltage selection for your location before turning on the back of your computer to set to the correct voltage position. The switch is supplied at 230 volts at 50 Hz. The power supply should be moved to ...
The power supply, a component built into your computer, provides power to match the electrical service available in your usage area (such as Europe, the utility power is located on your computer is operating in another country). Make sure this , the voltage switch should always be damaged. In other areas of your computer, near the power cable connector. The power supply's voltage selection for your location before turning on the back of your computer to set to the correct voltage position. The switch is supplied at 230 volts at 50 Hz. The power supply should be moved to ...

User Guide
Page 21
For information about setting up modem Warning To reduce the risk of your computer to a cable or DSL (broadband) modem or to a wired Ethernet network. For the location, see "Back" on page 4. 11 Connecting a dial-up a wired or wireless Ethernet network. To connect to a broadband modem or to an Ethernet network: 1 Insert one end of the modem cable into the modem jack on the back of fire, use with a built-in Ethernet (network) jack. For the location, see "Back" on page 4. 2 Insert the other end of the network cable into the network jack on the modem at the back of the network ...
For information about setting up modem Warning To reduce the risk of your computer to a cable or DSL (broadband) modem or to a wired Ethernet network. For the location, see "Back" on page 4. 11 Connecting a dial-up a wired or wireless Ethernet network. To connect to a broadband modem or to an Ethernet network: 1 Insert one end of the modem cable into the modem jack on the back of fire, use with a built-in Ethernet (network) jack. For the location, see "Back" on page 4. 2 Insert the other end of the network cable into the network jack on the modem at the back of the network ...