User Guide
Page 18
...devices (RSS-210) 36 Exposure of humans to -disk recovery 20 Password 20 Using software 21 Playing DVD movies 21 Power management 22 eMachines Recovery Management 23 Burn backup discs 24 Restore 25 Restore Windows from backup discs 26 Troubleshooting 29 Troubleshooting tips 29 Error messages 29 Regulations... 17 Expanding through options 18 Connectivity options 18 Built-in network feature 18 Universal Serial Bus (USB) 18 Installing memory 19 BIOS utility 20 Boot sequence 20 Enable disk-to RF fields (RSS-102) 36 LCD panel ergonomic specifications 36
...devices (RSS-210) 36 Exposure of humans to -disk recovery 20 Password 20 Using software 21 Playing DVD movies 21 Power management 22 eMachines Recovery Management 23 Burn backup discs 24 Restore 25 Restore Windows from backup discs 26 Troubleshooting 29 Troubleshooting tips 29 Error messages 29 Regulations... 17 Expanding through options 18 Connectivity options 18 Built-in network feature 18 Universal Serial Bus (USB) 18 Installing memory 19 BIOS utility 20 Boot sequence 20 Enable disk-to RF fields (RSS-102) 36 LCD panel ergonomic specifications 36
User Guide
Page 24
...Make sure that the printer cable is connected securely to a power outlet and that it works, contact your system is Enabled. 3 Exit the BIOS utility and save changes. Check the following: • Make sure that is connected to the computer's parallel port or a USB port and the..., the internal speakers automatically turn on the power. Before performing a restore operation, please check the BIOS settings. 1 Check to see if eMachines Disk-to eject the tray. Note: To activate the BIOS utility, press during POST. The keyboard does not respond. The printer does not work. I want...
...Make sure that the printer cable is connected securely to a power outlet and that it works, contact your system is Enabled. 3 Exit the BIOS utility and save changes. Check the following: • Make sure that is connected to the computer's parallel port or a USB port and the..., the internal speakers automatically turn on the power. Before performing a restore operation, please check the BIOS settings. 1 Check to see if eMachines Disk-to eject the tray. Note: To activate the BIOS utility, press during POST. The keyboard does not respond. The printer does not work. I want...
User Guide
Page 34
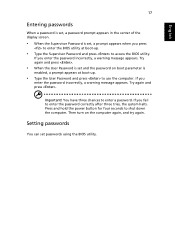
Insert the lock into the BIOS utility. Combine the use of this password with your Supervisor Password! Combine the use of . English 16 Securing your computer and data: • Supervisor Password ... protection for your computer Your computer is a valuable investment that you need to protect and take care of this password to gain access to the BIOS utility. • User Password secures your computer against unauthorized use . Important! If you must enter this password with a Kensington-compatible security slot for maximum security...
Insert the lock into the BIOS utility. Combine the use of this password with your Supervisor Password! Combine the use of . English 16 Securing your computer and data: • Supervisor Password ... protection for your computer Your computer is a valuable investment that you need to protect and take care of this password to gain access to the BIOS utility. • User Password secures your computer against unauthorized use . Important! If you must enter this password with a Kensington-compatible security slot for maximum security...
User Guide
Page 35
...a prompt appears at boot-up . • Type the User Password and press to use the computer. Important! If you press to enter the BIOS utility at boot-up . • Type the Supervisor Password and press to shut down the computer. You have three chances to enter the password ...If you enter the password incorrectly, a warning message appears. Try again and press . Press and hold the power button for four seconds to access the BIOS utility. Then turn on boot parameter is set, a prompt appears when you fail to enter a password. Try again and press . • When the...
...a prompt appears at boot-up . • Type the User Password and press to use the computer. Important! If you press to enter the BIOS utility at boot-up . • Type the Supervisor Password and press to shut down the computer. You have three chances to enter the password ...If you enter the password incorrectly, a warning message appears. Try again and press . Press and hold the power button for four seconds to access the BIOS utility. Then turn on boot parameter is set, a prompt appears when you fail to enter a password. Try again and press . • When the...
User Guide
Page 38
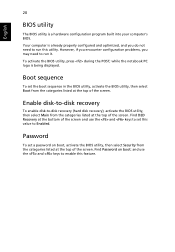
.... Find D2D Recovery at the top of the screen. Enable disk-to-disk recovery To enable disk-to-disk recovery (hard disk recovery), activate the BIOS utility, then select Main from the categories listed at the top of the screen and use the and keys to enable this value to run... it. Password To set the boot sequence in the BIOS utility, activate the BIOS utility, then select Boot from the categories listed at the bottom of the screen. Boot sequence To set a password on boot: and use...
.... Find D2D Recovery at the top of the screen. Enable disk-to-disk recovery To enable disk-to-disk recovery (hard disk recovery), activate the BIOS utility, then select Main from the categories listed at the top of the screen and use the and keys to enable this value to run... it. Password To set the boot sequence in the BIOS utility, activate the BIOS utility, then select Boot from the categories listed at the bottom of the screen. Boot sequence To set a password on boot: and use...
User Guide
Page 45
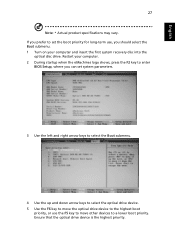
Restart your computer. 2 During startup when the eMachines logo shows, press the F2 key to a lower boot priority. English 27 Note: * Actual product specifications may vary. Ensure that the optical drive device is ... the F6 key to move the optical drive device to the highest boot priority, or use the F5 key to move other devices to enter BIOS Setup, where you should select the Boot submenu. 1 Turn on your computer and insert the first system recovery disc into the optical disc drive...
Restart your computer. 2 During startup when the eMachines logo shows, press the F2 key to a lower boot priority. English 27 Note: * Actual product specifications may vary. Ensure that the optical drive device is ... the F6 key to move the optical drive device to the highest boot priority, or use the F5 key to move other devices to enter BIOS Setup, where you should select the Boot submenu. 1 Turn on your computer and insert the first system recovery disc into the optical disc drive...
User Guide
Page 47
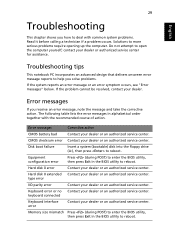
...opening up the computer. 29 English Troubleshooting This chapter shows you how to reboot. Memory size mismatch Press (during POST) to enter the BIOS utility, then press Exit in alphabetical order together with common system problems. Read it before calling a technician if a problem occurs. CMOS ... center. type error I/O parity error Contact your dealer or an authorized service center. The following table lists the error messages in the BIOS utility to help you solve problems. If the system reports an error message or an error symptom occurs, see "Error messages" below....
...opening up the computer. 29 English Troubleshooting This chapter shows you how to reboot. Memory size mismatch Press (during POST) to enter the BIOS utility, then press Exit in alphabetical order together with common system problems. Read it before calling a technician if a problem occurs. CMOS ... center. type error I/O parity error Contact your dealer or an authorized service center. The following table lists the error messages in the BIOS utility to help you solve problems. If the system reports an error message or an error symptom occurs, see "Error messages" below....

User Guide
Page 48
Some problems may be solved using the BIOS utility. English 30 If you still encounter problems after going through the corrective measures, please contact your dealer or an authorized service center for assistance.
Some problems may be solved using the BIOS utility. English 30 If you still encounter problems after going through the corrective measures, please contact your dealer or an authorized service center for assistance.


