eMachines Notebook User Guide (All Series)
Page 16
...(RSS-210) 38 Exposure of humans to -disk recovery 21 Password 21 Using software 22 Playing DVD movies 22 Power management 23 eMachines Recovery Management 24 Burn backup discs 25 Restore 26 Restore Windows Vista from backup discs 27 Troubleshooting 30 Troubleshooting tips 30 Error messages 30...Setting passwords 18 Expanding through options 19 Connectivity options 19 Built-in network feature 19 Universal Serial Bus (USB) 19 Installing memory 20 BIOS utility 21 Boot sequence 21 Enable disk-to RF fields (RSS-102) 38 LCD panel ergonomic specifications 39
...(RSS-210) 38 Exposure of humans to -disk recovery 21 Password 21 Using software 22 Playing DVD movies 22 Power management 23 eMachines Recovery Management 24 Burn backup discs 25 Restore 26 Restore Windows Vista from backup discs 27 Troubleshooting 30 Troubleshooting tips 30 Error messages 30...Setting passwords 18 Expanding through options 19 Connectivity options 19 Built-in network feature 19 Universal Serial Bus (USB) 19 Installing memory 20 BIOS utility 21 Boot sequence 21 Enable disk-to RF fields (RSS-102) 38 LCD panel ergonomic specifications 39
eMachines Notebook User Guide (All Series)
Page 37
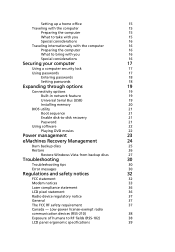
...or contact your local eMachines dealer. The computer automatically detects and reconfigures the total memory size. then lift up and remove the memory cover. 3 (a) Insert the memory module diagonally into the slot, then (b) gently press it down until it clicks into place. 4 Replace the memory cover and secure it ...and reconnect the AC adapter. 6 Turn on the computer. English 20 Installing memory Follow these steps to access its base. 2 Remove the screws from the memory cover; Then turn the computer over to install memory: 1 Turn off the computer, unplug the AC adapter (if connected) and ...
...or contact your local eMachines dealer. The computer automatically detects and reconfigures the total memory size. then lift up and remove the memory cover. 3 (a) Insert the memory module diagonally into the slot, then (b) gently press it down until it clicks into place. 4 Replace the memory cover and secure it ...and reconnect the AC adapter. 6 Turn on the computer. English 20 Installing memory Follow these steps to access its base. 2 Remove the screws from the memory cover; Then turn the computer over to install memory: 1 Turn off the computer, unplug the AC adapter (if connected) and ...
eMachines Notebook User Guide (All Series)
Page 40
English 23 Power management This computer has a built-in order to the computer, and video memory. This computer employs a power management scheme that monitors system activity. Windows handles all of these devices in power management unit that supports the advanced configuration ...
English 23 Power management This computer has a built-in order to the computer, and video memory. This computer employs a power management scheme that monitors system activity. Windows handles all of these devices in power management unit that supports the advanced configuration ...
eMachines Notebook User Guide (All Series)
Page 47
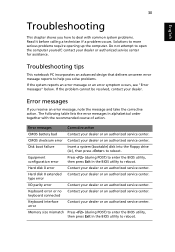
... a system (bootable) disk into the floppy drive (A:), then press to open the computer yourself; Hard disk 0 extended Contact your dealer or an authorized service center. Memory size mismatch Press (during POST) to enter the BIOS utility, then press Exit in the BIOS utility to reboot. If the problem cannot be resolved...
... a system (bootable) disk into the floppy drive (A:), then press to open the computer yourself; Hard disk 0 extended Contact your dealer or an authorized service center. Memory size mismatch Press (during POST) to enter the BIOS utility, then press Exit in the BIOS utility to reboot. If the problem cannot be resolved...
eMachines Notebook User Guide (All Series)
Page 58
... messages 30 Euro 5 F FAQ. See frequently-asked questions frequently-asked questions 6 H Hibernation mode hotkey 4 hotkeys 4 K keyboard 2 embedded numeric keypad 2 hotkeys 4 lock keys 2 troubleshooting 7 Windows keys 3 M memory installing 20 messages error 30 N network 19 num lock 2 numeric keypad embedded 2 P password 17 types 17
... messages 30 Euro 5 F FAQ. See frequently-asked questions frequently-asked questions 6 H Hibernation mode hotkey 4 hotkeys 4 K keyboard 2 embedded numeric keypad 2 hotkeys 4 lock keys 2 troubleshooting 7 Windows keys 3 M memory installing 20 messages error 30 N network 19 num lock 2 numeric keypad embedded 2 P password 17 types 17

eMachines E620 Series Quick Guide
Page 9
Note: Do not cover or obstruct the opening of the fan. 9 Base view English # Icon Item 1 Battery bay Description Houses the computer's battery pack. 2 Battery release latch Releases the battery for removal. 3 Memory compartment Houses the computer's main memory. 4 Hard disk bay Houses the computer's hard disk (secured with screws). 5 Ventilation slots and Enable the computer to stay cool, even after cooling fan prolonged use.
Note: Do not cover or obstruct the opening of the fan. 9 Base view English # Icon Item 1 Battery bay Description Houses the computer's battery pack. 2 Battery release latch Releases the battery for removal. 3 Memory compartment Houses the computer's main memory. 4 Hard disk bay Houses the computer's hard disk (secured with screws). 5 Ventilation slots and Enable the computer to stay cool, even after cooling fan prolonged use.
eMachines E620 Series Quick Guide
Page 10
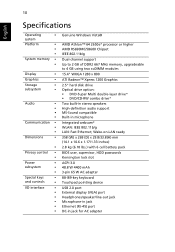
10 English Specifications Operating • system Platform • • • System memory • • Display • Graphics • Storage • subsystem • Audio • • • • Communication • • • Dimensions • •...AMD Athlon™ 64 2650e* processor or higher AMD RS690MC/SB600 Chipset IEEE 802.11b/g Dual-channel support Up to 2 GB of DDR2 667 MHz memory, upgradeable to 4 GB using two soDIMM modules 15.4" WXGA 1280 x 800 ATI Radeon™ Xpress 1200 Graphics 2.5" hard disk drive Optical drive ...
10 English Specifications Operating • system Platform • • • System memory • • Display • Graphics • Storage • subsystem • Audio • • • • Communication • • • Dimensions • •...AMD Athlon™ 64 2650e* processor or higher AMD RS690MC/SB600 Chipset IEEE 802.11b/g Dual-channel support Up to 2 GB of DDR2 667 MHz memory, upgradeable to 4 GB using two soDIMM modules 15.4" WXGA 1280 x 800 ATI Radeon™ Xpress 1200 Graphics 2.5" hard disk drive Optical drive ...


