
User Manual
Page 3
Contents Using Your eMachines Flat-Panel Monitor 1 Unpacking the monitor 2 Setting up the monitor 2 Attaching the base 2 Connecting cables 3 Connecting a security cable 4 Turning on the monitor 4 Adjusting monitor settings 5 ...
Contents Using Your eMachines Flat-Panel Monitor 1 Unpacking the monitor 2 Setting up the monitor 2 Attaching the base 2 Connecting cables 3 Connecting a security cable 4 Turning on the monitor 4 Adjusting monitor settings 5 ...

User Manual
Page 5
Using Your eMachines Flat-Panel Monitor • Unpacking the monitor • Setting up the monitor • Turning on the monitor • Adjusting monitor settings • Power management • Maintaining • Troubleshooting • Specifications 1
Using Your eMachines Flat-Panel Monitor • Unpacking the monitor • Setting up the monitor • Turning on the monitor • Adjusting monitor settings • Power management • Maintaining • Troubleshooting • Specifications 1
User Manual
Page 6
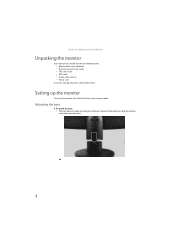
Attaching the base To attach the base: • Place the base on a table top, then press the base's release button while you are missing any items, call Customer Care. Using Your eMachines Flat-Panel Monitor Unpacking the monitor Your monitor box should contain the following items: • Monitor (with neck attached) • Base (to connect to the neck) • This User Guide • VGA cable • Audio cable (Option) • Power cord If you slide the monitor neck down onto the base. 2 Setting up the monitor To set up the monitor, first attach the base, then connect cables.
Attaching the base To attach the base: • Place the base on a table top, then press the base's release button while you are missing any items, call Customer Care. Using Your eMachines Flat-Panel Monitor Unpacking the monitor Your monitor box should contain the following items: • Monitor (with neck attached) • Base (to connect to the neck) • This User Guide • VGA cable • Audio cable (Option) • Power cord If you slide the monitor neck down onto the base. 2 Setting up the monitor To set up the monitor, first attach the base, then connect cables.

User Manual
Page 7
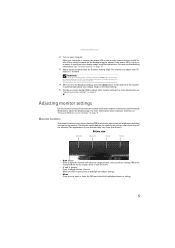
www.emachines.com Connecting cables To connect video and power cables: 1 Position your computer and the monitor so you can reach the back of each, then connect the blue VGA video cable to the blue VGA video connector under the back of the monitor. 2 Make sure that your computer is turned off, then connect the other end of the video cable to the matching video port on the back of your computer. 3 Connect the power cord to the power connector under the back of the monitor. 3
www.emachines.com Connecting cables To connect video and power cables: 1 Position your computer and the monitor so you can reach the back of each, then connect the blue VGA video cable to the blue VGA video connector under the back of the monitor. 2 Make sure that your computer is turned off, then connect the other end of the video cable to the matching video port on the back of your computer. 3 Connect the power cord to the power connector under the back of the monitor. 3

User Manual
Page 8
... secure your monitor to your monitor's AUDIO jack. (Option) Audio jack 5 Plug the power cord into a correctly grounded (three-prong) AC power outlet. Using Your eMachines Flat-Panel Monitor 4 If you want to have your computer's audio played through your monitor's speakers, connect the included audio cable to your computer's headphones...
... secure your monitor to your monitor's AUDIO jack. (Option) Audio jack 5 Plug the power cord into a correctly grounded (three-prong) AC power outlet. Using Your eMachines Flat-Panel Monitor 4 If you want to have your computer's audio played through your monitor's speakers, connect the included audio cable to your computer's headphones...
User Manual
Page 9
... settings, even if you see the Windows desktop, press the Auto button on the bottom of the monitor for the display image to appear. www.emachines.com 2 Turn on your monitor may vary from 15° back to 5° forward. For more information about computer controls, see a display image, check the...
... settings, even if you see the Windows desktop, press the Auto button on the bottom of the monitor for the display image to appear. www.emachines.com 2 Turn on your monitor may vary from 15° back to 5° forward. For more information about computer controls, see a display image, check the...
User Manual
Page 10
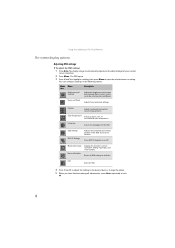
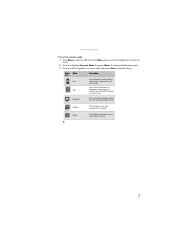
..., input type, and serial number. OSD Settings DDC/CI Settings Adjusts the horizontal and vertical position of the OSD and sets the timeout. Using Your eMachines Flat-Panel Monitor On-screen display options Adjusting OSD settings To adjust the OSD settings: 1 Press Auto. You can configure settings in the following menus...
..., input type, and serial number. OSD Settings DDC/CI Settings Adjusts the horizontal and vertical position of the OSD and sets the timeout. Using Your eMachines Flat-Panel Monitor On-screen display options Adjusting OSD settings To adjust the OSD settings: 1 Press Auto. You can configure settings in the following menus...
User Manual
Page 11
... User-defined (custom) settings, User which can be adjusted to highlight Scenario Mode, then press Menu. Graphic This enhances color and emphasizes fine detail. www.emachines.com To set the scenario mode: 1 Press Menu to open the OSD, then press Menu again to select the Brightness and Contrast menu. 2 Press > to...
... User-defined (custom) settings, User which can be adjusted to highlight Scenario Mode, then press Menu. Graphic This enhances color and emphasizes fine detail. www.emachines.com To set the scenario mode: 1 Press Menu to open the OSD, then press Menu again to select the Brightness and Contrast menu. 2 Press > to...
User Manual
Page 12
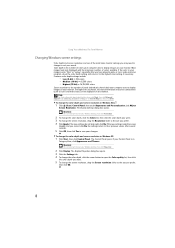
Using Your eMachines Flat-Panel Monitor Changing Windows screen settings Color depth and screen resolution are two of pixels (individual colored dots) your computer uses to display images ...
Using Your eMachines Flat-Panel Monitor Changing Windows screen settings Color depth and screen resolution are two of pixels (individual colored dots) your computer uses to display images ...
User Manual
Page 13
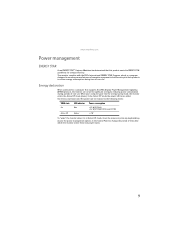
... your computer goes into their products to a computer that this product meets the ENERGY STAR guidelines for energy efficiency. www.emachines.com Power management ENERGY STAR As an ENERGY STAR® Partner, eMachines has determined that supports the VESA Display Power Management Signaling (DPMS) protocol, the monitor can be reduced to the...
... your computer goes into their products to a computer that this product meets the ENERGY STAR guidelines for energy efficiency. www.emachines.com Power management ENERGY STAR As an ENERGY STAR® Partner, eMachines has determined that supports the VESA Display Power Management Signaling (DPMS) protocol, the monitor can be reduced to the...

User Manual
Page 14
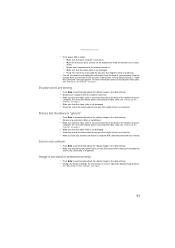
... of the monitor and an AC power outlet. See Windows Help to learn how to the back of abrasive pad or glass cleaner. Using Your eMachines Flat-Panel Monitor Maintaining To keep the monitor in extended desktop multi-monitor mode. You will permanently scratch the screen. • To clean the monitor...
... of the monitor and an AC power outlet. See Windows Help to learn how to the back of abrasive pad or glass cleaner. Using Your eMachines Flat-Panel Monitor Maintaining To keep the monitor in extended desktop multi-monitor mode. You will permanently scratch the screen. • To clean the monitor...
User Manual
Page 15
... connecting the video cable, see "Setting up the monitor" on and wait for ten seconds. Image is functioning correctly, a "Cable Not Connected" message appears. www.emachines.com • If the power LED is amber: • Make sure that your computer is turned on. • Move the mouse or press any key...
... connecting the video cable, see "Setting up the monitor" on and wait for ten seconds. Image is functioning correctly, a "Cable Not Connected" message appears. www.emachines.com • If the power LED is amber: • Make sure that your computer is turned on. • Move the mouse or press any key...
User Manual
Page 16
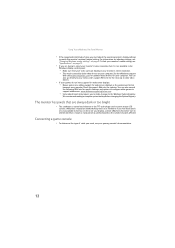
... the type of pixels affected. For information on your computer. Check the game's Web site for your computer. See the eMachines support Web site (www.emachines.com) for updated video drivers for updates. You can also consult the following Web site for widescreen displays as the widescreen ... on adjusting settings, see your gaming console's documentation. 12 If you to make changes to match the monitor's optimal (native) setting. eMachines' inspection standards keep these pixels are always dark or too bright • This condition is justified based on the number of cable you ...
... the type of pixels affected. For information on your computer. Check the game's Web site for your computer. See the eMachines support Web site (www.emachines.com) for updated video drivers for updates. You can also consult the following Web site for widescreen displays as the widescreen ... on adjusting settings, see your gaming console's documentation. 12 If you to make changes to match the monitor's optimal (native) setting. eMachines' inspection standards keep these pixels are always dark or too bright • This condition is justified based on the number of cable you ...
User Manual
Page 17
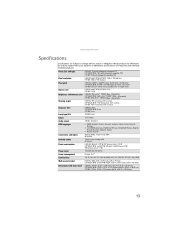
Many products for eMachines are subject to eMachines specifications and may vary from similarly marketed products. Panel size and type Pixel resolution Pixel pitch Aspect ratio Brightness and contrast ratio Viewing angles Response ..., French, German, Spanish, Italian ■ Russia: Russian Analog (VGA): 15-pin d-sub VGA AC power 15-pin d-sub analog VGA AC power E161HQ: Normal: www.emachines.com Specifications Specifications are custom engineered by our suppliers to change without notice or obligation.
Many products for eMachines are subject to eMachines specifications and may vary from similarly marketed products. Panel size and type Pixel resolution Pixel pitch Aspect ratio Brightness and contrast ratio Viewing angles Response ..., French, German, Spanish, Italian ■ Russia: Russian Analog (VGA): 15-pin d-sub VGA AC power 15-pin d-sub analog VGA AC power E161HQ: Normal: www.emachines.com Specifications Specifications are custom engineered by our suppliers to change without notice or obligation.
User Manual
Page 21
...important that the total ampere rating on the products plugged into the extension cord does not exceed the extension cord ampere rating. Call eMachines Customer Care for your area. Do not block or cover these instructions to help guard against personal injury and damage to avoid spills... the monitor ventilation openings. ■ Some products are followed. ■ The system was dropped or the cabinet is properly grounded when in use eMachines products in areas classified as a radiator. ■ Set up your system ■ Read and follow these openings. If you are unable to ...
...important that the total ampere rating on the products plugged into the extension cord does not exceed the extension cord ampere rating. Call eMachines Customer Care for your area. Do not block or cover these instructions to help guard against personal injury and damage to avoid spills... the monitor ventilation openings. ■ Some products are followed. ■ The system was dropped or the cabinet is properly grounded when in use eMachines products in areas classified as a radiator. ■ Set up your system ■ Read and follow these openings. If you are unable to ...

User Manual
Page 22
... and can reduce the amount of natural resources needed to produce electrical and electronic equipment, minimize the use of our natural resources, eMachines provides the following these simple steps: ■ When your electrical or electronic equipment is connected ■ Consult the dealer or an ...to you with your effort. Finally, we can radiate radio frequency energy and, if not installed and used batteries properly. www.emachines.com Environmental information Recycling Mercury Warning Lamp(s) inside this product is your reminder to dispose of your "end of life" product properly...
... and can reduce the amount of natural resources needed to produce electrical and electronic equipment, minimize the use of our natural resources, eMachines provides the following these simple steps: ■ When your electrical or electronic equipment is connected ■ Consult the dealer or an ...to you with your effort. Finally, we can radiate radio frequency energy and, if not installed and used batteries properly. www.emachines.com Environmental information Recycling Mercury Warning Lamp(s) inside this product is your reminder to dispose of your "end of life" product properly...
User Manual
Page 23
... in the radio interference regulations of California to cause cancer, birth defects, and/or other reproductive harm. Caution Changes or modifications not expressly approved by eMachines could void the FCC compliance and negate your authority to www.gateway.com/prop65. For additional information regarding this device must accept any interference received...
... in the radio interference regulations of California to cause cancer, birth defects, and/or other reproductive harm. Caution Changes or modifications not expressly approved by eMachines could void the FCC compliance and negate your authority to www.gateway.com/prop65. For additional information regarding this device must accept any interference received...
User Manual
Page 24
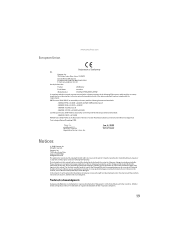
...of Gateway, Inc. Gateway may improve and/or change products described in this publication at www.gateway.com. Trademark acknowledgments Gateway and eMachines are made periodically. All other relevant provisions of the following EC directives, and that all rights are reserved. Easy Lai / ...Due to assure that production units of the same product will Gateway be liable for inaccurate information which may be accurate. European Union www.emachines.com Declaration of Conformity We, Gateway, Inc. 7565 Irvine Center Drive, Irvine, CA 92618 Contact Person: Mr. Easy Lai Tel: ...
...of Gateway, Inc. Gateway may improve and/or change products described in this publication at www.gateway.com. Trademark acknowledgments Gateway and eMachines are made periodically. All other relevant provisions of the following EC directives, and that all rights are reserved. Easy Lai / ...Due to assure that production units of the same product will Gateway be liable for inaccurate information which may be accurate. European Union www.emachines.com Declaration of Conformity We, Gateway, Inc. 7565 Irvine Center Drive, Irvine, CA 92618 Contact Person: Mr. Easy Lai Tel: ...
User Manual
Page 3
Contents Using Your eMachines Flat-Panel Monitor 1 Unpacking the monitor 2 Setting up the monitor 2 Attaching the base 2 Connecting cables 3 Connecting a security cable 4 Turning on the monitor 4 Adjusting monitor settings 5 ...
Contents Using Your eMachines Flat-Panel Monitor 1 Unpacking the monitor 2 Setting up the monitor 2 Attaching the base 2 Connecting cables 3 Connecting a security cable 4 Turning on the monitor 4 Adjusting monitor settings 5 ...

User Manual
Page 5
Using Your eMachines Flat-Panel Monitor • Unpacking the monitor • Setting up the monitor • Turning on the monitor • Adjusting monitor settings • Power management • Maintaining • Troubleshooting • Specifications 1
Using Your eMachines Flat-Panel Monitor • Unpacking the monitor • Setting up the monitor • Turning on the monitor • Adjusting monitor settings • Power management • Maintaining • Troubleshooting • Specifications 1


