
User Guide
Page 6
... Network Interface 108 10.4.3 Configuring Web Configurator 112 10.4.4 Configuring Network Diagnosis 113 10.5 UPnP Port Mapping Screen ...113 10.5.1 UPnP and the NAS's IP Address 114 10.5.2 UPnP and Security ...115 10.5.3 The NAS's Services and UPnP 115 10.5.4 UPnP Router ...116 10.5.5 Configuring UPnP Port Mapping 116 10.6 Terminal Screen ...119 10.7 DyDNS Screen ...120 10.8 FW Upgrade Screen...
... Network Interface 108 10.4.3 Configuring Web Configurator 112 10.4.4 Configuring Network Diagnosis 113 10.5 UPnP Port Mapping Screen ...113 10.5.1 UPnP and the NAS's IP Address 114 10.5.2 UPnP and Security ...115 10.5.3 The NAS's Services and UPnP 115 10.5.4 UPnP Router ...116 10.5.5 Configuring UPnP Port Mapping 116 10.6 Terminal Screen ...119 10.7 DyDNS Screen ...120 10.8 FW Upgrade Screen...

User Guide
Page 7
... the Download Service Preferences 165 14.7.3 Using Download Service Notification 168 14.8 Printer Server Tutorial ...171 14.9 Copy and Flickr Auto Upload Tutorial 173 14.10 FTP Uploadr Tutorial ...174 Cloud Storage User's Guide 7
... the Download Service Preferences 165 14.7.3 Using Download Service Notification 168 14.8 Printer Server Tutorial ...171 14.9 Copy and Flickr Auto Upload Tutorial 173 14.10 FTP Uploadr Tutorial ...174 Cloud Storage User's Guide 7

User Guide
Page 9
... to Download 228 17.7.6 Displaying the Task Information 229 17.8 Web Publishing Screen ...230 17.9 Print Server Screen ...231 17.9.1 Print Server Rename ...232 17.10 Copy/Sync Button Screen ...232 17.11 Technical Reference ...234 17.11.1 Sharing Media Files on Your Network 234 17.11.2 Download Service ...235 17...
... to Download 228 17.7.6 Displaying the Task Information 229 17.8 Web Publishing Screen ...230 17.9 Print Server Screen ...231 17.9.1 Print Server Rename ...232 17.10 Copy/Sync Button Screen ...232 17.11 Technical Reference ...234 17.11.1 Sharing Media Files on Your Network 234 17.11.2 Download Service ...235 17...

User Guide
Page 10
... 23.3.2 Group Names ...289 Chapter 24 Shares ...291 24.1 Overview ...291 24.2 What You Can Do ...291 24.3 Shares Screen ...291 Cloud Storage User's Guide 10
... 23.3.2 Group Names ...289 Chapter 24 Shares ...291 24.1 Overview ...291 24.2 What You Can Do ...291 24.3 Shares Screen ...291 Cloud Storage User's Guide 10
User Guide
Page 12
...Job Screen ...327 27.3.6 Edit Job: Step 1 ...328 27.3.7 Edit Job: Step 2 ...329 27.3.8 Restore Archive Screen ...330 27.3.9 Restore Archive: Step 1 ...330 27.3.10 Restore Archive: Step 2 ...331 27.3.11 Restore Archive: Step 3 ...331 27.4 Restore Screen ...332 27.4.1 Restore: Step 1 ...332 27.4.2 Restore: Step 2 ...334 27...The NAS ...343 28.6 Users Cannot Access the NAS ...344 28.7 External USB Drives ...345 28.8 Storage ...345 28.9 Firmware ...346 28.10 File Transfer ...346 28.11 Networking ...347 28.12 Some Features' Screens Do Not Display 347 28.13 Media Server Functions ...348 28.14 Download...
...Job Screen ...327 27.3.6 Edit Job: Step 1 ...328 27.3.7 Edit Job: Step 2 ...329 27.3.8 Restore Archive Screen ...330 27.3.9 Restore Archive: Step 1 ...330 27.3.10 Restore Archive: Step 2 ...331 27.3.11 Restore Archive: Step 3 ...331 27.4 Restore Screen ...332 27.4.1 Restore: Step 1 ...332 27.4.2 Restore: Step 2 ...334 27...The NAS ...343 28.6 Users Cannot Access the NAS ...344 28.7 External USB Drives ...345 28.8 Storage ...345 28.9 Firmware ...346 28.10 File Transfer ...346 28.11 Networking ...347 28.12 Some Features' Screens Do Not Display 347 28.13 Media Server Functions ...348 28.14 Download...
User Guide
Page 16
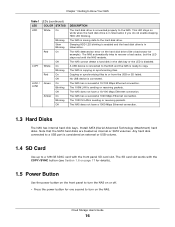
... Blinking Off On Blinking Off DESCRIPTION The hard disk drive is connected properly to or from the USB or SD failed. The NAS has a successful 10/100 Mbps Ethernet connection. The NAS does not have a 1000 Mbps Ethernet connection. 1.3 Hard Disks The NAS has internal hard disk bays. The 1000 M ...LAN is sending or receiving packets. The NAS does not have a 10/100 Mbps Ethernet connection. This LED stays on or off. • Press the power button for one second to the hard disk drive. Sleeping HDD...
... Blinking Off On Blinking Off DESCRIPTION The hard disk drive is connected properly to or from the USB or SD failed. The NAS has a successful 10/100 Mbps Ethernet connection. The NAS does not have a 1000 Mbps Ethernet connection. 1.3 Hard Disks The NAS has internal hard disk bays. The 1000 M ...LAN is sending or receiving packets. The NAS does not have a 10/100 Mbps Ethernet connection. This LED stays on or off. • Press the power button for one second to the hard disk drive. Sleeping HDD...

User Guide
Page 17
... settings, nor data stored on the front panel to copy or synchronize files between a connected USB or SD device and the NAS. See Section 17.10 on the rear panel to restore the NAS's default settings. You will hear one more seconds Release for software shutdown Release for more seconds, then...
... settings, nor data stored on the front panel to copy or synchronize files between a connected USB or SD device and the NAS. See Section 17.10 on the rear panel to restore the NAS's default settings. You will hear one more seconds Release for software shutdown Release for more seconds, then...
User Guide
Page 22
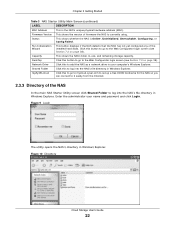
...the NAS detects that the NAS has not yet configured any of firmware the NAS is currently using. Click this button to go to mycloud.zyxel.com to set up a free DDNS hostname for the NAS so you can connect to it easily from the Internet. 2.3.3 Directory of ...screen click Shared Folder to add the NAS as a network drive in Windows Explorer. Enter the administrator user name and password and click Login. Figure 10 Directory Cloud Storage User's Guide 22 Chapter 2 Getting Started Table 3 NAS Starter Utility Main Screen (continued) LABEL DESCRIPTION MAC Address This is Online,...
...the NAS detects that the NAS has not yet configured any of firmware the NAS is currently using. Click this button to go to mycloud.zyxel.com to set up a free DDNS hostname for the NAS so you can connect to it easily from the Internet. 2.3.3 Directory of ...screen click Shared Folder to add the NAS as a network drive in Windows Explorer. Enter the administrator user name and password and click Login. Figure 10 Directory Cloud Storage User's Guide 22 Chapter 2 Getting Started Table 3 NAS Starter Utility Main Screen (continued) LABEL DESCRIPTION MAC Address This is Online,...

User Guide
Page 34
....4 on page 332) to restore previous backups based on the NAS. Cloud Storage User's Guide 34 You can restore by backup files. See Section 17.10 on page 232 to configure the copy/ sync settings. • Use the NAS's Backup screens (Section 27.3 on page 321) to schedule backups of files... and folders on your NAS to another ZyXEL NAS or a NAS using rsync. • See Section 14.14.1 on page 192 for an example of files and folders on your NAS to another...
....4 on page 332) to restore previous backups based on the NAS. Cloud Storage User's Guide 34 You can restore by backup files. See Section 17.10 on page 232 to configure the copy/ sync settings. • Use the NAS's Backup screens (Section 27.3 on page 321) to schedule backups of files... and folders on your NAS to another ZyXEL NAS or a NAS using rsync. • See Section 14.14.1 on page 192 for an example of files and folders on your NAS to another...

User Guide
Page 42
Cloud Storage User's Guide 42 Click it again to restore the windows to you can see the desktop. Chapter 7 Web Configurator Figure 26 Desktop (Administrator) 1 2 3 4 5 6 7 13 12 8 9 10 11 Status Zone Figure 27 Desktop (User) 14 15 Note: The Web Configurator session automatically times out if left idle for 15 minutes. Simply log back into the NAS if this to minimize all windows so you . 1 Desktop - click this happens to their previous state.
Cloud Storage User's Guide 42 Click it again to restore the windows to you can see the desktop. Chapter 7 Web Configurator Figure 26 Desktop (Administrator) 1 2 3 4 5 6 7 13 12 8 9 10 11 Status Zone Figure 27 Desktop (User) 14 15 Note: The Web Configurator session automatically times out if left idle for 15 minutes. Simply log back into the NAS if this to minimize all windows so you . 1 Desktop - click this happens to their previous state.

User Guide
Page 43
... displays the health state of web sessions. Click this to the Network screen for various features you can access. click this to go to mycloud.zyxel.com to set up a free DDNS hostname for the NAS so you can connect to open the application zone in a new tab. 7 File ... 11 myZyXELcloud - Chapter 7 Web Configurator 2 Storage Manager- Cloud Storage User's Guide 43 click this to view photos in the shares that publish music. 10 Video - click this to see files in a new tab. 15 Application Zone - click this to open the control panel screens to display NAS status ...
... displays the health state of web sessions. Click this to the Network screen for various features you can access. click this to go to mycloud.zyxel.com to set up a free DDNS hostname for the NAS so you can connect to open the application zone in a new tab. 7 File ... 11 myZyXELcloud - Chapter 7 Web Configurator 2 Storage Manager- Cloud Storage User's Guide 43 click this to view photos in the shares that publish music. 10 Video - click this to see files in a new tab. 15 Application Zone - click this to open the control panel screens to display NAS status ...

User Guide
Page 50
... Table 8 RAID Types RAID NO. of disk failure. Use JBOD with two or more data protection in case of HDD) -1 RAID 5 3-4 1 RAID 6 4 RAID 10 4 2 1 HDD in each RAID 1 group DESCRIPTION CAPACITY Use Basic with four disks for more disks for maximum speed and no fault tolerance. of data on... volumes on a disk group. Allows you to re-build the volume or disk group. Use RAID 0 with high performance. Note: RAID 5, RAID 6, RAID 10, and the hot spare option apply to a 3-disk RAID 5. Use RAID 1 to repair the volume. You can add a hot spare to 4-bay NAS devices...
... Table 8 RAID Types RAID NO. of disk failure. Use JBOD with two or more data protection in case of HDD) -1 RAID 5 3-4 1 RAID 6 4 RAID 10 4 2 1 HDD in each RAID 1 group DESCRIPTION CAPACITY Use Basic with four disks for more disks for maximum speed and no fault tolerance. of data on... volumes on a disk group. Allows you to re-build the volume or disk group. Use RAID 0 with high performance. Note: RAID 5, RAID 6, RAID 10, and the hot spare option apply to a 3-disk RAID 5. Use RAID 1 to repair the volume. You can add a hot spare to 4-bay NAS devices...

User Guide
Page 51
This can help you manage your content grows, you can do the following RAID types without losing stored data. Table 10 Expand Volumes and Disk Groups EXPANSION METHOD Using unallocated disk space Adding disks DESCRIPTION You can add more storage space to a JBOD, RAID 1 or RAID 5. ...
This can help you manage your content grows, you can do the following RAID types without losing stored data. Table 10 Expand Volumes and Disk Groups EXPANSION METHOD Using unallocated disk space Adding disks DESCRIPTION You can add more storage space to a JBOD, RAID 1 or RAID 5. ...

User Guide
Page 56
...with two or more disks to mirror primary data to create a volume. Use RAID 1 with two or four disks for RAID 1, 5, 6, or 10 to save the settings. For example, the Repair RAID option is available only when a degraded volume is not available at this step. Cloud Storage User... disks for more disks for more disks to get better performance than RAID 6, with data protection in case of disk failure. Use RAID 10 with four disks to balance performance, hard disk capacity usage with slightly less data protection. Back This button is selected. Use JBOD with ...
...with two or more disks to mirror primary data to create a volume. Use RAID 1 with two or four disks for RAID 1, 5, 6, or 10 to save the settings. For example, the Repair RAID option is available only when a degraded volume is not available at this step. Cloud Storage User... disks for more disks for more disks to get better performance than RAID 6, with data protection in case of disk failure. Use RAID 10 with four disks to balance performance, hard disk capacity usage with slightly less data protection. Back This button is selected. Use JBOD with ...

User Guide
Page 61
... to replace the failed one This section lists all entries in the table and displays the corresponding disk tray of hard disks for RAID 1, 5, 6, or 10 to the previous step. Next Click Next to go to avoid wasting space. Disk Selected This field displays the hard disks you selected on the...
... to replace the failed one This section lists all entries in the table and displays the corresponding disk tray of hard disks for RAID 1, 5, 6, or 10 to the previous step. Next Click Next to go to avoid wasting space. Disk Selected This field displays the hard disks you selected on the...

User Guide
Page 62
... This field displays the name of the hard disk. Size This field shows the total disk size. Summary Action This field displays for RAID 1, 5, 6, or 10 to save the settings. Back Click Back to go to the previous step. Action This field displays for increasing the volume's capacity. Cloud Storage User...
... This field displays the name of the hard disk. Size This field shows the total disk size. Summary Action This field displays for RAID 1, 5, 6, or 10 to save the settings. Back Click Back to go to the previous step. Action This field displays for increasing the volume's capacity. Cloud Storage User...

User Guide
Page 68
...'s Guide 68 The corresponding space allocations of the volume. Use Basic with high performance. Use RAID 1 with two or more information. Use RAID 10 with four disks to save the settings. Summary Note: Use the same capacity of the disk group. This field displays the name of hard disks... for the volume. You can also type a new name for RAID 1, 5, 6, or 10 to close the screen without saving any settings. Click Back to go to close the screen without saving any settings. Click Cancel to avoid wasting...
...'s Guide 68 The corresponding space allocations of the volume. Use Basic with high performance. Use RAID 1 with two or more information. Use RAID 10 with four disks to save the settings. Summary Note: Use the same capacity of the disk group. This field displays the name of hard disks... for the volume. You can also type a new name for RAID 1, 5, 6, or 10 to close the screen without saving any settings. Click Back to go to close the screen without saving any settings. Click Cancel to avoid wasting...

User Guide
Page 74
...disk failure. Next Cancel Step 2. Disk Selected This field displays the hard disk(s) on which the RAID array will be built. Use RAID 10 with four disks to another disk(s) with slightly less data protection. Chapter 8 Storage Manager Table 17 Create Disk Group (continued) LABEL Choose a...RAID 6, with high performance. Summary Click Next to go to the next step. Use Basic with four disks for RAID 1, 5, 6, or 10 to the previous step. Volume Capacity This field displays the size of available size, data protection area, and wasted size display. Cancel Click ...
...disk failure. Next Cancel Step 2. Disk Selected This field displays the hard disk(s) on which the RAID array will be built. Use RAID 10 with four disks to another disk(s) with slightly less data protection. Chapter 8 Storage Manager Table 17 Create Disk Group (continued) LABEL Choose a...RAID 6, with high performance. Summary Click Next to go to the next step. Use Basic with four disks for RAID 1, 5, 6, or 10 to the previous step. Volume Capacity This field displays the size of available size, data protection area, and wasted size display. Cancel Click ...

User Guide
Page 80
... Sector Count This is the total number of errors reading or writing a sector that corresponds to a spare area. the temperature in a power-on the manufacturer). 10 Spin Retry Count Low This is the number of unstable sectors awaiting reallocation. If the sector is later successfully written or read errors. Only failed...
... Sector Count This is the total number of errors reading or writing a sector that corresponds to a spare area. the temperature in a power-on the manufacturer). 10 Spin Retry Count Low This is the number of unstable sectors awaiting reallocation. If the sector is later successfully written or read errors. Only failed...

User Guide
Page 89
Figure 52 Creating a new LUN Cloud Storage User's Guide 89 Chapter 8 Storage Manager Note: The NAS can create only 10 targets at maximum.
Figure 52 Creating a new LUN Cloud Storage User's Guide 89 Chapter 8 Storage Manager Note: The NAS can create only 10 targets at maximum.