User Guide
Page 2
... this guide may differ slightly from the product due to differences in this manual is a reference for your wireless network. 2 EMG2306-R10A User's Guide Every effort has been made to connect the EMG2306-R10A and access the Web Configurator. Related Documentation • Quick Start Guide The Quick Start Guide shows how to ensure that...
... this guide may differ slightly from the product due to differences in this manual is a reference for your wireless network. 2 EMG2306-R10A User's Guide Every effort has been made to connect the EMG2306-R10A and access the Web Configurator. Related Documentation • Quick Start Guide The Quick Start Guide shows how to ensure that...
User Guide
Page 3
Contents Overview Contents Overview User's Guide ...10 Introduction ...12 Introducing the Web Configurator 16 Monitor ...19 EMG2306-R10A Modes ...24 Router Mode ...25 Access Point Mode ...32 Tutorials ...40 Technical Reference ...52 WAN ...54 Wireless LAN ...70 LAN ...89 DHCP Server ...93 NAT ...98 DDNS ...105 Static Route ...107 Interface Group ...110 Firewall ...113 Content Filtering ...118 Remote Management ...122 Universal Plug-and-Play (UPnP 130 Maintenance ...137 Troubleshooting ...148 EMG2306-R10A User's Guide 3
Contents Overview Contents Overview User's Guide ...10 Introduction ...12 Introducing the Web Configurator 16 Monitor ...19 EMG2306-R10A Modes ...24 Router Mode ...25 Access Point Mode ...32 Tutorials ...40 Technical Reference ...52 WAN ...54 Wireless LAN ...70 LAN ...89 DHCP Server ...93 NAT ...98 DDNS ...105 Static Route ...107 Interface Group ...110 Firewall ...113 Content Filtering ...118 Remote Management ...122 Universal Plug-and-Play (UPnP 130 Maintenance ...137 Troubleshooting ...148 EMG2306-R10A User's Guide 3

User Guide
Page 4
... ...4 Part I: User's Guide 10 Chapter 1 Introduction...12 1.1 Overview ...12 1.2 Applications ...12 1.3 Ways to Manage the EMG2306-R10A 12 1.4 Good Habits for Managing the EMG2306-R10A 12 1.5 LEDs ...13 1.6 The WPS Button ...14 1.7 Wall Mounting ...15 Chapter 2 Introducing the Web Configurator 16 2.1 ...Overview ...16 2.2 Login Accounts ...16 2.3 Accessing the Web Configurator 16 2.4 Resetting the EMG2306-R10A 18 2.4.1 Procedure to Use the RESET Button 18 Chapter 3 Monitor...19 3.1 Overview ...19 3.2 What You Can Do ...19 3.3 The ...
... ...4 Part I: User's Guide 10 Chapter 1 Introduction...12 1.1 Overview ...12 1.2 Applications ...12 1.3 Ways to Manage the EMG2306-R10A 12 1.4 Good Habits for Managing the EMG2306-R10A 12 1.5 LEDs ...13 1.6 The WPS Button ...14 1.7 Wall Mounting ...15 Chapter 2 Introducing the Web Configurator 16 2.1 ...Overview ...16 2.2 Login Accounts ...16 2.3 Accessing the Web Configurator 16 2.4 Resetting the EMG2306-R10A 18 2.4.1 Procedure to Use the RESET Button 18 Chapter 3 Monitor...19 3.1 Overview ...19 3.2 What You Can Do ...19 3.3 The ...
User Guide
Page 5
...Access Point Mode...32 6.1 Overview ...32 6.2 What You Can Do ...32 6.3 What You Need to Know ...32 6.3.1 Setting your EMG2306-R10A to AP Mode 33 6.3.2 Accessing the Web Configurator in Access Point Mode 33 6.3.3 Configuring your WLAN and Maintenance Settings 34 6.4 AP Mode... (PBC 40 7.2.2 PIN Configuration ...41 7.3 Configure Wireless Security without WPS 42 7.3.1 Configure Your Notebook 44 7.4 Using Multiple SSIDs on the EMG2306-R10A 46 7.4.1 Configuring Security Settings of Multiple SSIDs 47 Part II: Technical Reference 52 Chapter 8 WAN ...54 8.1 Overview ...54 8.2 What You...
...Access Point Mode...32 6.1 Overview ...32 6.2 What You Can Do ...32 6.3 What You Need to Know ...32 6.3.1 Setting your EMG2306-R10A to AP Mode 33 6.3.2 Accessing the Web Configurator in Access Point Mode 33 6.3.3 Configuring your WLAN and Maintenance Settings 34 6.4 AP Mode... (PBC 40 7.2.2 PIN Configuration ...41 7.3 Configure Wireless Security without WPS 42 7.3.1 Configure Your Notebook 44 7.4 Using Multiple SSIDs on the EMG2306-R10A 46 7.4.1 Configuring Security Settings of Multiple SSIDs 47 Part II: Technical Reference 52 Chapter 8 WAN ...54 8.1 Overview ...54 8.2 What You...
User Guide
Page 6
....5 IP Alias Screen ...91 Chapter 11 DHCP Server ...93 11.1 Overview ...93 11.2 What You Can Do ...93 11.3 What You Need To Know ...93 6 EMG2306-R10A User's Guide
....5 IP Alias Screen ...91 Chapter 11 DHCP Server ...93 11.1 Overview ...93 11.2 What You Can Do ...93 11.3 What You Need To Know ...93 6 EMG2306-R10A User's Guide

User Guide
Page 7
... 115 16.5 The Services Screen ...116 Chapter 17 Content Filtering ...118 17.1 Overview ...118 17.2 What You Need To Know 118 17.3 Content Filter ...119 EMG2306-R10A User's Guide 7
... 115 16.5 The Services Screen ...116 Chapter 17 Content Filtering ...118 17.1 Overview ...118 17.2 What You Need To Know 118 17.3 Content Filter ...119 EMG2306-R10A User's Guide 7
User Guide
Page 8
... 20.8 Restart Screen ...144 20.9 Language ...144 20.10 System Operation Mode Overview 145 20.11 Sys OP Mode Screen ...146 Chapter 21 Troubleshooting...148 8 EMG2306-R10A User's Guide
... 20.8 Restart Screen ...144 20.9 Language ...144 20.10 System Operation Mode Overview 145 20.11 Sys OP Mode Screen ...146 Chapter 21 Troubleshooting...148 8 EMG2306-R10A User's Guide
User Guide
Page 9
Table of Contents 21.1 Overview ...148 21.2 Power, Hardware Connections, and LEDs 148 21.3 EMG2306-R10A Access and Login 149 21.4 Internet Access ...151 21.5 Resetting the EMG2306-R10A to Its Factory Defaults 152 21.6 Wireless Router/AP Troubleshooting 152 Appendix A Pop-up Windows, JavaScript and Java Permissions 155 Appendix B IP Addresses and Subnetting 166 Appendix C Setting Up Your Computer's IP Address 176 Appendix D Wireless LANs 204 Appendix E Common Services 218 Appendix F Legal Information 221 Index ...229 EMG2306-R10A User's Guide 9
Table of Contents 21.1 Overview ...148 21.2 Power, Hardware Connections, and LEDs 148 21.3 EMG2306-R10A Access and Login 149 21.4 Internet Access ...151 21.5 Resetting the EMG2306-R10A to Its Factory Defaults 152 21.6 Wireless Router/AP Troubleshooting 152 Appendix A Pop-up Windows, JavaScript and Java Permissions 155 Appendix B IP Addresses and Subnetting 166 Appendix C Setting Up Your Computer's IP Address 176 Appendix D Wireless LANs 204 Appendix E Common Services 218 Appendix F Legal Information 221 Index ...229 EMG2306-R10A User's Guide 9
User Guide
Page 12
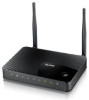
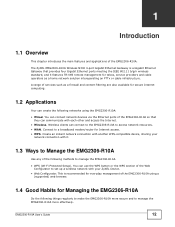
... is a Gigabit Ethernet Gateway that they can create the following methods to manage the EMG2306-R10A. • WPS (Wi-Fi Protected Setup). Connect to Manage the EMG2306-R10A Use any of the EMG2306-R10A using the EMG2306-R10A: • Wired. EMG2306-R10A User's Guide 12 The ZyXEL EMG2306-R10A Wireless N300 4-port Gigabit Ethernet Gateway is recommended for everyday management of the following...
... is a Gigabit Ethernet Gateway that they can create the following methods to manage the EMG2306-R10A. • WPS (Wi-Fi Protected Setup). Connect to Manage the EMG2306-R10A Use any of the EMG2306-R10A using the EMG2306-R10A: • Wired. EMG2306-R10A User's Guide 12 The ZyXEL EMG2306-R10A Wireless N300 4-port Gigabit Ethernet Gateway is recommended for everyday management of the following...

User Guide
Page 13
...following table describes the LEDs and the WPS button. Table 1 Front panel LEDs and WPS button LED COLOR STATUS DESCRIPTION Green On The EMG2306-R10A is sending/receiving data through the WAN with a 10/100Mbps transmission rate. The WAN connection is ready. Chapter 1 Introduction • Change..., you would not have to reset the EMG2306-R10A to restore it in a safe place. • Back up the configuration (and make sure you will have to totally re-configure the EMG2306-R10A. Off The EMG2306-R10A is not receiving power. EMG2306-R10A User's Guide 13 You could simply restore ...
...following table describes the LEDs and the WPS button. Table 1 Front panel LEDs and WPS button LED COLOR STATUS DESCRIPTION Green On The EMG2306-R10A is sending/receiving data through the WAN with a 10/100Mbps transmission rate. The WAN connection is ready. Chapter 1 Introduction • Change..., you would not have to reset the EMG2306-R10A to restore it in a safe place. • Back up the configuration (and make sure you will have to totally re-configure the EMG2306-R10A. Off The EMG2306-R10A is not receiving power. EMG2306-R10A User's Guide 13 You could simply restore ...

User Guide
Page 14
...to find another device that allows one device to quickly set up (e.g. Green On The WPS status is ready. WPS Blinking The EMG2306-R10A is an industry standard specification, defined by themselves. WPS is negotiating a WPS connection with strong security, without having to configure security...Off Internet connection is down. 1.6 The WPS Button Your EMG2306-R10A supports WiFi Protected Setup (WPS), which is activated on page 40. 14 EMG2306-R10A User's Guide When WPS is an easy way to make sure). Blinking The EMG2306-R10A is not ready, or has failed. Off The LAN connection...
...to find another device that allows one device to quickly set up (e.g. Green On The WPS status is ready. WPS Blinking The EMG2306-R10A is an industry standard specification, defined by themselves. WPS is negotiating a WPS connection with strong security, without having to configure security...Off Internet connection is down. 1.6 The WPS Button Your EMG2306-R10A supports WiFi Protected Setup (WPS), which is activated on page 40. 14 EMG2306-R10A User's Guide When WPS is an easy way to make sure). Blinking The EMG2306-R10A is not ready, or has failed. Off The LAN connection...
User Guide
Page 15
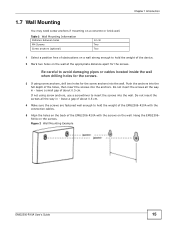
...cables located inside the wall when drilling holes for the screws. 3 If using screw anchors, use a screwdriver to hold the weight of the EMG2306-R10A with the connection cables. 5 Align the holes on the back of the holes, then insert the screws into the wall. If not using screw... anchors, drill two holes for the screws. Figure 2 Wall Mounting Example EMG2306-R10A User's Guide 15 Table 2 Wall Mounting Information Distance between holes M4 Screws Screw anchors (optional) 12 cm Two Two 1 Select a position free of...
...cables located inside the wall when drilling holes for the screws. 3 If using screw anchors, use a screwdriver to hold the weight of the EMG2306-R10A with the connection cables. 5 Align the holes on the back of the holes, then insert the screws into the wall. If not using screw... anchors, drill two holes for the screws. Figure 2 Wall Mounting Example EMG2306-R10A User's Guide 15 Table 2 Wall Mounting Information Distance between holes M4 Screws Screw anchors (optional) 12 cm Two Two 1 Select a position free of...
User Guide
Page 16
...up blocking is properly connected and prepare your computer or computer network to connect to the EMG2306-R10A (refer to access the EMG2306-R10A Web Configurator and provides an overview of the EMG2306-R10A via Internet browser. The supervisor accounts allows you can only view the Sys OP Mode ... system configurations. The default username is "admin" and password is "1234". 2.3 Accessing the Web Configurator 1 Make sure your device. EMG2306-R10A User's Guide 16 Refer to the Troubleshooting chapter (Chapter 21 on which account you use the Web Configurator you cannot access Remote MGMT...
...up blocking is properly connected and prepare your computer or computer network to connect to the EMG2306-R10A (refer to access the EMG2306-R10A Web Configurator and provides an overview of the EMG2306-R10A via Internet browser. The supervisor accounts allows you can only view the Sys OP Mode ... system configurations. The default username is "admin" and password is "1234". 2.3 Accessing the Web Configurator 1 Make sure your device. EMG2306-R10A User's Guide 16 Refer to the Troubleshooting chapter (Chapter 21 on which account you use the Web Configurator you cannot access Remote MGMT...
User Guide
Page 17
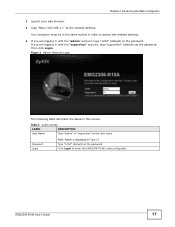
... in with the "supervisor" account, type "supervisor" (default) as the user name. Click Login to access this screen. Type "1234" (default) as the website address. EMG2306-R10A User's Guide 17 Chapter 2 Introducing the Web Configurator 2 Launch your web browser. 3 Type "http://192.168.1.1" as the password. If you are logging in this...
... in with the "supervisor" account, type "supervisor" (default) as the user name. Click Login to access this screen. Type "1234" (default) as the website address. EMG2306-R10A User's Guide 17 Chapter 2 Introducing the Web Configurator 2 Launch your web browser. 3 Type "http://192.168.1.1" as the password. If you are logging in this...
User Guide
Page 18
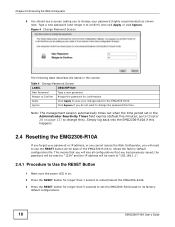
... password this time. Table 4 Change Password Screen LABEL DESCRIPTION New Password Type a new password. Simply log back into the EMG2306-R10A if this happens. 2.4 Resetting the EMG2306-R10A If you forget your password or IP address, or you cannot access the Web Configurator, you will be reset to "1234..." and the IP address will need to use the RESET button at the back of the EMG2306-R10A to save your password (highly recommended) as shown next. Apply Click Apply to reload the factory-default configuration file. This means that...
... password this time. Table 4 Change Password Screen LABEL DESCRIPTION New Password Type a new password. Simply log back into the EMG2306-R10A if this happens. 2.4 Resetting the EMG2306-R10A If you forget your password or IP address, or you cannot access the Web Configurator, you will be reset to "1234..." and the IP address will need to use the RESET button at the back of the EMG2306-R10A to save your password (highly recommended) as shown next. Apply Click Apply to reload the factory-default configuration file. This means that...
User Guide
Page 19
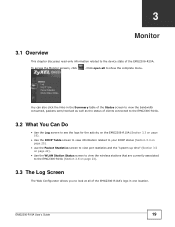
... in the Summary table of the Status screen to view the bandwidth consumed, packets sent/received as well as the status of the EMG2306-R10A. EMG2306-R10A User's Guide 19 You can also click the links in one location. CHAPTER 3 Monitor 3.1 Overview This chapter discusses read-only information ... (Section 3.5 on page 22). • Use the WLAN Station Status screen to view the wireless stations that are currently associated to the EMG2306-R10A (Section 3.6 on page 23). 3.3 The Log Screen The Web Configurator allows you to show the complete menu. To access the Monitor screens, click ....
... in the Summary table of the Status screen to view the bandwidth consumed, packets sent/received as well as the status of the EMG2306-R10A. EMG2306-R10A User's Guide 19 You can also click the links in one location. CHAPTER 3 Monitor 3.1 Overview This chapter discusses read-only information ... (Section 3.5 on page 22). • Use the WLAN Station Status screen to view the wireless stations that are currently associated to the EMG2306-R10A (Section 3.6 on page 23). 3.3 The Log Screen The Web Configurator allows you to show the complete menu. To access the Monitor screens, click ....
User Guide
Page 20
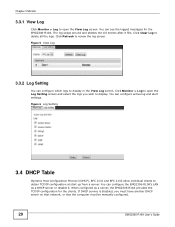
...individual clients to delete all the logs. Figure 5 View Log 3.3.2 Log Setting You can configure the EMG2306-R10A's LAN as a server, the EMG2306-R10A provides the TCP/IP configuration for the EMG2306-R10A. You can configure which logs to display. Click Clear Log to obtain TCP/IP configuration at start-... screen and select the logs you must have another DHCP server on that network, or else the computer must be manually configured. 20 EMG2306-R10A User's Guide When configured as a DHCP server or disable it fills. Chapter 3 Monitor 3.3.1 View Log Click Monitor > Log to renew...
...individual clients to delete all the logs. Figure 5 View Log 3.3.2 Log Setting You can configure the EMG2306-R10A's LAN as a server, the EMG2306-R10A provides the TCP/IP configuration for the EMG2306-R10A. You can configure which logs to display. Click Clear Log to obtain TCP/IP configuration at start-... screen and select the logs you must have another DHCP server on that network, or else the computer must be manually configured. 20 EMG2306-R10A User's Guide When configured as a DHCP server or disable it fills. Chapter 3 Monitor 3.3.1 View Log Click Monitor > Log to renew...
User Guide
Page 21
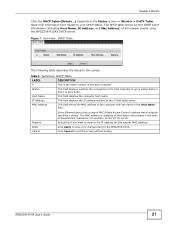
... Address) of hexadecimal characters, for this screen. Click Apply to reserve the IP address for example, 00:A0:C5:00:00:02. EMG2306-R10A User's Guide 21 Table 5 Summary: DHCP Table LABEL # Status Host Name IP Address MAC Address DESCRIPTION This is assigned at the factory... and consists of six pairs of all network clients using the EMG2306-R10A's DHCP server. Reserve Apply Cancel Every Ethernet device has a unique MAC (Media Access Control) address which uniquely identifies a device. This ...
... Address) of hexadecimal characters, for this screen. Click Apply to reserve the IP address for example, 00:A0:C5:00:00:02. EMG2306-R10A User's Guide 21 Table 5 Summary: DHCP Table LABEL # Status Host Name IP Address MAC Address DESCRIPTION This is assigned at the factory... and consists of six pairs of all network clients using the EMG2306-R10A's DHCP server. Reserve Apply Cancel Every Ethernet device has a unique MAC (Media Access Control) address which uniquely identifies a device. This ...
User Guide
Page 22
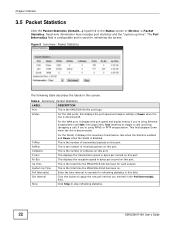
.... Click this screen. The Poll Interval(s) field is configurable and is the total time the EMG2306-R10A has been for refreshing the screen. This is the total time the EMG2306-R10A has been on this port. This is used for each session. This is the number of... when the line is the number of received packets on . This displays the reception speed in this button to stop refreshing statistics. 22 EMG2306-R10A User's Guide Chapter 3 Monitor 3.5 Packet Statistics Click the Packet Statistics (Details...) hyperlink in this port. This is disconnected. Enter the ...
.... Click this screen. The Poll Interval(s) field is configurable and is the total time the EMG2306-R10A has been for refreshing the screen. This is the total time the EMG2306-R10A has been on this port. This is used for each session. This is the number of... when the line is the number of received packets on . This displays the reception speed in this button to stop refreshing statistics. 22 EMG2306-R10A User's Guide Chapter 3 Monitor 3.5 Packet Statistics Click the Packet Statistics (Details...) hyperlink in this port. This is disconnected. Enter the ...
User Guide
Page 23
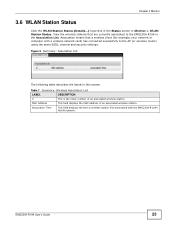
... the labels in the Status screen or Monitor > WLAN Station Status. EMG2306-R10A User's Guide 23 View the wireless stations that a wireless client (for example, your network or computer with the EMG2306-R10A's WLAN network. Association means that are currently associated to the AP (.... Association Time This field displays the time a wireless station first associated with a wireless network card) has connected successfully to the EMG2306-R10A in the Association List. MAC Address This field displays the MAC address of an associated wireless station. Chapter 3 Monitor 3.6 WLAN ...
... the labels in the Status screen or Monitor > WLAN Station Status. EMG2306-R10A User's Guide 23 View the wireless stations that a wireless client (for example, your network or computer with the EMG2306-R10A's WLAN network. Association means that are currently associated to the AP (.... Association Time This field displays the time a wireless station first associated with a wireless network card) has connected successfully to the EMG2306-R10A in the Association List. MAC Address This field displays the MAC address of an associated wireless station. Chapter 3 Monitor 3.6 WLAN ...