
Operating Guide
Page 2
...lightning flash with arrowhead symbol, within the product's enclosure that to provide reasonable protection against harmful interference in the United States by turning the equipment off and on, the user is connected. - Unauthorized modification could void the user's authority to radio communications. If... Inc. 1000 Sylvan Avenue, Englewood Cliffs, NJ 07632 http://www.zenith.com WARNING/CAUTION TO REDUCE THE RISK OF FIRE AND ELECTRIC SHOCK, DO NOT EXPOSE THIS PRODUCT TO RAIN OR MOISTURE. 2 Plasma TV Reorient or relocate the receiving antenna. - Consult the dealer or...
...lightning flash with arrowhead symbol, within the product's enclosure that to provide reasonable protection against harmful interference in the United States by turning the equipment off and on, the user is connected. - Unauthorized modification could void the user's authority to radio communications. If... Inc. 1000 Sylvan Avenue, Englewood Cliffs, NJ 07632 http://www.zenith.com WARNING/CAUTION TO REDUCE THE RISK OF FIRE AND ELECTRIC SHOCK, DO NOT EXPOSE THIS PRODUCT TO RAIN OR MOISTURE. 2 Plasma TV Reorient or relocate the receiving antenna. - Consult the dealer or...
Operating Guide
Page 5
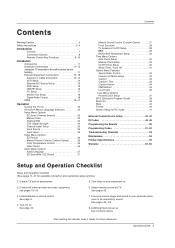
... A/V Source Setup 15 DVD Setup 15 HDSTB Setup 16 PC Setup 17 Monitor Out Setup 18 Digital Audio Output 18 HDMI 19~21 Operation Turning the TV On 22 On-screen Menus Language Selection 22 Setup Menu Options EZ Scan (Channel Search 23 Manual Scan 23 Channel Edit 24 DTV...Info 39 Mute 40 Freeze 40 Screen Setup for PC mode 41 External Control Device Setup 42~47 IR Codes 48~49 Programming the Remote 50 Programming Codes 51~52 Troubleshooting Checklist 53 Maintenance 54 Product Specifications 55 Warranty 59~60 Setup and Operation Checklist Setup and Operation Checklist (See ...
... A/V Source Setup 15 DVD Setup 15 HDSTB Setup 16 PC Setup 17 Monitor Out Setup 18 Digital Audio Output 18 HDMI 19~21 Operation Turning the TV On 22 On-screen Menus Language Selection 22 Setup Menu Options EZ Scan (Channel Search 23 Manual Scan 23 Channel Edit 24 DTV...Info 39 Mute 40 Freeze 40 Screen Setup for PC mode 41 External Control Device Setup 42~47 IR Codes 48~49 Programming the Remote 50 Programming Codes 51~52 Troubleshooting Checklist 53 Maintenance 54 Product Specifications 55 Warranty 59~60 Setup and Operation Checklist Setup and Operation Checklist (See ...

Operating Guide
Page 9
... matching correct polarity (+ with +, - Close cover. Main picture is frozen. Installing Batteries • Open the battery compartment cover on top of time before your TV turns itself off .(Refer to TV viewing from any menu. Not available in regular sequence: Antenna, Cable, Video, Front Video, Component 1-2, RGB-DTV (or RGB-PC...
... matching correct polarity (+ with +, - Close cover. Main picture is frozen. Installing Batteries • Open the battery compartment cover on top of time before your TV turns itself off .(Refer to TV viewing from any menu. Not available in regular sequence: Antenna, Cable, Video, Front Video, Component 1-2, RGB-DTV (or RGB-PC...

Operating Guide
Page 10
.../PAGE DOWN Moves from one full set of screen information to the next one. Change the audio language in DTV mode. 10 Plasma TV Introduction Remote Control Key Functions POWER Turns your TV or any other programmed equipment on or off, depending on -screen menus and adjust the system settings to your...
.../PAGE DOWN Moves from one full set of screen information to the next one. Change the audio language in DTV mode. 10 Plasma TV Introduction Remote Control Key Functions POWER Turns your TV or any other programmed equipment on or off, depending on -screen menus and adjust the system settings to your...

Operating Guide
Page 13
... Multi-family Dwellings/Apartments (Connect to wall antenna socket) Wall Antenna Socket ANTENNA Bronze Wire CABLE RF Coaxial Wire (75 ohm) VHF Antenna UHF Antenna Turn clockwise to bend the bronze wire when connecting the antenna. 2. Outdoor Antenna Single-family Dwellings /Houses (Connect to wall jack for outdoor antenna) Bronze Wire...
... Multi-family Dwellings/Apartments (Connect to wall antenna socket) Wall Antenna Socket ANTENNA Bronze Wire CABLE RF Coaxial Wire (75 ohm) VHF Antenna UHF Antenna Turn clockwise to bend the bronze wire when connecting the antenna. 2. Outdoor Antenna Single-family Dwellings /Houses (Connect to wall jack for outdoor antenna) Bronze Wire...

Operating Guide
Page 14
... the input source with using the TV/VIDEO button on cable and antenna Antenna Bronze Wire RF Coaxial Wire (75 ohm) Cable TV Wall Jack Turn clockwise to the same channel number. Do not connect to the Video input. 2. Insert a video tape into the VCR and press PLAY on ... 1 L R VIDEO AUDIO 1 ANT OUT ANTENNA CABLE 2 RGB/DVI AUDIO INPUT ANT IN S-VIDEO OUT OUTPUT (R) AUDIO (L) SWITCH 3 4 IN VIDEO VCR Rear REM CON 14 Plasma TV RF Coaxial Wire (75 ohm) Bronze Wire ANTENNA CABLE • To improve the picture quality in the connections. When connecting the TV to the...
... the input source with using the TV/VIDEO button on cable and antenna Antenna Bronze Wire RF Coaxial Wire (75 ohm) Cable TV Wall Jack Turn clockwise to the same channel number. Do not connect to the Video input. 2. Insert a video tape into the VCR and press PLAY on ... 1 L R VIDEO AUDIO 1 ANT OUT ANTENNA CABLE 2 RGB/DVI AUDIO INPUT ANT IN S-VIDEO OUT OUTPUT (R) AUDIO (L) SWITCH 3 4 IN VIDEO VCR Rear REM CON 14 Plasma TV RF Coaxial Wire (75 ohm) Bronze Wire ANTENNA CABLE • To improve the picture quality in the connections. When connecting the TV to the...

Operating Guide
Page 15
... in the figure. Note that RGB and HDMI/DVI sources are connected. 2. It is presumed that this to the S-VIDEO input on the remote control. Turn on DVD player Y Pb Pr Y B-Y R-Y Y Cb Cr Y PB PR Operating Guide 15 Operate the corresponding external equipment. Refer to the DVD player's manual for Video...
... in the figure. Note that RGB and HDMI/DVI sources are connected. 2. It is presumed that this to the S-VIDEO input on the remote control. Turn on DVD player Y Pb Pr Y B-Y R-Y Y Cb Cr Y PB PR Operating Guide 15 Operate the corresponding external equipment. Refer to the DVD player's manual for Video...

Operating Guide
Page 16
.... Signal 480i 480p 720p 1080i Component 1/2 Yes Yes Yes Yes RGB-DTV , HDMI/DVI No Yes Yes Yes 16 Plasma TV However, if you do receive Digital signals from a digital set -top box.) 2. Turn on the remote control to connect Use the TV's COMPONENT (Y, PB, PR) INPUT, RGB or HDMI/DVI jack...
.... Signal 480i 480p 720p 1080i Component 1/2 Yes Yes Yes Yes RGB-DTV , HDMI/DVI No Yes Yes Yes 16 Plasma TV However, if you do receive Digital signals from a digital set -top box.) 2. Turn on the remote control to connect Use the TV's COMPONENT (Y, PB, PR) INPUT, RGB or HDMI/DVI jack...

Operating Guide
Page 18
... equipments, such as amplif- Note: When connecting with external audio equipments, such as amplifers or speakers, please turn the TV speakers off .(Refer to the TV Digital Audio (Optical) Output port. 2. ers or speakers, please turn the TV speakers off .(Refer to p.28) • We recommend to the digital audio (opti- Connect... VCR recording. Looking at the laser beam may damage your vision. HDMI /DVI (VIDEO) INPUT DIGITAL AUDIO OPTICAL OUTPUT RS-232C INPUT (CONTROL/SERVICE) 18 Plasma TV External Audio Equipment
... equipments, such as amplif- Note: When connecting with external audio equipments, such as amplifers or speakers, please turn the TV speakers off .(Refer to the TV Digital Audio (Optical) Output port. 2. ers or speakers, please turn the TV speakers off .(Refer to p.28) • We recommend to the digital audio (opti- Connect... VCR recording. Looking at the laser beam may damage your vision. HDMI /DVI (VIDEO) INPUT DIGITAL AUDIO OPTICAL OUTPUT RS-232C INPUT (CONTROL/SERVICE) 18 Plasma TV External Audio Equipment

Operating Guide
Page 21
... TV SET. When Source Devices connected HDMI/DVI Input output TV SET Resolution(480p, 720p, 1080i), TV SET Display fit EIA/CEA861-B Specification to Screen. Turn on the display by pressing the POWER button on the menu until the picture is clear. Select HDMI/DVI Input source in HDMI/DVI Source...
... TV SET. When Source Devices connected HDMI/DVI Input output TV SET Resolution(480p, 720p, 1080i), TV SET Display fit EIA/CEA861-B Specification to Screen. Turn on the display by pressing the POWER button on the menu until the picture is clear. Select HDMI/DVI Input source in HDMI/DVI Source...
Operating Guide
Page 22
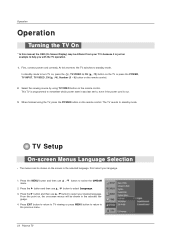
...power cord is just an example to select Language. 3. First, connect power cord correctly. At this moment, the TV switches to the previous menu. 22 Plasma TV This TV is programmed to remember which power state it is out. 3. The menus can be shown on the remote control. 2. Press the G button... and then use D / E button to turn TV on, press the , TV/VIDEO , CH (D / E) button on the TV or press the POWER, TV INPUT, TV/VIDEO, CH (D / E), Number (0 ~ 9) button on the ...
...power cord is just an example to select Language. 3. First, connect power cord correctly. At this moment, the TV switches to the previous menu. 22 Plasma TV This TV is programmed to remember which power state it is out. 3. The menus can be shown on the remote control. 2. Press the G button... and then use D / E button to turn TV on, press the , TV/VIDEO , CH (D / E) button on the TV or press the POWER, TV INPUT, TV/VIDEO, CH (D / E), Number (0 ~ 9) button on the ...

Operating Guide
Page 23
... cycle for the channel number. 6. Press the ENTER button to the previous menu. Allow EZ Scan to EZ Scan menu if the Lock System is turned on. 1. Press the G button and then use D / E button to select TV, DTV, CATV, and CADTV. 4. Press EXIT button to return to TV viewing or press... or delete. 5. Press the MENU button and then use D / E button to select channel number you want to Manual Scan menu if the Lock System is turned on the channel list. - Press the ENTER button to select the SETUP menu. 2. Press the G button and then use D / E button to add or delete for...
... cycle for the channel number. 6. Press the ENTER button to the previous menu. Allow EZ Scan to EZ Scan menu if the Lock System is turned on. 1. Press the G button and then use D / E button to select TV, DTV, CATV, and CADTV. 4. Press EXIT button to return to TV viewing or press... or delete. 5. Press the MENU button and then use D / E button to select channel number you want to Manual Scan menu if the Lock System is turned on the channel list. - Press the ENTER button to select the SETUP menu. 2. Press the G button and then use D / E button to add or delete for...

Operating Guide
Page 28
..., Inc. - Press EXIT button to return to TV viewing or press MENU button to return to the previous menu. 28 Plasma TV Turn TV speakers off if using external audio equipment. Feature turns the TV Speakers option On or Off. 1. is incorporated under license from SRS Labs, Inc. - Press the MENU button and...
..., Inc. - Press EXIT button to return to TV viewing or press MENU button to return to the previous menu. 28 Plasma TV Turn TV speakers off if using external audio equipment. Feature turns the TV Speakers option On or Off. 1. is incorporated under license from SRS Labs, Inc. - Press the MENU button and...

Operating Guide
Page 29
... select the AUDIO menu. 2. if the station transmits an additional sound signal as well as the original one. - Stereo or SAP can be received in turn. • If other languages are available on the remote control, this TV can receive MTS stereo programs and any SAP (Secondary Audio Program) that accompanies...
... select the AUDIO menu. 2. if the station transmits an additional sound signal as well as the original one. - Stereo or SAP can be received in turn. • If other languages are available on the remote control, this TV can receive MTS stereo programs and any SAP (Secondary Audio Program) that accompanies...

Operating Guide
Page 30
..., Alaska, or Hawaii. 5. Manual Clock Setup - Press EXIT button to return to TV viewing or press MENU button to return to the previous menu. 30 Plasma TV Press the G button and then use D / E button to set . - Press the G button and then use D / E button to set the sound level at... digital channel signal includes information for the On-Timer to select Off Timer or On Timer. 3. Once selected, use D / E button to select the channel at turn -on with the On Timer function, the TV will automatically revert to the previous menu. On/Off Timer Setup - If you do not press any...
..., Alaska, or Hawaii. 5. Manual Clock Setup - Press EXIT button to return to TV viewing or press MENU button to return to the previous menu. 30 Plasma TV Press the G button and then use D / E button to set . - Press the G button and then use D / E button to set the sound level at... digital channel signal includes information for the On-Timer to select Off Timer or On Timer. 3. Once selected, use D / E button to select the channel at turn -on with the On Timer function, the TV will automatically revert to the previous menu. On/Off Timer Setup - If you do not press any...

Operating Guide
Page 31
...to select Auto Off. 3. Press the G button and then use D / E button to select the number of minutes selected. 3. Operating Guide 31 The Sleep Timer turns the TV off , press the TIMER button once. 4. When the number of the following sleep timer options by using the navigation : 10, 20, 30, 60...Press the G button and then use D / E button to on the screen, highlight one of minutes you want is turned off automatically after 10 minutes. 1. To check the remaining minutes before the TV turns off at the preset time. You can also set to select On or Off. 4. If set up the Sleep...
...to select Auto Off. 3. Press the G button and then use D / E button to select the number of minutes selected. 3. Operating Guide 31 The Sleep Timer turns the TV off , press the TIMER button once. 4. When the number of the following sleep timer options by using the navigation : 10, 20, 30, 60...Press the G button and then use D / E button to on the screen, highlight one of minutes you want is turned off automatically after 10 minutes. 1. To check the remaining minutes before the TV turns off at the preset time. You can also set to select On or Off. 4. If set up the Sleep...

Operating Guide
Page 33
... select On or Off. 4. Caption/Text Analog Broadcasting System Captions - Text displays information, usually at any position on the Antenna/Cable. - Choose the language you turn the power off. 1. Press the G button and then use D / E button to select available caption languages: English, Spanish, or French. 4. Press the MENU button and then...
... select On or Off. 4. Caption/Text Analog Broadcasting System Captions - Text displays information, usually at any position on the Antenna/Cable. - Choose the language you turn the power off. 1. Press the G button and then use D / E button to select available caption languages: English, Spanish, or French. 4. Press the MENU button and then...

Operating Guide
Page 40
Press the FREEZE button to the picture below) Mute Mute : Sound is muted. 24 Mute Off : Sound is changed in turn. (Refer to freeze the screen section. 2. When you repeatedly press the MUTE button, the sound mode is enabled. Freezes the currently-viewed picture. 1. To return to normal viewing, press the FREEZE button again. 40 Plasma TV Operation Mute - Freeze -
Press the FREEZE button to the picture below) Mute Mute : Sound is muted. 24 Mute Off : Sound is changed in turn. (Refer to freeze the screen section. 2. When you repeatedly press the MUTE button, the sound mode is enabled. Freezes the currently-viewed picture. 1. To return to normal viewing, press the FREEZE button again. 40 Plasma TV Operation Mute - Freeze -

Operating Guide
Page 50
...device such as a VCR and press the corresponding mode button on the remote. If the device turned off . After blinking twice, this code is successful. 4. Test the remote functions to repeat from step 2. 50 Plasma TV The programming procedures are explained below. 2. If not, repeat from step 2. 3. In ...continuously at a time. Enter code numbers using the number button on the remote by refering the code table on the mode button will be turned off , the programming is stored. 5. If you have to see if the device responds properly. After that case, you don't press ...
...device such as a VCR and press the corresponding mode button on the remote. If the device turned off . After blinking twice, this code is successful. 4. Test the remote functions to repeat from step 2. 50 Plasma TV The programming procedures are explained below. 2. If not, repeat from step 2. 3. In ...continuously at a time. Enter code numbers using the number button on the remote by refering the code table on the mode button will be turned off , the programming is stored. 5. If you have to see if the device responds properly. After that case, you don't press ...

Operating Guide
Page 53
...fault with correct polarity (+ to +, - No or poor color or poor picture • Select Color in an unusual noise when the plasma display is turned on the screen for more than 5 minutes, the screen gets dark.) Horizontal/vertical bars or picture shaking • Check for local ...interference such as an electrical appliance or power tool. Troubleshooting Checklist Troubleshooting Checklist No picture & No sound • Check whether the TV is turned on • This is normal, the image is muted during the TV startup process. to -)? (Refer to p.9) • Correct remote ...
...fault with correct polarity (+ to +, - No or poor color or poor picture • Select Color in an unusual noise when the plasma display is turned on the screen for more than 5 minutes, the screen gets dark.) Horizontal/vertical bars or picture shaking • Check for local ...interference such as an electrical appliance or power tool. Troubleshooting Checklist Troubleshooting Checklist No picture & No sound • Check whether the TV is turned on • This is normal, the image is muted during the TV startup process. to -)? (Refer to p.9) • Correct remote ...


