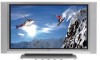

Operating Guide
Page 2
... Inc. 1000 Sylvan Avenue, Englewood Cliffs, NJ 07632 http://www.zenith.com WARNING/CAUTION TO REDUCE THE RISK OF FIRE AND ELECTRIC SHOCK, DO NOT EXPOSE THIS PRODUCT TO RAIN OR MOISTURE. 2 Plasma TV Reorient or relocate the receiving antenna. - The lightning flash with...limits are designed to Part 15 of important operating and maintenance (servicing) instructions in a residential installation. However, there is connected. - COMPLIANCE: The responsible party for a Class B digital device, pursuant to provide reasonable protection against harmful interference in the literature accompanying ...
... Inc. 1000 Sylvan Avenue, Englewood Cliffs, NJ 07632 http://www.zenith.com WARNING/CAUTION TO REDUCE THE RISK OF FIRE AND ELECTRIC SHOCK, DO NOT EXPOSE THIS PRODUCT TO RAIN OR MOISTURE. 2 Plasma TV Reorient or relocate the receiving antenna. - The lightning flash with...limits are designed to Part 15 of important operating and maintenance (servicing) instructions in a residential installation. However, there is connected. - COMPLIANCE: The responsible party for a Class B digital device, pursuant to provide reasonable protection against harmful interference in the literature accompanying ...
Operating Guide
Page 5
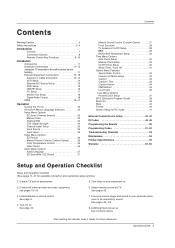
... Instructions 11~12 Joining the TV assembly to the wall to your personal preference or as required by source. Select viewing source for available connection and operational setup options.) 1. See page 22. 7. After reading this manual, keep it handy for future reference. Unpack TV and all...Mute 40 Freeze 40 Screen Setup for PC mode 41 External Control Device Setup 42~47 IR Codes 48~49 Programming the Remote 50 Programming Codes 51~52 Troubleshooting Checklist 53 Maintenance 54 Product Specifications 55 Warranty 59~60 Setup and Operation Checklist Setup and Operation Checklist...
... Instructions 11~12 Joining the TV assembly to the wall to your personal preference or as required by source. Select viewing source for available connection and operational setup options.) 1. See page 22. 7. After reading this manual, keep it handy for future reference. Unpack TV and all...Mute 40 Freeze 40 Screen Setup for PC mode 41 External Control Device Setup 42~47 IR Codes 48~49 Programming the Remote 50 Programming Codes 51~52 Troubleshooting Checklist 53 Maintenance 54 Product Specifications 55 Warranty 59~60 Setup and Operation Checklist Setup and Operation Checklist...
Operating Guide
Page 6
... comprised of locations where conventional TVs will normally occur in a variety of 3 sub pixels, corresponding to produce over 160 degrees. Multimedia Connect your plasma display to install your viewing experience is as pixels, which is the display device of this PDP is less than 5 inches thick. ...160° - Several tiny, minute colored dots visible on the PDP screen The PDP (Plasma Display Panel), which are easily viewable in a theater. Our production technology minimizes these mean that is defective. The PDP can be thought of...
... comprised of locations where conventional TVs will normally occur in a variety of 3 sub pixels, corresponding to produce over 160 degrees. Multimedia Connect your plasma display to install your viewing experience is as pixels, which is the display device of this PDP is less than 5 inches thick. ...160° - Several tiny, minute colored dots visible on the PDP screen The PDP (Plasma Display Panel), which are easily viewable in a theater. Our production technology minimizes these mean that is defective. The PDP can be thought of...

Operating Guide
Page 8
...-theair signals to operate the TV on Control Port the Specifications Connect your page. The Remote voltage is indicated on control here. DC power. 8 Plasma TV RS-232C INPUT (CONTROL/SERVICE) PORT Connect to these jacks. Monitor Output Connect a second TV or Monitor. HDMI /DVI (VIDEO) INPUT DIGITAL AUDIO OPTICAL OUTPUT RS-232C INPUT...
...-theair signals to operate the TV on Control Port the Specifications Connect your page. The Remote voltage is indicated on control here. DC power. 8 Plasma TV RS-232C INPUT (CONTROL/SERVICE) PORT Connect to these jacks. Monitor Output Connect a second TV or Monitor. HDMI /DVI (VIDEO) INPUT DIGITAL AUDIO OPTICAL OUTPUT RS-232C INPUT...

Operating Guide
Page 9
... Video, Component 1-2, RGB-DTV (or RGB-PC) and HDMI/DVI input sources. (Video, Front Video, Component 1-2 input sources are linked automatically, only if these are connected ) RATIO Changes the aspect ratio. Installing Batteries • Open the battery compartment cover on or off automatically. TV INPUT TV/VIDEO MODE DAY - FLASHBK Tunes...
... Video, Component 1-2, RGB-DTV (or RGB-PC) and HDMI/DVI input sources. (Video, Front Video, Component 1-2 input sources are linked automatically, only if these are connected ) RATIO Changes the aspect ratio. Installing Batteries • Open the battery compartment cover on or off automatically. TV INPUT TV/VIDEO MODE DAY - FLASHBK Tunes...

Operating Guide
Page 12
... or on the bottom, and 2" from the wall. Detailed installation instructions are not possible, have a qualified electrician install a separate circuit breaker. GROUNDING Ensure that you connect the earth ground wire to telephone wires, lightening rods, or gas pipes. Installation Installation Instructions • The TV can be mounted horizontally. Desktop Pedestal Installation... in the optional Desktop Stand Installation. 4 inches 4 inches 4 inches 2.36 inches 2 inches To Install on a Desktop Pedestal mount minimum allowableclearances for adequate ventilation. 12 Plasma TV
... or on the bottom, and 2" from the wall. Detailed installation instructions are not possible, have a qualified electrician install a separate circuit breaker. GROUNDING Ensure that you connect the earth ground wire to telephone wires, lightening rods, or gas pipes. Installation Installation Instructions • The TV can be mounted horizontally. Desktop Pedestal Installation... in the optional Desktop Stand Installation. 4 inches 4 inches 4 inches 2.36 inches 2 inches To Install on a Desktop Pedestal mount minimum allowableclearances for adequate ventilation. 12 Plasma TV

Operating Guide
Page 13
...Wall Jack Bronze Wire RF Coaxial Wire (75 ohm) Bronze Wire ANTENNA CABLE Operating Guide 13 Multi-family Dwellings/Apartments (Connect to wall antenna socket) Wall Antenna Socket ANTENNA Bronze Wire CABLE RF Coaxial Wire (75 ohm) VHF Antenna UHF Antenna...Turn clockwise to bend the bronze wire when connecting the antenna. 2. Outdoor Antenna Single-family Dwellings /Houses (Connect to wall jack for outdoor antenna) Bronze Wire Be careful not to tighten. External Equipment Connections Installation Antenna or Cable Connection 1. For optimum picture quality, adjust antenna...
...Wall Jack Bronze Wire RF Coaxial Wire (75 ohm) Bronze Wire ANTENNA CABLE Operating Guide 13 Multi-family Dwellings/Apartments (Connect to wall antenna socket) Wall Antenna Socket ANTENNA Bronze Wire CABLE RF Coaxial Wire (75 ohm) VHF Antenna UHF Antenna...Turn clockwise to bend the bronze wire when connecting the antenna. 2. Outdoor Antenna Single-family Dwellings /Houses (Connect to wall jack for outdoor antenna) Bronze Wire Be careful not to tighten. External Equipment Connections Installation Antenna or Cable Connection 1. For optimum picture quality, adjust antenna...

Operating Guide
Page 14
...signal amplifier and install properly. • If the antenna needs to be split for Video, Front Video and Component 1-2. When connecting the TV to the Video input. 2. compared to connecting a regular VCR to VCR, match the jack colors (Video = yellow, Audio Left = white, and Audio Right = red...AUDIO INPUT ANT IN S-VIDEO OUT OUTPUT (R) AUDIO (L) SWITCH 3 4 IN VIDEO VCR Rear REM CON 14 Plasma TV Note that RGB and HDMI/DVI sources are connected. Do not connect to the same channel number. Installation 3. Signal Amplifier • If the antenna is used; Use the ISM Method...
...signal amplifier and install properly. • If the antenna needs to be split for Video, Front Video and Component 1-2. When connecting the TV to the Video input. 2. compared to connecting a regular VCR to VCR, match the jack colors (Video = yellow, Audio Left = white, and Audio Right = red...AUDIO INPUT ANT IN S-VIDEO OUT OUTPUT (R) AUDIO (L) SWITCH 3 4 IN VIDEO VCR Rear REM CON 14 Plasma TV Note that RGB and HDMI/DVI sources are connected. Do not connect to the same channel number. Installation 3. Signal Amplifier • If the antenna is used; Use the ISM Method...

Operating Guide
Page 15
...Operating Guide 15 Component ports on the TV Y PB PR Video output ports on the remote control to select Component 1 or Component 2. (If connected to S-VIDEO, select the Video or Front Video external input source.) 3. Turn on the TV, as shown in the figure. Operate the ...corresponding external equipment. When connecting the TV to external equipment, match the jack colors (Video = yellow, Audio Left = white, and Audio Right = red). If your DVD player...
...Operating Guide 15 Component ports on the TV Y PB PR Video output ports on the remote control to select Component 1 or Component 2. (If connected to S-VIDEO, select the Video or Front Video external input source.) 3. Turn on the TV, as shown in the figure. Operate the ...corresponding external equipment. When connecting the TV to external equipment, match the jack colors (Video = yellow, Audio Left = white, and Audio Right = red). If your DVD player...

Operating Guide
Page 16
... -top box.) 2. Use TV/VIDEO on the remote control to use 1. This TV supports HDCP (High-bandwidth Digital Contents Protection) protocol for video connections, depending on the digital set-top box. (Refer to the owner's manual for the digital set -top box or other digital external device, refer ...(Y, PB, PR) INPUT, RGB or HDMI/DVI jack for Digital Contents (480p,720p,1080i). Then, make the corresponding audio connections. Signal 480i 480p 720p 1080i Component 1/2 Yes Yes Yes Yes RGB-DTV , HDMI/DVI No Yes Yes Yes 16 Plasma TV Installation HDSTB Setup - Turn on your set -top box.
... -top box.) 2. Use TV/VIDEO on the remote control to use 1. This TV supports HDCP (High-bandwidth Digital Contents Protection) protocol for video connections, depending on the digital set-top box. (Refer to the owner's manual for the digital set -top box or other digital external device, refer ...(Y, PB, PR) INPUT, RGB or HDMI/DVI jack for Digital Contents (480p,720p,1080i). Then, make the corresponding audio connections. Signal 480i 480p 720p 1080i Component 1/2 Yes Yes Yes Yes RGB-DTV , HDMI/DVI No Yes Yes Yes 16 Plasma TV Installation HDSTB Setup - Turn on your set -top box.

Operating Guide
Page 17
... graphic card can not be changed , change the PC graphic card or consult the manufacturer of the PC) has an analog audio output connector, connect the PC's audio output to -DVI cable(not supplied with the resolution, vertical pattern, contrast or brightness in PC mode. Monitor Display Specifications (... consult the manufacturer of RGB INPUT port. How To Use 1. Installation PC Setup - There may be noise associated with this product). 2. How to connect 1. Connect the PC to RGB INPUT port of this TV with an HDMI-to RGB/DVI AUDIO INPUT port located on the PC graphic card, change...
... graphic card can not be changed , change the PC graphic card or consult the manufacturer of the PC) has an analog audio output connector, connect the PC's audio output to -DVI cable(not supplied with the resolution, vertical pattern, contrast or brightness in PC mode. Monitor Display Specifications (... consult the manufacturer of RGB INPUT port. How To Use 1. Installation PC Setup - There may be noise associated with this product). 2. How to connect 1. Connect the PC to RGB INPUT port of this TV with an HDMI-to RGB/DVI AUDIO INPUT port located on the PC graphic card, change...

Operating Guide
Page 18
... OUTPUT. S-VIDEO IN VIDEO (L) AUDIO (R) Second TV or monitor Digital Audio Output Send the TV's audio to the digital audio (opti- Connect the other end of the optical cable to external audio equipment (stereo system) via the Digital Audio Output (Optical) port. Note: When... at the laser beam may damage your vision. HDMI /DVI (VIDEO) INPUT DIGITAL AUDIO OPTICAL OUTPUT RS-232C INPUT (CONTROL/SERVICE) 18 Plasma TV External Audio Equipment Installation Monitor Display Specifications (HDMI/DVI Mode) Resolution 640x480 800x600 Horizontal Vertical Frequency(KHz) Frequency(Hz) 31.469 37....
... OUTPUT. S-VIDEO IN VIDEO (L) AUDIO (R) Second TV or monitor Digital Audio Output Send the TV's audio to the digital audio (opti- Connect the other end of the optical cable to external audio equipment (stereo system) via the Digital Audio Output (Optical) port. Note: When... at the laser beam may damage your vision. HDMI /DVI (VIDEO) INPUT DIGITAL AUDIO OPTICAL OUTPUT RS-232C INPUT (CONTROL/SERVICE) 18 Plasma TV External Audio Equipment Installation Monitor Display Specifications (HDMI/DVI Mode) Resolution 640x480 800x600 Horizontal Vertical Frequency(KHz) Frequency(Hz) 31.469 37....

Operating Guide
Page 19
...device to HDMI/DVI port of the source device will be automatically set to set the output resolution appropriately. Operating Guide 19 HDMI Installation - Connect the source device to 1280x720p. - If the source device does not support Auto HDMI, you need to P.25) TV/VIDEO button is also...the output resolution of the source device will be automatically set the output resolution appropriately. If the source device has an analog audio output connector, connect the PC's audio output to 1024x768, 60Hz. - How To Use - To get the best picture quality, adjust the DVD Player or Set...
...device to HDMI/DVI port of the source device will be automatically set to set the output resolution appropriately. Operating Guide 19 HDMI Installation - Connect the source device to 1280x720p. - If the source device does not support Auto HDMI, you need to P.25) TV/VIDEO button is also...the output resolution of the source device will be automatically set the output resolution appropriately. If the source device has an analog audio output connector, connect the PC's audio output to 1024x768, 60Hz. - How To Use - To get the best picture quality, adjust the DVD Player or Set...

Operating Guide
Page 21
... Devices or contact your TV SET. Installation How to use a HDMI to DVI Cable. - As shown the lower picture, press the ADJUST button to Screen. Connect the HDMI/DVI Source Devices(DVD Player or Set Top Box or PC) and the TV SET. 2. Turn on the display by pressing the POWER... the screen. ed on the TV SET screen for a long period of TV SET and contact an PC graphics card service center. - When Source Devices connected HDMI/DVI Input output TV SET Resolution(480p, 720p, 1080i), TV SET Display fit EIA/CEA861-B Specification to adjust the screen Position of time. In...
... Devices or contact your TV SET. Installation How to use a HDMI to DVI Cable. - As shown the lower picture, press the ADJUST button to Screen. Connect the HDMI/DVI Source Devices(DVD Player or Set Top Box or PC) and the TV SET. 2. Turn on the display by pressing the POWER... the screen. ed on the TV SET screen for a long period of TV SET and contact an PC graphics card service center. - When Source Devices connected HDMI/DVI Input output TV SET Resolution(480p, 720p, 1080i), TV SET Display fit EIA/CEA861-B Specification to adjust the screen Position of time. In...
Operating Guide
Page 22
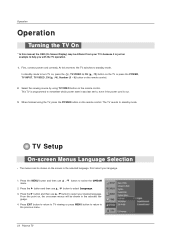
... on, the on the remote control. From this moment, the TV switches to select Language. 3. First, connect power cord correctly. First select your TV's because it was last set to the previous menu. 22 Plasma TV Press EXIT button to return to TV viewing or press MENU button to return to , even...
... on, the on the remote control. From this moment, the TV switches to select Language. 3. First, connect power cord correctly. First select your TV's because it was last set to the previous menu. 22 Plasma TV Press EXIT button to return to TV viewing or press MENU button to return to , even...

Operating Guide
Page 23
...-the-air) TV signal CATV: analog cable TV signal CADTV: digital cable TV signal Operating Guide 23 Run EZ Scan again after any Antenna/Cable connection changes. - A password is required to gain access to add or delete for ANTENNA, and CABLE. Notes: • This channel number is a physical channel number, which...
...-the-air) TV signal CATV: analog cable TV signal CADTV: digital cable TV signal Operating Guide 23 Run EZ Scan again after any Antenna/Cable connection changes. - A password is required to gain access to add or delete for ANTENNA, and CABLE. Notes: • This channel number is a physical channel number, which...

Operating Guide
Page 25
... use D / E button to your TV. 1. Use D / E / F / G button to select the appropriate label for your TV, cable TV, VCR, DVD, or any other devices that are connected to select the source: Antenna, Cable, Video, Front Video, Component1, Component2, RGB-DTV (or RGB-PC), HDMI/DVI. 4. Change the picture source so you press...
... use D / E button to your TV. 1. Use D / E / F / G button to select the appropriate label for your TV, cable TV, VCR, DVD, or any other devices that are connected to select the source: Antenna, Cable, Video, Front Video, Component1, Component2, RGB-DTV (or RGB-PC), HDMI/DVI. 4. Change the picture source so you press...

Operating Guide
Page 41
Position : Adjust the screen position. Adjustment for PC mode Operation • When RGB connect to PC input and select the RGB-PC, this function is used . • When HDMI/DVI connect to PC input and checking the screen quality. - Size : Adjust the screen size. - After displaying the Adjust, select the ...phase of Pixel clock. In HDMI/DVI-PC mode, PHASE is not available. - Screen Setup for screen Position, Size, Phase, Reset •After connecting RGB-PC or HDMI/DVI to PC input and select HDMI/DVI input, this function is used . • In RGB-DTV mode, SIZE and PHASE...
Position : Adjust the screen position. Adjustment for PC mode Operation • When RGB connect to PC input and select the RGB-PC, this function is used . • When HDMI/DVI connect to PC input and checking the screen quality. - Size : Adjust the screen size. - After displaying the Adjust, select the ...phase of Pixel clock. In HDMI/DVI-PC mode, PHASE is not available. - Screen Setup for screen Position, Size, Phase, Reset •After connecting RGB-PC or HDMI/DVI to PC input and select HDMI/DVI input, this function is used . • In RGB-DTV mode, SIZE and PHASE...

Operating Guide
Page 42
... REMOTE CONTROL RGB INPUT AC INPUT PC Type of the control device to the RS-232C jack on the Monitor back panel. - Pin Name 1 No connection 2 RXD (Receive data) 3 TXD (Transmit data) 4 DTR (DTE side ready) 5 GND 6 DSR (DCE side ready) 7 RTS (Ready to send) 8 CTS...Monitor. D-Sub 9-Pin Male No. Connect the serial port of Connector; Connect the RS-232C input jack to send) 9 No Connection RS-232C Configurations 7-Wire Configurations (Standard RS-232C cable) PC PDP RXD 2 TXD 3 GND 5 DTR 4 DSR 6 RTS 7 CTS 8 3 TXD 2 RXD 5 GND 6 DSR 4 DTR 8 CTS 7 RTS D-Sub 9 42 Plasma TV D-Sub 9 1 5 9...
... REMOTE CONTROL RGB INPUT AC INPUT PC Type of the control device to the RS-232C jack on the Monitor back panel. - Pin Name 1 No connection 2 RXD (Receive data) 3 TXD (Transmit data) 4 DTR (DTE side ready) 5 GND 6 DSR (DCE side ready) 7 RTS (Ready to send) 8 CTS...Monitor. D-Sub 9-Pin Male No. Connect the serial port of Connector; Connect the RS-232C input jack to send) 9 No Connection RS-232C Configurations 7-Wire Configurations (Standard RS-232C cable) PC PDP RXD 2 TXD 3 GND 5 DTR 4 DSR 6 RTS 7 CTS 8 3 TXD 2 RXD 5 GND 6 DSR 4 DTR 8 CTS 7 RTS D-Sub 9 42 Plasma TV D-Sub 9 1 5 9...
Operating Guide
Page 43
... use D / E button to p.46) q 0 ~ 1 r 1 ~ FE s 1 ~3 * This data will be explained in Setup menu. The adjustment range of the PC computer. When selecting Set ID '0', every connected the TV is 1 ~ 99. 4. If the data is data write mode, it indicates present status data. COMMAND 1 MAND 2 DATA 0 (Hexadecimal) DATA 1 (Hexadecimal) DATA 2 DATA 3 DATA...
... use D / E button to p.46) q 0 ~ 1 r 1 ~ FE s 1 ~3 * This data will be explained in Setup menu. The adjustment range of the PC computer. When selecting Set ID '0', every connected the TV is 1 ~ 99. 4. If the data is data write mode, it indicates present status data. COMMAND 1 MAND 2 DATA 0 (Hexadecimal) DATA 1 (Hexadecimal) DATA 2 DATA 3 DATA...