Operation Guide
Page 4
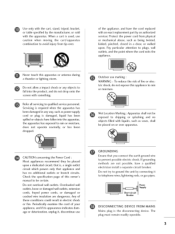
... attention to qualified service personnel. that is damaged, liquid has been spilled or objects have fallen into the product, and do not expose this owner's manual to avoid injury from physical or mechanical abuse, such as being twisted, kinked, pinched, closed in electric shock or fire. Periodically examine the cord of...
... attention to qualified service personnel. that is damaged, liquid has been spilled or objects have fallen into the product, and do not expose this owner's manual to avoid injury from physical or mechanical abuse, such as being twisted, kinked, pinched, closed in electric shock or fire. Periodically examine the cord of...

Operation Guide
Page 5
...User Mode 48 Balance 49 Stereo/SAP Broadcasts Setup 50 Audio Language 51 On-Screen Menus Language Selection 52 Caption Mode 53 - Add / Delete Channel (Manual Tuning) ...... 33 - Picture Mode - Color Tone - Digital Broadcasting System Captions ........ 55 - Channel Editing 34 Key Lock 35 Picture Size (Aspect... Low-Power Picture Mode 45 Picture Reset 46 Preset Sound Setting (Sound Mode 47 Sound Setting Adjustment - Preset 39 Manual Picture Adjustment - Color Tone - Auto Scan (Auto Tuning 32 - User Mode 41 Digital Booster 42 Advanced - Caption Option 56 4
...User Mode 48 Balance 49 Stereo/SAP Broadcasts Setup 50 Audio Language 51 On-Screen Menus Language Selection 52 Caption Mode 53 - Add / Delete Channel (Manual Tuning) ...... 33 - Picture Mode - Color Tone - Digital Broadcasting System Captions ........ 55 - Channel Editing 34 Key Lock 35 Picture Size (Aspect... Low-Power Picture Mode 45 Picture Reset 46 Preset Sound Setting (Sound Mode 47 Sound Setting Adjustment - Preset 39 Manual Picture Adjustment - Color Tone - Auto Scan (Auto Tuning 32 - User Mode 41 Digital Booster 42 Advanced - Caption Option 56 4
Operation Guide
Page 6
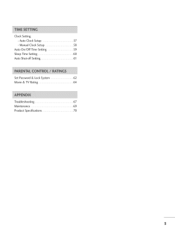
Clock Setting - Manual Clock Setup 58 Auto On/Off Time Setting 59 Sleep Time Setting 60 Auto Shut-off Setting 61 Set Password & Lock System 62 Movie & TV Rating 64 Troubleshooting 67 Maintenance 69 Product Specifications 70 5 Auto Clock Setup 57 -
Clock Setting - Manual Clock Setup 58 Auto On/Off Time Setting 59 Sleep Time Setting 60 Auto Shut-off Setting 61 Set Password & Lock System 62 Movie & TV Rating 64 Troubleshooting 67 Maintenance 69 Product Specifications 70 5 Auto Clock Setup 57 -
Operation Guide
Page 8
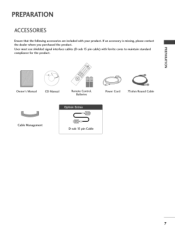
If an accessory is missing, please contact the dealer where you purchased the product. -O User must use shielded signal interface cables (D-sub 15 pin cable) with your product. PREPA ACCESSORIES Ensure that the following accessories are included with ferrite cores to maintain standard _o compliance for the product. _o © z Owner's Manual CD Manual Remote Control, Batteries Power Cord 75ohm Round Cable Cable Management D-sub 15 pin Cable 7
If an accessory is missing, please contact the dealer where you purchased the product. -O User must use shielded signal interface cables (D-sub 15 pin cable) with your product. PREPA ACCESSORIES Ensure that the following accessories are included with ferrite cores to maintain standard _o compliance for the product. _o © z Owner's Manual CD Manual Remote Control, Batteries Power Cord 75ohm Round Cable Cable Management D-sub 15 pin Cable 7

Operation Guide
Page 18
... VIDEO jacks on the set. 2. operation) Select Component input source by using the INPUT button on the digital set-top box. (Refer to the owner's manual for the digital set . However, if you have finished connecting all equipment. Y, CB/PB, CR/PR Yes Yes Yes Yes Yes No Yes Yes Yes...
... VIDEO jacks on the set. 2. operation) Select Component input source by using the INPUT button on the digital set-top box. (Refer to the owner's manual for the digital set . However, if you have finished connecting all equipment. Y, CB/PB, CR/PR Yes Yes Yes Yes Yes No Yes Yes Yes...
Operation Guide
Page 19
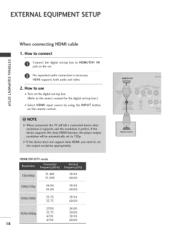
How to HDMI/DVI IN m jack on the set. HDMI/DVI-DTV mode 51.469 51.500 45.00 33.72 33.75 27.00 33.75 67.43 67.50 18 59.94 60.00 60.00 59.94 60.00 24.00 30.00 59.94 60.00 z m No separated audio connection is necessary. _D HDMI supports both audio and video. How to connect m x Connect the digital set -top box. m (Refer to the owner's manual for the digital set-top box.) c -O Select HDMI input source by using the INPUT button on the digital set -top box to use m z Turn on the remote control. c 2. EXTERNAL EQUIPMENT When connecting HDM[ cable 1.
How to HDMI/DVI IN m jack on the set. HDMI/DVI-DTV mode 51.469 51.500 45.00 33.72 33.75 27.00 33.75 67.43 67.50 18 59.94 60.00 60.00 59.94 60.00 24.00 30.00 59.94 60.00 z m No separated audio connection is necessary. _D HDMI supports both audio and video. How to connect m x Connect the digital set -top box. m (Refer to the owner's manual for the digital set-top box.) c -O Select HDMI input source by using the INPUT button on the digital set -top box to use m z Turn on the remote control. c 2. EXTERNAL EQUIPMENT When connecting HDM[ cable 1.

Operation Guide
Page 20
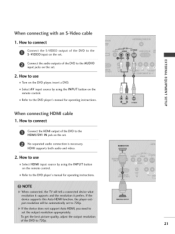
How to use 01T_urn on the digital set-top box. (Refer to the AUDIO IN (RGB/DVI) jack on the remote control. 19 Connect the audio output of the digital set-top box to the HDMI/DVI IN jack on the set -top box to the owner's manual for the digital set-top box.) 01S_elect HDMI input source by using the INPUT button on the set. 2. How to DVi cable m x m _o z m XZ) c m z m c 1. When connecting HDM[ to connect Connect the DVI output of the digital set .
How to use 01T_urn on the digital set-top box. (Refer to the AUDIO IN (RGB/DVI) jack on the remote control. 19 Connect the audio output of the digital set-top box to the HDMI/DVI IN jack on the set -top box to the owner's manual for the digital set-top box.) 01S_elect HDMI input source by using the INPUT button on the set. 2. How to DVi cable m x m _o z m XZ) c m z m c 1. When connecting HDM[ to connect Connect the DVI output of the digital set .

Operation Guide
Page 21
... quality, connect a DVD player to the COMPONENT IN AUDIO jacks on the set . m XD c Connect the audio outputs of the DVD to the DVD player's manual for operating instructions. How to use c -O 01_Turn on the DVD player, insert a DVD. 01_Select Component input source by using the INPUT button on the remote...
... quality, connect a DVD player to the COMPONENT IN AUDIO jacks on the set . m XD c Connect the audio outputs of the DVD to the DVD player's manual for operating instructions. How to use c -O 01_Turn on the DVD player, insert a DVD. 01_Select Component input source by using the INPUT button on the remote...
Operation Guide
Page 22
.... _o z _> 2. immRel fer to the AUDIO x input jacks on the set . How to connect Connect the S-VIDEO output of the DVD to the DVD player's manual for operating instructions. How to use 01_Select HDMI input source by using the INPUT button on the remote control. How to use XD Turn on... connecting HDM[ cable 1. z Refer to the S-VIDEO input on the DVD player, insert a DVD. Connect the audio outputs of the DVD to the DVD player's manual for operating instructions.
.... _o z _> 2. immRel fer to the AUDIO x input jacks on the set . How to connect Connect the S-VIDEO output of the DVD to the DVD player's manual for operating instructions. How to use 01_Select HDMI input source by using the INPUT button on the remote control. How to use XD Turn on... connecting HDM[ cable 1. z Refer to the S-VIDEO input on the DVD player, insert a DVD. Connect the audio outputs of the DVD to the DVD player's manual for operating instructions.
Operation Guide
Page 23
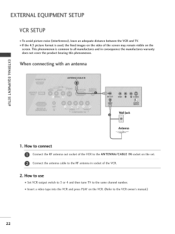
... product bearing this phenomenon. the fixed images on the sides of the VCR to the ANTENNA/CABLE 0 Connect the antenna cable to the VCR owner's manual.) 22
... product bearing this phenomenon. the fixed images on the sides of the VCR to the ANTENNA/CABLE 0 Connect the antenna cable to the VCR owner's manual.) 22

Operation Guide
Page 24
How to use z m 01I_nsert a video tape into the VCR and press PLAY on the VCR. (Refer to the VCR owner's manual.) 01_Select AV input source by using the INPUT button on the set . Match the jack colors (Video = yellow, Audio Left = white, and Audio Right = red) m X m 2. ... the AUDIO input jacks on the remote control. When connecting with an S-Video cable 1. Connect the audio outputs of the VCR to the VCR owner's manual.) C 01S_elect AV input source by using the INPUT button on the set . 2.
How to use z m 01I_nsert a video tape into the VCR and press PLAY on the VCR. (Refer to the VCR owner's manual.) 01_Select AV input source by using the INPUT button on the set . Match the jack colors (Video = yellow, Audio Left = white, and Audio Right = red) m X m 2. ... the AUDIO input jacks on the remote control. When connecting with an S-Video cable 1. Connect the audio outputs of the VCR to the VCR owner's manual.) C 01S_elect AV input source by using the INPUT button on the set . 2.

Operation Guide
Page 32
Press the • button and then use • or • button to display the available menus. SETUP _h PICTURE -r" Z < N I > z z fT1 N © Z © LOCK For USA For Canada AUDIO OPTION TIME _m 31 Press the MENU button and then use • • _1 • button to select the each menu. ON-SCREEN MENUS SELECTION Your TV's OSD (On Screen Display) may differ slightly from what is shown in this manual.
Press the • button and then use • or • button to display the available menus. SETUP _h PICTURE -r" Z < N I > z z fT1 N © Z © LOCK For USA For Canada AUDIO OPTION TIME _m 31 Press the MENU button and then use • • _1 • button to select the each menu. ON-SCREEN MENUS SELECTION Your TV's OSD (On Screen Display) may differ slightly from what is shown in this manual.

Operation Guide
Page 34
... • or • button to select channel you can view the on-screen signal strength monitor to Manual Tuning menu if the Lock System is turned on. Pserelescst thMean•ualbutTtounninagn. Add/Delete Channel (Manual Tuning) A password is required to gain access to see the quality of the signal being received. If...
... • or • button to select channel you can view the on-screen signal strength monitor to Manual Tuning menu if the Lock System is turned on. Pserelescst thMean•ualbutTtounninagn. Add/Delete Channel (Manual Tuning) A password is required to gain access to see the quality of the signal being received. If...

Operation Guide
Page 41
... • or • button to select User. "0 N Press the MENU button and then use • or • button to © select Picture Mode. PICTURE CONTROL MANUAL PICTURE ADJUSTMENT Picture Mode - N © Z Press the • button and then use • or • button C to make appropriate adjustments.
... • or • button to select User. "0 N Press the MENU button and then use • or • button to © select Picture Mode. PICTURE CONTROL MANUAL PICTURE ADJUSTMENT Picture Mode - N © Z Press the • button and then use • or • button C to make appropriate adjustments.

Operation Guide
Page 43
... selecting the Manual, you can adjust the DB Contrast, DB Color and DB Noise. Press the EXIT button to return to TV viewing or press the BACK button to return to select the PICTURE menu. When selecting Picture Mode options (Dynamic, Standard, and Mild), DB is Zenith's unique picture... improving technology to select Auto or Manual. N © Z _D Press the • button and then use • or • button to display a real HD source ...
... selecting the Manual, you can adjust the DB Contrast, DB Color and DB Noise. Press the EXIT button to return to TV viewing or press the BACK button to return to select the PICTURE menu. When selecting Picture Mode options (Dynamic, Standard, and Mild), DB is Zenith's unique picture... improving technology to select Auto or Manual. N © Z _D Press the • button and then use • or • button to display a real HD source ...

Operation Guide
Page 58
... Auto, Off, On, depending on whether or not your viewing area time zone: Eastern, Mountain, Pacific, Alaska or Hawaii. m @ rT1 z C_ @0 @@ 57 Set the clock manually if the current time is set incorrectly by the broadcasting station. The digital channel signal includes information for the current time provided by the auto...
... Auto, Off, On, depending on whether or not your viewing area time zone: Eastern, Mountain, Pacific, Alaska or Hawaii. m @ rT1 z C_ @0 @@ 57 Set the clock manually if the current time is set incorrectly by the broadcasting station. The digital channel signal includes information for the current time provided by the auto...
Operation Guide
Page 59
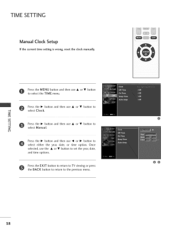
... Setup If the current time setting is wrong, reset the clock manually. c_ Press the • button and then use • or • button to select either the year, date, or time option. Press the EXIT button ...; button to set the year, date, and time options. r_ r_ 0 Press the • button and then use the • or • button to z select Manual. Press the • button and then use • or • button to the previous menu. 58 @ @@
... Setup If the current time setting is wrong, reset the clock manually. c_ Press the • button and then use • or • button to select either the year, date, or time option. Press the EXIT button ...; button to set the year, date, and time options. r_ r_ 0 Press the • button and then use the • or • button to z select Manual. Press the • button and then use • or • button to the previous menu. 58 @ @@

Operation Guide
Page 67
...; button to the previous menu. @ _D m z @ N O Based on rating table, your TV's OSD (On z Screen Display] may differ slightly from what is shown in this manual. _D O _D z 66
...; button to the previous menu. @ _D m z @ N O Based on rating table, your TV's OSD (On z Screen Display] may differ slightly from what is shown in this manual. _D O _D z 66


