
YSV104_Owners Manual_EN
Page 2
... of the Yamaha Cor- SRT Powered system simulates the natural sound and resonance of an acoustic violin by using samples that you keep it in the position of the player's ears. Contents PRECAUTIONS 3 Main Unit / Accessories 5 Parts Diagram: Main Unit 6 Parts Diagram: Control Box 8 Installing/Replacing batteries 10 About the Auto power off function 10 Tuning and Changing the Strings 11 The Shoulder Rest 13 Specifications 14 EN...
... of the Yamaha Cor- SRT Powered system simulates the natural sound and resonance of an acoustic violin by using samples that you keep it in the position of the player's ears. Contents PRECAUTIONS 3 Main Unit / Accessories 5 Parts Diagram: Main Unit 6 Parts Diagram: Control Box 8 Installing/Replacing batteries 10 About the Auto power off function 10 Tuning and Changing the Strings 11 The Shoulder Rest 13 Specifications 14 EN...
YSV104_Owners Manual_EN
Page 3
... symbols are therefore the owners responsibility. You should not be at the time of the following measures: Relocate either alone or in combination with both user safe and environmentally friendly. This product, when installed as indicated in the instructions contained in the ears, you can be used electrical and electronic products and batteries should record the model number, serial number, and the date of...
... symbols are therefore the owners responsibility. You should not be at the time of the following measures: Relocate either alone or in combination with both user safe and environmentally friendly. This product, when installed as indicated in the instructions contained in the ears, you can be used electrical and electronic products and batteries should record the model number, serial number, and the date of...
YSV104_Owners Manual_EN
Page 4
... the same type, same model, and made by Yamaha service personnel. - Keep the batteries separate from the instrument. EN 3 Use the specified battery type (page 14) only. - Use new batteries, all batteries from metallic objects such as necklaces, hairpins, coins, and keys. - Always make sure all batteries are not limited to rain, use of the instrument. PRECAUTIONS PLEASE READ CAREFULLY BEFORE PROCEEDING Please keep this manual in a safe...
... the same type, same model, and made by Yamaha service personnel. - Keep the batteries separate from the instrument. EN 3 Use the specified battery type (page 14) only. - Use new batteries, all batteries from metallic objects such as necklaces, hairpins, coins, and keys. - Always make sure all batteries are not limited to rain, use of the instrument. PRECAUTIONS PLEASE READ CAREFULLY BEFORE PROCEEDING Please keep this manual in a safe...
YSV104_Owners Manual_EN
Page 5
... use the instrument for all volume levels to minimum. Before turning the power on or off the power for a long period of physical injury to you experience any hearing loss or ringing in the ears, consult a physician. • If cleaning is required, wipe with others and/or objects while playing the instrument. • Make sure to discard used batteries according to local...
... use the instrument for all volume levels to minimum. Before turning the power on or off the power for a long period of physical injury to you experience any hearing loss or ringing in the ears, consult a physician. • If cleaning is required, wipe with others and/or objects while playing the instrument. • Make sure to discard used batteries according to local...
YSV104_Owners Manual_EN
Page 6
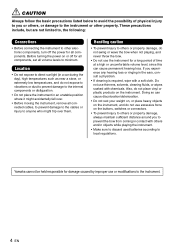
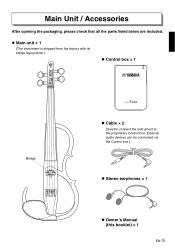
Main Unit / Accessories After opening the packaging, please check that all the parts listed below are included. Main unit × 1 (The instrument is shipped from the factory with its bridge laying down.) Control box × 1 Bridge Cable × 2 (Used to connect the instrument to the proprietary Control box. External audio devices can be connected via the Control box.) Stereo earphones × 1 Owner's Manual (this booklet) × 1 EN 5
Main Unit / Accessories After opening the packaging, please check that all the parts listed below are included. Main unit × 1 (The instrument is shipped from the factory with its bridge laying down.) Control box × 1 Bridge Cable × 2 (Used to connect the instrument to the proprietary Control box. External audio devices can be connected via the Control box.) Stereo earphones × 1 Owner's Manual (this booklet) × 1 EN 5

YSV104_Owners Manual_EN
Page 7
Front Parts Diagram: Main Unit Rear Tuning peg Nut Fingerboard Neck 4th string (G) 3rd string (D) 2nd string (A) 1st string (E) Neck Frame Body Bridge Adjuster q Volume control (instrument) w Jack (connect to Control box) Chin rest Tailpiece Shoulder rest 6 EN
Front Parts Diagram: Main Unit Rear Tuning peg Nut Fingerboard Neck 4th string (G) 3rd string (D) 2nd string (A) 1st string (E) Neck Frame Body Bridge Adjuster q Volume control (instrument) w Jack (connect to Control box) Chin rest Tailpiece Shoulder rest 6 EN
YSV104_Owners Manual_EN
Page 8
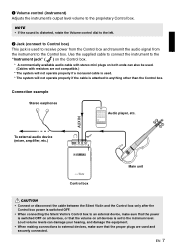
... instrument to the "Instrument jack" ( ) on the Control box. * A commercially available audio cable with stereo mini plugs on both ends can damage your hearing, and damage the equipment. • When making connections to the proprietary Control box. Loud volume levels can also be used. (Cables with resistors are used . * The system will not operate properly if the cable is set to anything other than the Control box. q Volume control (instrument) Adjusts the instrument's output...
... instrument to the "Instrument jack" ( ) on the Control box. * A commercially available audio cable with stereo mini plugs on both ends can damage your hearing, and damage the equipment. • When making connections to the proprietary Control box. Loud volume levels can also be used. (Cables with resistors are used . * The system will not operate properly if the cable is set to anything other than the Control box. q Volume control (instrument) Adjusts the instrument's output...
YSV104_Owners Manual_EN
Page 9
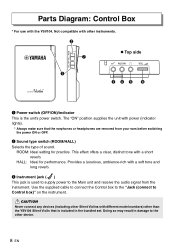
... reverb. Use the supplied cable to connect the Control box to the "Jack (connect to the other device. 8 EN CAUTION Never connect any devices (including other Silent Violins with power (indicator lights). * Always make sure that is included in damage to Control box)" on the instrument. w Sound type switch (ROOM/HALL) Selects the type of sound. Not compatible with the YSV104. HALL: Ideal for practice. e Instrument jack ( ) This jack is the unit's power switch. Parts Diagram: Control Box...
... reverb. Use the supplied cable to connect the Control box to the "Jack (connect to the other device. 8 EN CAUTION Never connect any devices (including other Silent Violins with power (indicator lights). * Always make sure that is included in damage to Control box)" on the instrument. w Sound type switch (ROOM/HALL) Selects the type of sound. Not compatible with the YSV104. HALL: Ideal for practice. e Instrument jack ( ) This jack is the unit's power switch. Parts Diagram: Control Box...

YSV104_Owners Manual_EN
Page 10
... jack" ( ). When connecting other such device to the AUX IN jack for use with audio from the stereo output, especially when recording. (When connecting the instrument's stereo output to the mono input on an external audio device, only the L channel signal is ON, or the unit experiencing a strong shock may cause a loud noise that supplies power to the connected device (plug-in-power, phantom power, etc.). y Volume control (VOL) Controls the volume level of stereo earphones or headphones...
... jack" ( ). When connecting other such device to the AUX IN jack for use with audio from the stereo output, especially when recording. (When connecting the instrument's stereo output to the mono input on an external audio device, only the L channel signal is ON, or the unit experiencing a strong shock may cause a loud noise that supplies power to the connected device (plug-in-power, phantom power, etc.). y Volume control (VOL) Controls the volume level of stereo earphones or headphones...
YSV104_Owners Manual_EN
Page 11
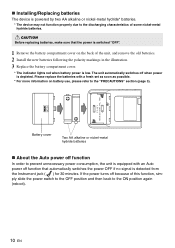
Please replace the batteries with an Auto power off because of some nickel-metal hydride batteries. If the power turns off function that the power is switched "OFF". 1 Remove the battery compartment cover on battery use, please refer to the ON position again (reboot). 10 EN The unit automatically switches off when power is detected from the Instrument jack ( ) for 30 minutes. Battery cover Two AA alkaline or...
Please replace the batteries with an Auto power off because of some nickel-metal hydride batteries. If the power turns off function that the power is switched "OFF". 1 Remove the battery compartment cover on battery use, please refer to the ON position again (reboot). 10 EN The unit automatically switches off when power is detected from the Instrument jack ( ) for 30 minutes. Battery cover Two AA alkaline or...
YSV104_Owners Manual_EN
Page 12
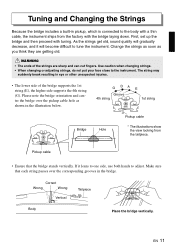
... 4th string E 1st string Hole Pickup cable * The illustrations show the view looking from the factory with the bridge laying down. Please note the bridge orientation and center the bridge over the corresponding grooves in the bridge. Use caution when changing strings. • When changing or adjusting strings, do not put your face close to tune the instrument. Make sure that the bridge stands vertically...
... 4th string E 1st string Hole Pickup cable * The illustrations show the view looking from the factory with the bridge laying down. Please note the bridge orientation and center the bridge over the corresponding grooves in the bridge. Use caution when changing strings. • When changing or adjusting strings, do not put your face close to tune the instrument. Make sure that the bridge stands vertically...

YSV104_Owners Manual_EN
Page 13
... time, loosen the strings until the pitch drops a whole tone. • Before using the instrument, make sure that the bridge is positioned vertically. Even if the bridge is standing vertically before tuning, it leans in place when tuning the instrument. Don't loosen too much. • When the instrument is too loose, it stands vertically. Use a piano, tuning fork, or tuner as reference when tuning the instrument. • Finally, use the adjuster...
... time, loosen the strings until the pitch drops a whole tone. • Before using the instrument, make sure that the bridge is positioned vertically. Even if the bridge is standing vertically before tuning, it leans in place when tuning the instrument. Don't loosen too much. • When the instrument is too loose, it stands vertically. Use a piano, tuning fork, or tuner as reference when tuning the instrument. • Finally, use the adjuster...

YSV104_Owners Manual_EN
Page 14
... the tuning peg, turn the tuning peg making one wrap on one side of the hole and the remaining wraps on the adjuster, making sure the ball is properly inserted in the diagram below. Winding the strings (Please refer to this section when changing the strings) 1 Before you string the instrument, set to the instrument. * Some shoulder rests may damage the strings or fine tuner...
... the tuning peg, turn the tuning peg making one wrap on one side of the hole and the remaining wraps on the adjuster, making sure the ball is properly inserted in the diagram below. Winding the strings (Please refer to this section when changing the strings) 1 Before you string the instrument, set to the instrument. * Some shoulder rests may damage the strings or fine tuner...

YSV104_Owners Manual_EN
Page 15
...Pickup Power String length Dimensions Weight Controls Control box Case Connections Controls Power Battery life Dimensions Weight Accessories Maple Spruce Ebony Maple (with built-in piezo-electric pickup Supplied via the Control box connection 328 mm (12-15/16") 583 (L) × 206 (W) × 111 (H) mm 22-15/16" (L) × 8-1/8" (W) × 4-3/8" (H) Approximately 490 g (1 lbs. 1 oz.) Volume control Synthetic resin Instrument jack (Input/Output) AUX IN jack (Input) PHONES jack (Output) * All mini jack type Volume control (VOL) Sound type switch (ROOM/HALL) Power switch (OFF...
...Pickup Power String length Dimensions Weight Controls Control box Case Connections Controls Power Battery life Dimensions Weight Accessories Maple Spruce Ebony Maple (with built-in piezo-electric pickup Supplied via the Control box connection 328 mm (12-15/16") 583 (L) × 206 (W) × 111 (H) mm 22-15/16" (L) × 8-1/8" (W) × 4-3/8" (H) Approximately 490 g (1 lbs. 1 oz.) Volume control Synthetic resin Instrument jack (Input/Output) AUX IN jack (Input) PHONES jack (Output) * All mini jack type Volume control (VOL) Sound type switch (ROOM/HALL) Power switch (OFF...


